Start building your vulnerable machine
A while ago I started building vulnerable machines. First for colleagues of mine so that they became familiar with certain vulnerabilities and techniques. Last year I started sharing machines on HackMyVM. A number of people have asked me how I get started on my machines. Although I am not an expert and have not automated it (yet), I will share my steps so that you can also start building vulnerable machines. In this article I will share my process for the machine Quick3 on HackMyVM.
Getting started
Before starting with building a vulnerable machine you should answer a few questions.
- What vulnerability do you want to be educated?
- What techniques do you want to be educated?
- What would be a logical scenario?
- Who should be able to hack the vulnerable machine?
This is not a complete list with questions what you should answer, but it will give you an idea how you can design the scenario for the vulnerable machine. One of the techniques I use to design the scenario is with a kind of attack path within Obsidian.
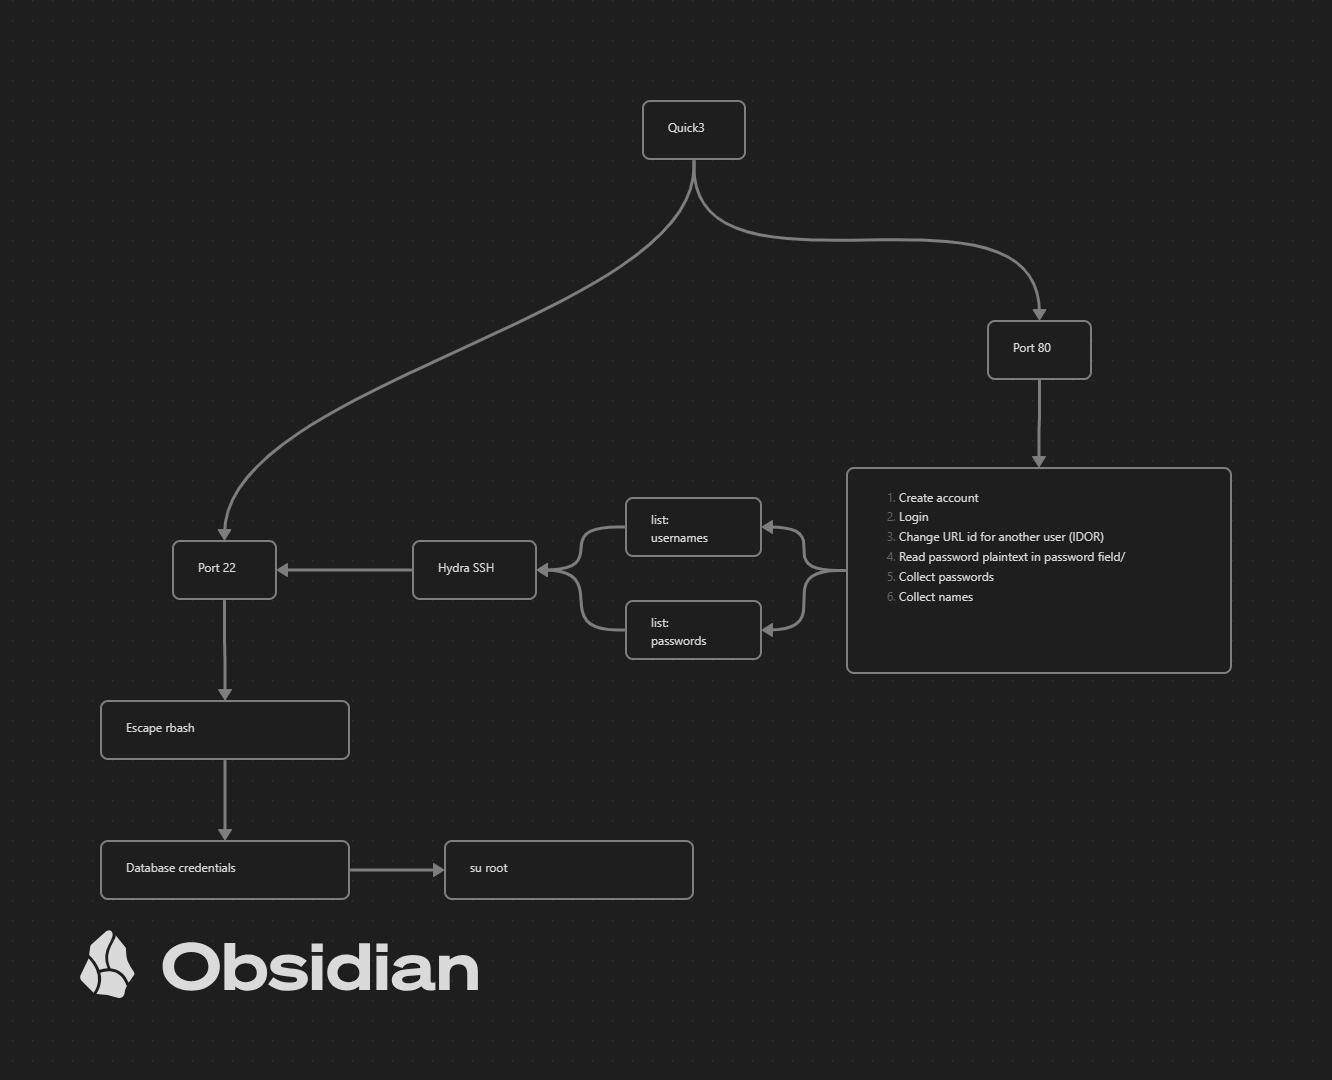
After designing the scenario you should consider a theme. This is needed to build custom themes like something for Christmas, an enterprise, a shop or something else. In the Quick saga I started working on a theme for a car company called Quick Automative, yes there is something wrong with the name, but probably the most of you won’t see it.
Start building the scenario
Start building a vulnerable can be overwhelming. There is so much you have to consider and sometimes to reconsider that it is wise to start writing some notes. Things like what user has sudo permissions, what user is member of a certain group. What service is vulnerable and what files should be changed. To effectively manage the numerous items you have to deal with, it is crucial to maintain a list of notes or a checklist. This will assist you in remembering essential details and keep the focus on building the vulnerable machine.
Use a todo list
There is a lot to consider when designing and creating a vulnerable machine. I personally like to make a checklist with action points that I still have to do. Such a checklist differs per scenario/machine. A number of action points appear on every checklist. For each machine/scenario I make such list.
Below is an idea of how you can set up such a to-do list, for example. This depends on what you need to build the scenario. This way you can hardly forget a step. Be aware that this list is not complete and you might have to adjust it to your needs.
- Install Operating System
- Add users
- username 1
- username 2
- Set permissions for user
- sudo permissions for user 2
- Restricted bash for user 1
- Install additional software
- Install Webserver (Apache/nginx)
- Configure virtual hosts
- etc
- Install PHP
- Install SQL Server
- Install Webserver (Apache/nginx)
- Implement flags
- User flag
- Set permissions
- Root flag
- Set permissions
- User flag
- Create custom boot screen
- Protect GRUB boot
- Setup interfaces for VMware and VirtualBox
- Clear tracks
- Username 1
- Username 2
- root / administrator
- Export the machine
- Import the machine for testing
- Test the vulnerable machine
- Write a writeup for the machine
The Operating System
Once you have come up with a scenario and theme, we can start installing an Operating System. What Operating System should be installed also depends on what kind of vulnerability you will use.. Suppose you want a kernel exploit to be used on the target, then you have to take this into account and choose the correct Operating System. In this article I mostly write for Linux (Ubuntu), since you don’t have to worry about any License to keep the product alive.
Take notes while installing your system. So think carefully about usernames and passwords. You need these to install and configure your system, users, software and vulnerabilities. While installing your vulnerable machine make sure you make some snapshots along the way. Believe me, this will save your ass! Making snapshots of you virtual machine is only possible with VirtualBox or VMware Workstation. It is not possible in VMware Workstation Player, please keep this in mind.
Vulnerabilities
Building a vulnerable machine takes time and if you also have to build an application/website or a service that is vulnerable, it will take some time. Unfortunately, but fortunately for us, there are plenty of applications that are vulnerable. And often there are already working exploits for it. An easy resource to find working exploits for a given system can be found at exploit-db . These exploits often state the version of the systems. This then makes it possible for you to search for, download and install this system on your vulnerable machine.
There are also other methods to do this. For example, you can search for a recent CVE, then search for that specific software. And if an exploit is available on Github or Gitlab (for example), you can install the system and test it first locally. I will not discuss this process in detail in this article because it involves quite a bit of work.
Applications, systems or services
For example, when you search for CVE-2021-41773 you will see that the Apache HTTP Server 2.4.49 is vulnerable for path traversal and remote code execution (RCE). This vulnerability was present in an application. To use those kind of specific vulnerabilities you should download and install that application on your vulnerable machine. Next you should test the exploit or payload related to this vulnerability. Be sure that the application is compatible with the Operating System what you have chosen.
Website
Many vulnerable machines have hosted a website. This is often used to demonstrate a certain vulnerability or to find information so that you can hack into another service. You can set up a website in different ways.
CMS
Building a custom website can be time-consuming. To save time, you could consider using a Content Management System (CMS). There are a number of well-known CMS systems such as:
- WordPress
- Joomla
- Drupal
- any other CMS
There are often add-ons available for a CMS system. If these are outdated they can often be vulnerable and used for a specific vulnerability. If you have them installed and do not actually need them, they can eventually become an unintended vulnerability in your CMS system. So limit only to what you really need.
Website templates
An alternative is to create a standard HTML page. There are plenty of free templates available that you can use. One of the websites I use to look for a suitable template is themewagon.
To have suitable images for your website, you can use stock photos from Pexels or Unsplash. These can be used for free, but please state where the photos come from. If you need icons, you may consider using IconFinder where you can search for free icons.
Custom build website
Of course you can build your own website, this takes more time than using existing systems. But building your own website for the vulnerable machine gives you the opportunity to completely configure the vulnerability the way you want. In addition, it is educational for the underlying techniques. The OWASP Top 10 can help you by choosing a known vulnerability to introduce in your own website.
Reading source codes such as HTML, JavaScript, CSS, PHP, JSP, Java, ASP.net and SQL becomes easy over time because you are creating websites for your vulnerable machines. You don’t have to be or become an expert. The internet is full of examples that you can reuse in your own website. Another option is to use a website template (HTML) and add a script language such as PHP and SQL. This combination makes a static website dynamic.
Privilege escalation
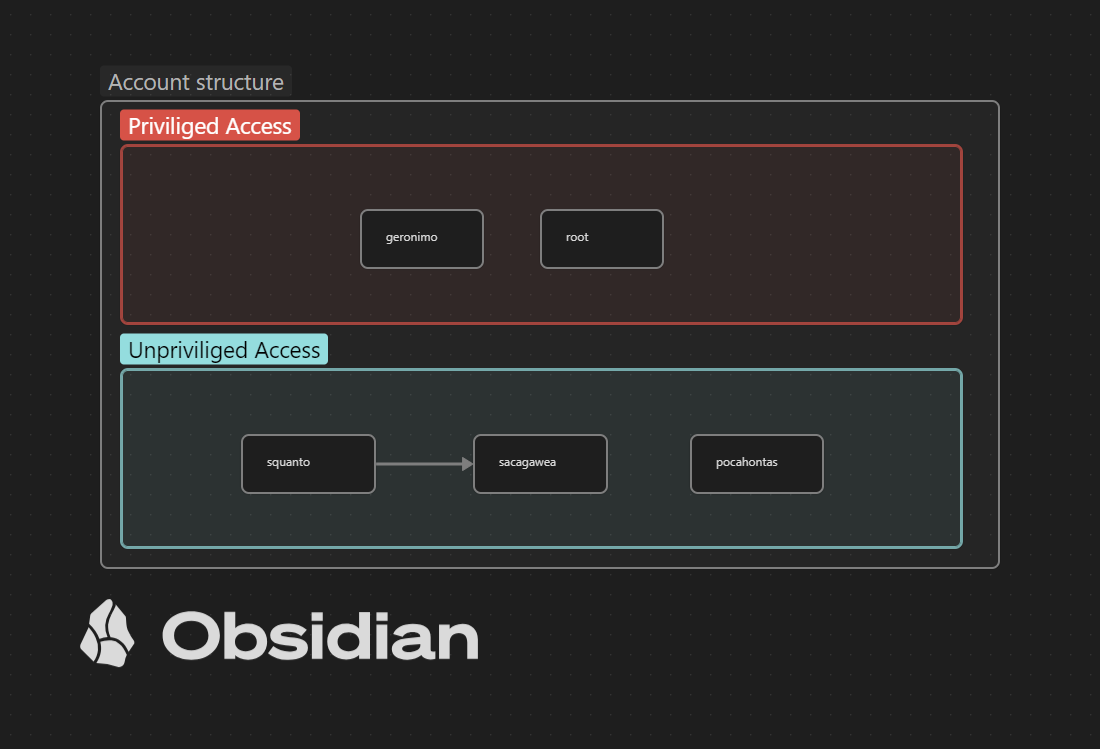
Depending on the scenario you should consider horizontal- and/or vertical privilege escalation. Yes there are two kind of privilege escalations mentioned here. The horizontal privileged escalation is to another user with the same permissions. For example you have compromised a low level user since this user was running a script locally via a phishing attack with a macro in a Microsoft Word document. Since you have compromised this user, you can search for other information. Imagine that this user is a member of a developer group and this user has access to a configuration file containing a password. If this user is used by another user, you could use that other account as well. There a plenty scenarios were you can move from a low privileged user to another low privileged user. In the image below a horizontal privilege escalation is shown.
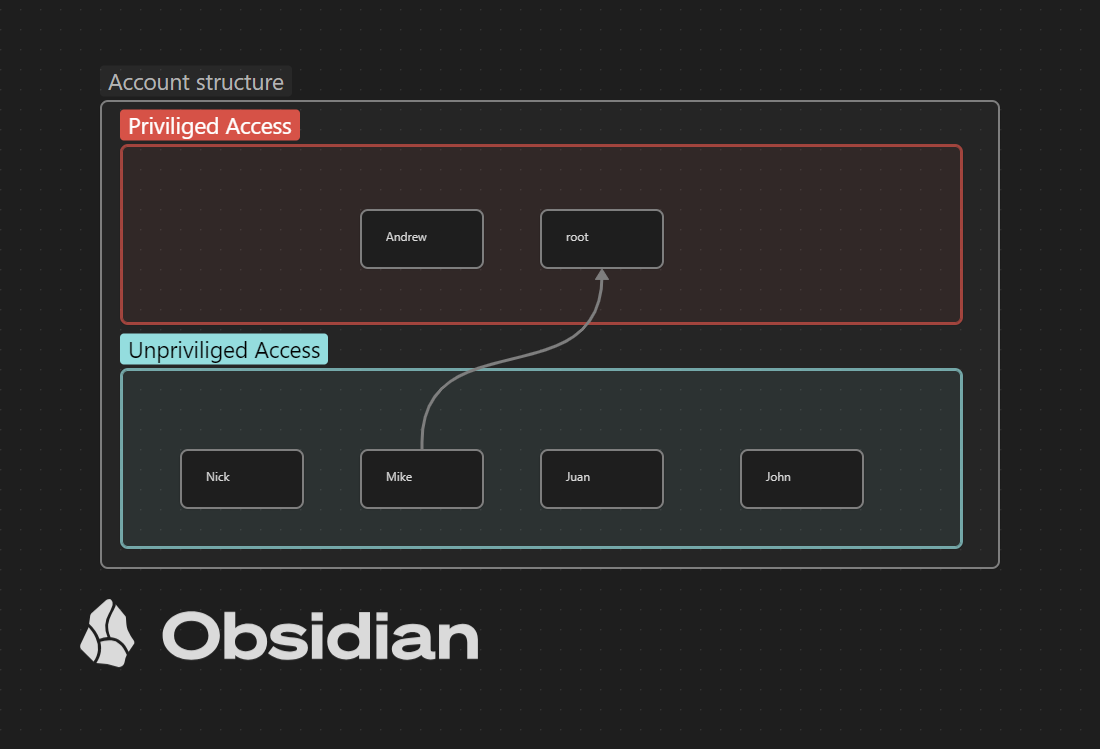
Not every scenario uses horizontal privilege escalation to gain more privileges in the end. Often a scenario is implemented that you have a low privileged access and from here you have to look to gain more privileges also known as vertical privilege escalation. In the image below an example of vertical privilege escalation is shown.
There are several ways to configure your machine in such manner that privilege escalation can be used. Keep in mind that there are some differences between Windows and Linux as shown in the table below.
| Windows | Linux |
|---|---|
| Kernel exploits | Kernel exploits |
| Missing security patches | Missing security patches |
| Insecure credentials | Insecure credentials |
| Common misconfigurations | Common misconfigurations |
| Vulnerable services | Vulnerable services |
| Vulnerable programs | Vulnerable programs |
| Exploiting Super User Do (SUDO) | |
| Exploiting Set User ID (SUID) |
As mentioned earlier in the article, I mainly write this for Linux environments and I will skip any Windows privilege escalation in this article.
To get some inspiration for privilege escalation on a Linux Operating System from the well known website: GTFOBins. This is a go to place to see if we can escalate privileges with some techniques. This website describe how the vulnerability could be set, but as well how it should be exploited.
Another option is to get inspired by the Linux Privilege Escalation checklist from hacktricks, or on the list from Payload all the things. Based on these website you might be able to find a suitable privilege escalation technique for your scenario. With a bit of searching on Google you might find how to configure your vulnerability.
Test the vulnerable machine
During the installation and configuration of you vulnerable machine you have to be sure that it works as intended. Testing changes on a system application or configuration is important to ensure that the changes will not have any unintended consequences or negative impacts on the system. This process can help to identify and fix any errors or issues with the changes before they are implemented in the final vulnerable machine.
Snapshots
While building your vulnerable machine you will do something that will have consequences you won’t like probably. Make a snapshot often so you can return to an earlier snapshot if something is not working as you want to. This option saved me several times a lot of time while building a vulnerable machine. If you are working on VirtualBox or VMware Workstation you can create a snapshot of the current state of the machine. When you are working on VMware Player you cannot create a snapshot, keep this in mind while building a machine. If there is something wrong and not working as expected, you can resolve this issue or restore to a previous snapshot. Before I create the final VM I always create a snapshot before the last configuration changes, since one of the last steps is to do some house cleaning.
Export the vulnerable machine
Before you export the vulnerable machine, there are some things that would make the machine even better.
Below I list a number of points that need to be done:
- Showing a custom banner with IP address
- Protect the GRUB
- A bit of house cleaning
- Setup network for VirtualBox and VMware
Showing a custom banner with IP address
Although you can perform a ping sweep of your network using nmap, netdiscover or fping to see if there is a machine on your network, it can be useful to know the IP address of the vulnerable machine. As a root user you can then edit the following file /etc/issue. Add to the bottom of this file this piece of code IP address: \4, this will show the IP address on the boot screen
Personally, I like the ASCII art and the ASCII banners. Yes, it can sometimes be too much, but I don’t think that matters for this type of machine. A website to create a number of banners is textfancy. When you copy the banner, you can paste it on the top of the file /etc/issue and save your changes.
Below there is an example of the /etc/issue file of the machine Quick 3.
1
2
3
4
5
6
7
8
9
10
11
12
13
14
root@quick3:~# cat /etc/issue


	 ██████╗ ██╗   ██╗██╗ ██████╗██╗  ██╗    ██████╗
	██╔═══██╗██║   ██║██║██╔════╝██║ ██╔╝    ╚════██╗
	██║   ██║██║   ██║██║██║     █████╔╝      █████╔╝
	██║▄▄ ██║██║   ██║██║██║     ██╔═██╗      ╚═══██╗
	╚██████╔╝╚██████╔╝██║╚██████╗██║  ██╗    ██████╔╝
	 ╚══▀▀═╝  ╚═════╝ ╚═╝ ╚═════╝╚═╝  ╚═╝    ╚═════╝

Ubuntu 22.04.3 LTS \n \l
IP address: \4
When you boot the vulnerable machine, it will show this after booting the machine. 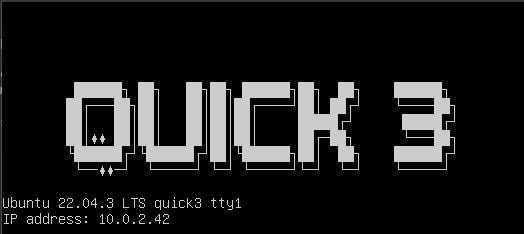
Protect the GRUB
When I started building my first machines, I never considered in protecting the GRUB. But protecting the GRUB makes sense since some hackers decided to hack the GRUB and get the FLAG on the machine and submit it to HackMyVM. By using the following steps you will make it a bit harder to cheat.
You should change the following file: /etc/grub.d/10_linux,this can be done with the following command.
1
sudo nano /etc/grub.d/10_linux
you should search for the following line CLASS="--class gnu-linux --class gnu --class os" and change it to this: CLASS="--class gnu-linux --class gnu --class os --unrestricted". After changing this line you should save the changes and closefile and update the grub. Updating the grub can be done with the following command.
1
sudo update-grub
A bit of house cleaning
Next step is to cover your tracks for each user. Unless you need for a specific user the history (since this is required for your scenario).. There are a few ways to cover your tracks on this machine. There are a few reasons why you might want to use the following options
- To prevent an attacker from being able to view your command line history, which could potentially reveal sensitive information such as usernames, passwords, or other sensitive data.
- To save disk space, as the
~/.bash_historyfile can grow quite large over time. - To prevent other users on a shared system from being able to view your command line history.
Below I discuss a few of them.
Option 1
1
ln -sf /dev/null ~/.bash_history
The command ln -sf /dev/null ~/.bash_history creates a symbolic link to /dev/null for the file ~/.bash_history. This has the effect of discarding any output that would normally be written to the ~/.bash_history file, effectively disabling the recording of command line history for the current user.
Option 2
1
history -c
The history -c command clears the command history for the current user in the Bash shell. This means that it deletes all of the commands that have been previously entered by the user in the current session.
Option 3
1
export HISTFILESIZE=0
The command export HISTFILESIZE=0 sets the HISTFILESIZE environment variable to 0, which controls the maximum number of commands that can be stored in the .bash_history file. By setting it to 0, it effectively disables the recording of command line history for the current user.
Option 4
1
export HISTSIZE=0
The command export HISTSIZE=0 sets the HISTSIZE environment variable to 0, which controls the number of commands that are kept in the history list for the current shell session. By setting it to 0, it effectively disables the recording of command line history for the current session.
Setup network for VirtualBox and VMware
On this part I had some help from sML and josewdf, they told me that it should be possible to create a vulnerable machine within VirtualBox that is playable on VMware as well. To make your vulnerable machine (Ubuntu) playable with VirtualBox and VMware you should change the following file/etc/netplan/00-installer-config.yaml. This file is a configuration file used by the Netplan network configuration system in Ubuntu. It is typically created during the installation of Ubuntu and contains network configuration settings for the system’s network interfaces. The file is written in the YAML format and specifies various network settings such as the device name, IP address, netmask, gateway, and DNS servers. The “00” prefix indicates that this file should be processed before other Netplan configuration files, making it the default configuration file for the system’s network interfaces. To change the configuration file you can run the following command
1
sudo nano /etc/netplan/00-installer-config.yaml
Within the file you should setup the following content
1
2
3
4
5
6
7
8
9
10
11
12
13
14
15
16
# This file describes the network interfaces available on your system
# For more information, see netplan(5).
network:
  version: 2
  renderer: networkd
  ethernets:
    enp0s3:
      dhcp4: yes
      dhcp6: yes
    enp0s8:
      dhcp4: yes
      dhcp6: yes
    ens32:
      dhcp4: yes
      dhcp6: yes
In this particular file, there are three network interfaces defined: enp0s3, enp0s8, and ens32. Each interface is configured to use DHCP (Dynamic Host Configuration Protocol) to obtain both IPv4 and IPv6 addresses automatically. the network interface ens32 should work within VMware. It is important to verify the correct device name before editing this file. To be sure if this work you can test it in VMware Workstation Player. You can check this by logon to the system and run the command ip a If there is no ens32 but an ens33 or ens34 network interface, you should adjust the configuration and export the vulnerable machine again to test it.
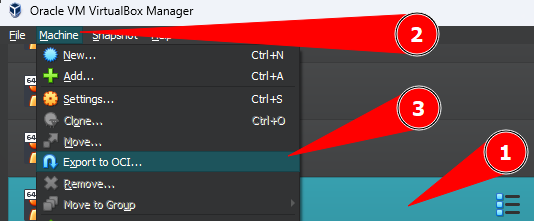
Since I build mostly my vulnerable machine on VirtualBox I will describe how to export the vulnerable machine so it can be imported in VMware as well..
- Step 1. Select the machine to export
- Step 2. Click on the menu
Machine - Step 3. Click on
Export to OCI
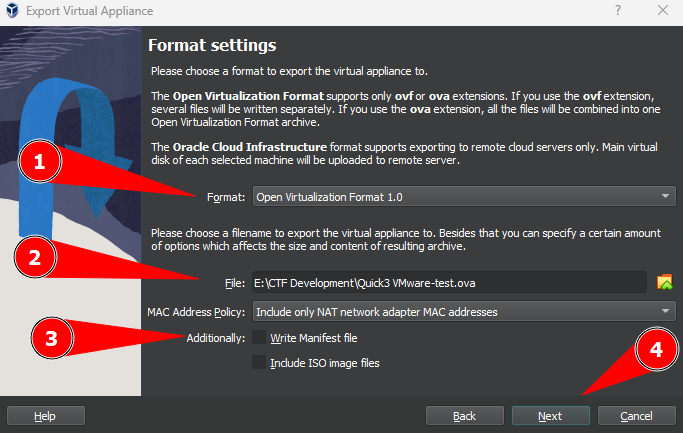
A new window Export Virtual Appliance is shown. Here you should configure a few items before moving forward.
- Step 1. Select
Open Virtualization Format 1.0 - Step 2. Set the output directory and output file name
- Step 3. Uncheck the
Write Manifest file - Step 4. Click on
Next
Now you can enter some Appliance settings. 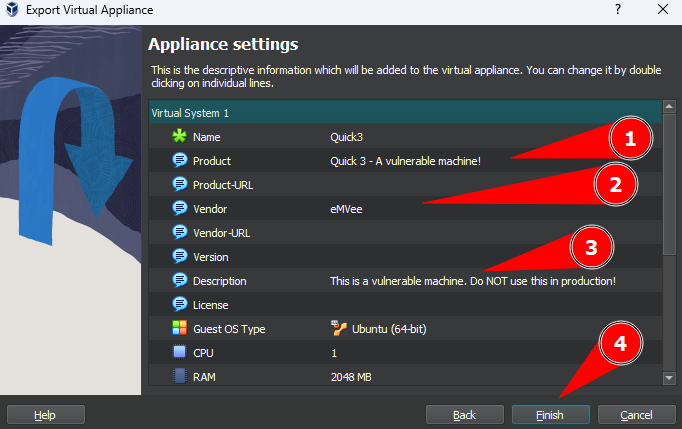
- Step 1. Enter the name of you product.
- Step 2. Enter your (nick)name into the Vendor
- Step 3. Write a small description. In this field I always write something that this should not be used in any production environment.
- Step 4. Click on the
Finish, your machine will be exported. This might take a while.
As soon as the vulnerable machine is exported, you should test it in VMware and VirtualBox.
Test it again and make a writeup
When the machine is ready for testing, export your machine so others can import it into their lab. Once the export is done, it’s time to test it again. First, the vulnerable system must be imported into the lab environment. After this we can start the machine and the real testing of the vulnerable system starts. You carry out and document every step as you would normally take to attack the machine. At the end of documenting you will have a writeup ready. If everything went successfully, archive the vulnerable machine to an archive file such as .ZIP or .Z7. You can then upload and share this file with, for example, HackMyVM. Don’t forget to share your writeup. This can be useful if HackMyVM (or another provider) needs to test the vulnerable system.
Even if you’ve tested it, someone may still have found something to hack the system in a way you didn’t plan… This did happened to me in the Quick release and I tried to solve it in Quick2, making Quick2 my worst machine. Of course I learned new things from it. Perhaps I have to release an updated version.
